
In this post, we're teaching you everything you need to know about how to make the perfect vegan meringues! The secret ingredient is aquafaba, which whips up into a thick, glossy mixture that perfectly bakes into crispy, sweet, chewy meringues.

Time after time, these vegan meringues never cease to amaze me. I just can't believe that you can use aquafaba (the liquid from a can of chickpeas) to make perfect meringues that look and taste exactly like the traditional egg white version.
Plus, they're made the exact same way as traditional meringues and don't require any special techniques. With just a few ingredients and only about 20 minutes of hands on work, you can have a few trays of bite-sized vegan meringues!
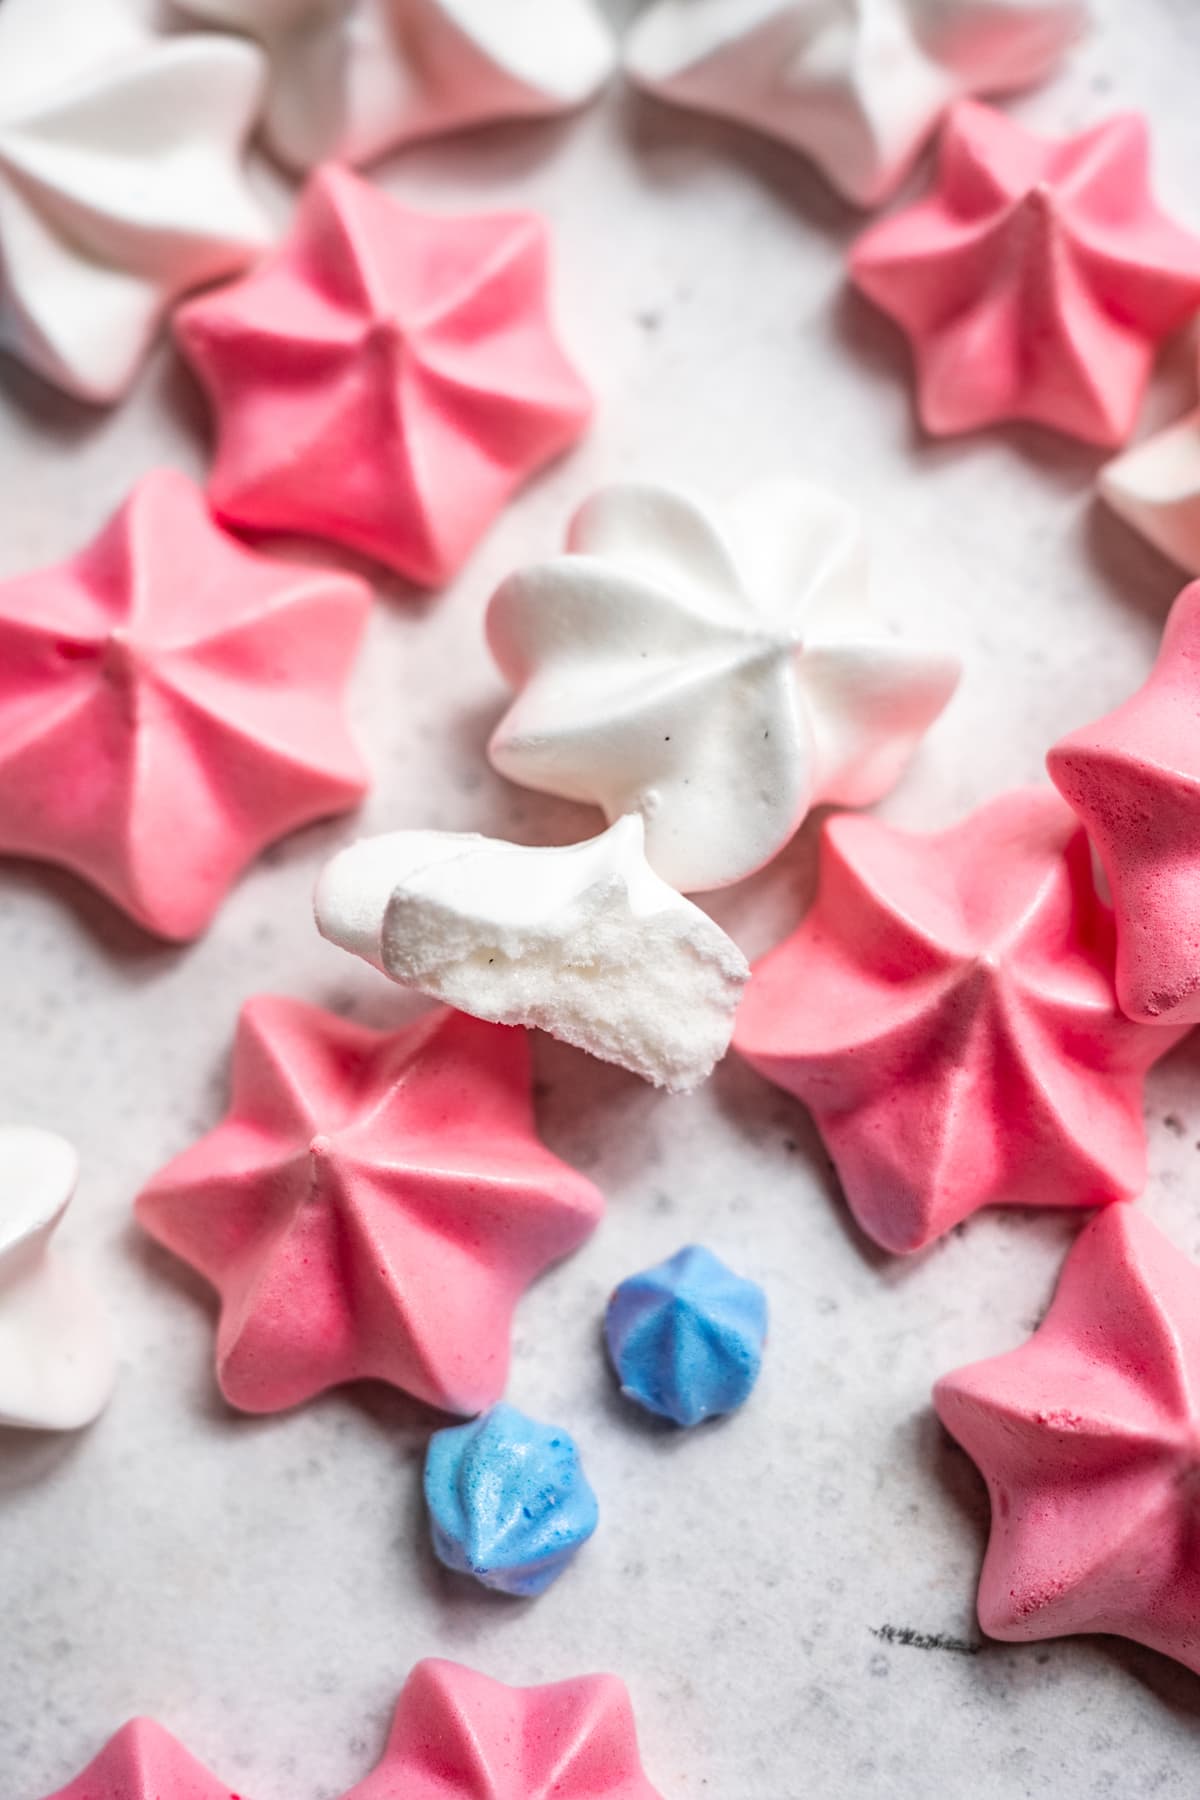
Since these vegan aquafaba meringues are also naturally gluten free and nut free, they're a great dessert option for a holiday/dinner party if you have any guests with allergies.
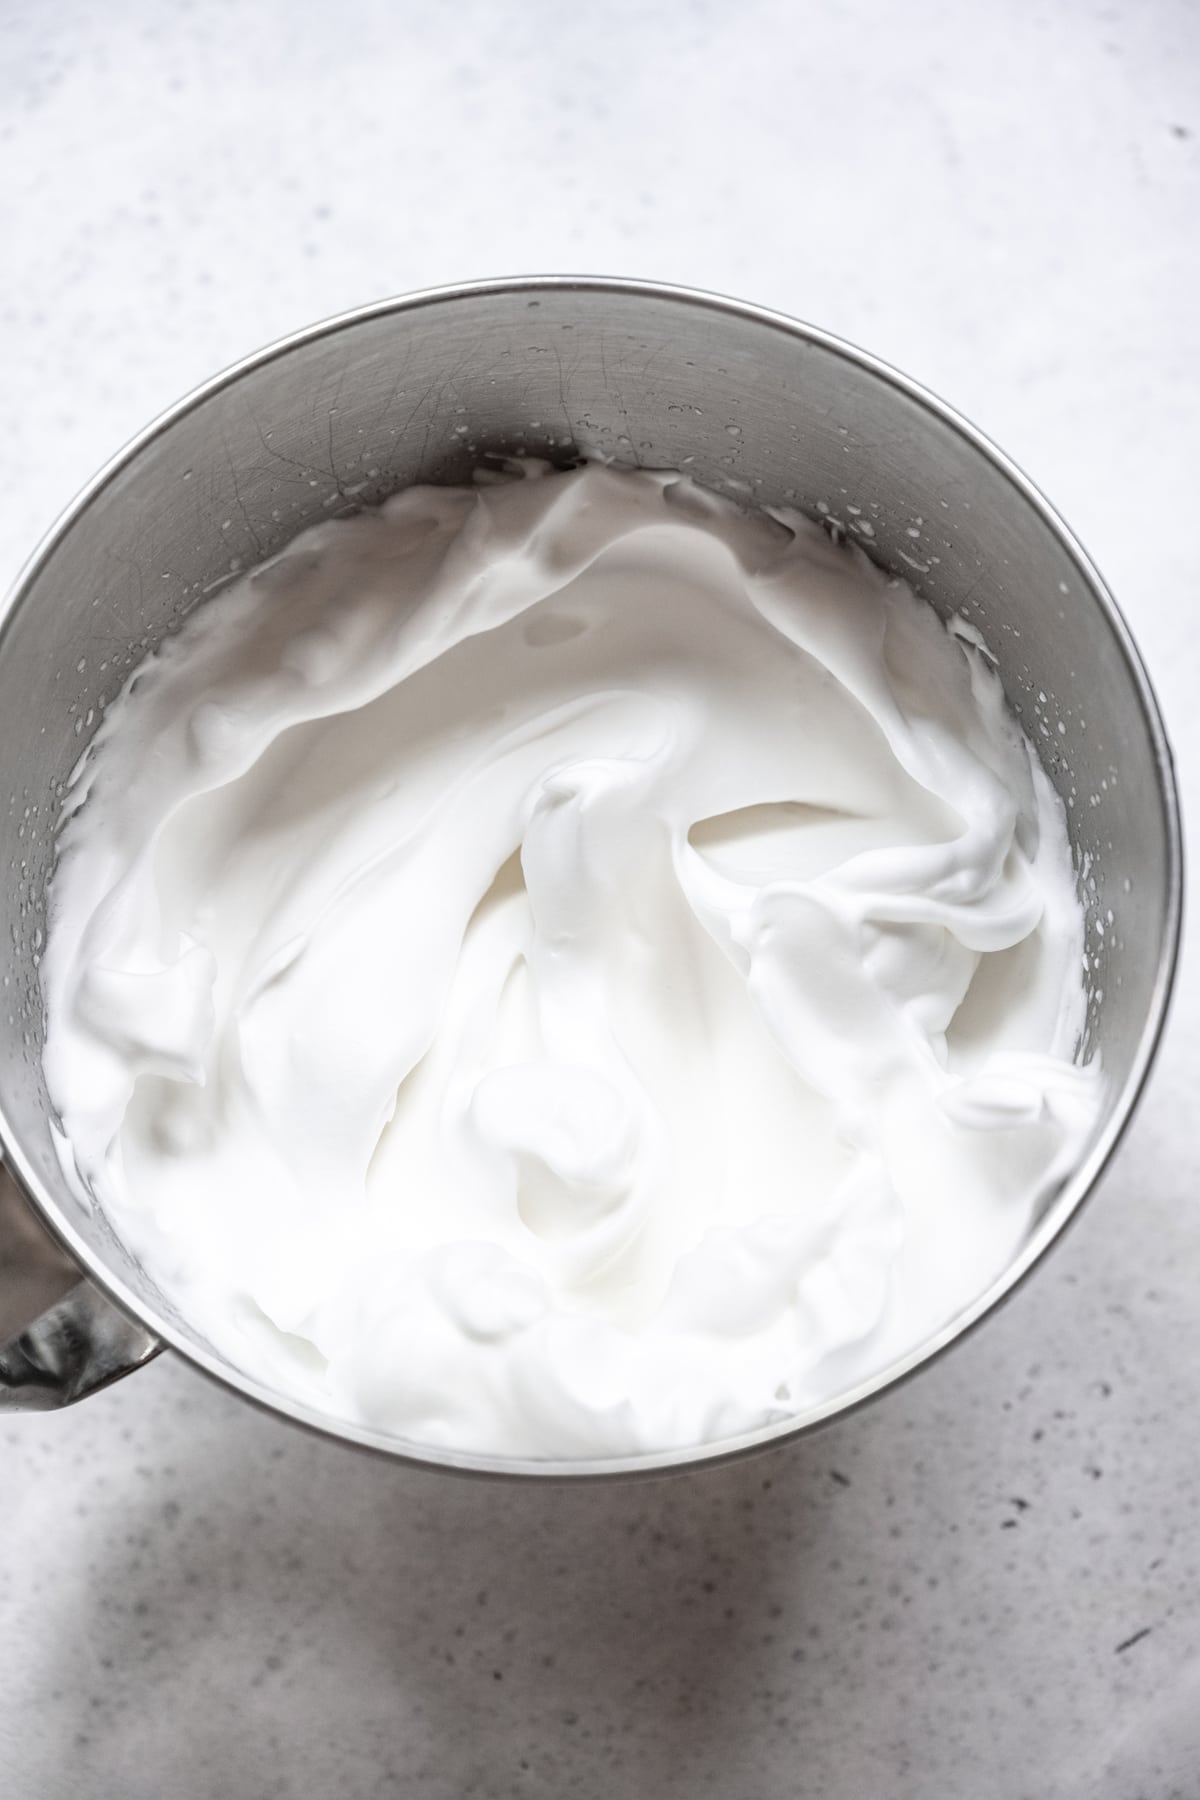
It's magical to watch the liquid from a can of chickpeas transform into a beautiful meringue.
Aquafaba is one of the most brilliant vegan ingredients - we often joke about its origins (seriously, who thought to try whipping up bean liquid?!). If you haven't given it a try yet, we highly suggest doing so ASAP. You'll be amazed as you watch the liquid transform into stiff, white peaks.
Don't believe us? Photo evidence below.
Ingredients
- Aquafaba: the liquid from a can of chickpeas.
- Cream of tartar
- Caster sugar: caster sugar is a fine sugar. It prevents the meringue from getting grainy.
- Xanthan gum: a natural stabilizer that really improves the texture of vegan meringues.
- Vanilla extract or vanilla bean paste
Directions
Start by draining the aquafaba into a bowl. For a single batch of these meringues, measure out ¾ cup of aquafaba and add to the bowl of your stand mixer (or a mixing bowl if using a hand mixer).
Using the whisk attachment, start beating the aquafaba at medium-high speed. For the first minute or two, it will look frothy but won't have much volume.
After about 5 minutes of continuous mixing, you should see some soft peaks starting to form. At this point, add in the cream of tartar and continue mixing for a few more minutes until the mixture starts to get thick and glossy.


Next, slowly add in the sugar while the meringue is mixing. Add it in spoonful by spoonful, with about 20-30 seconds between each interval so it has time to fully incorporate.
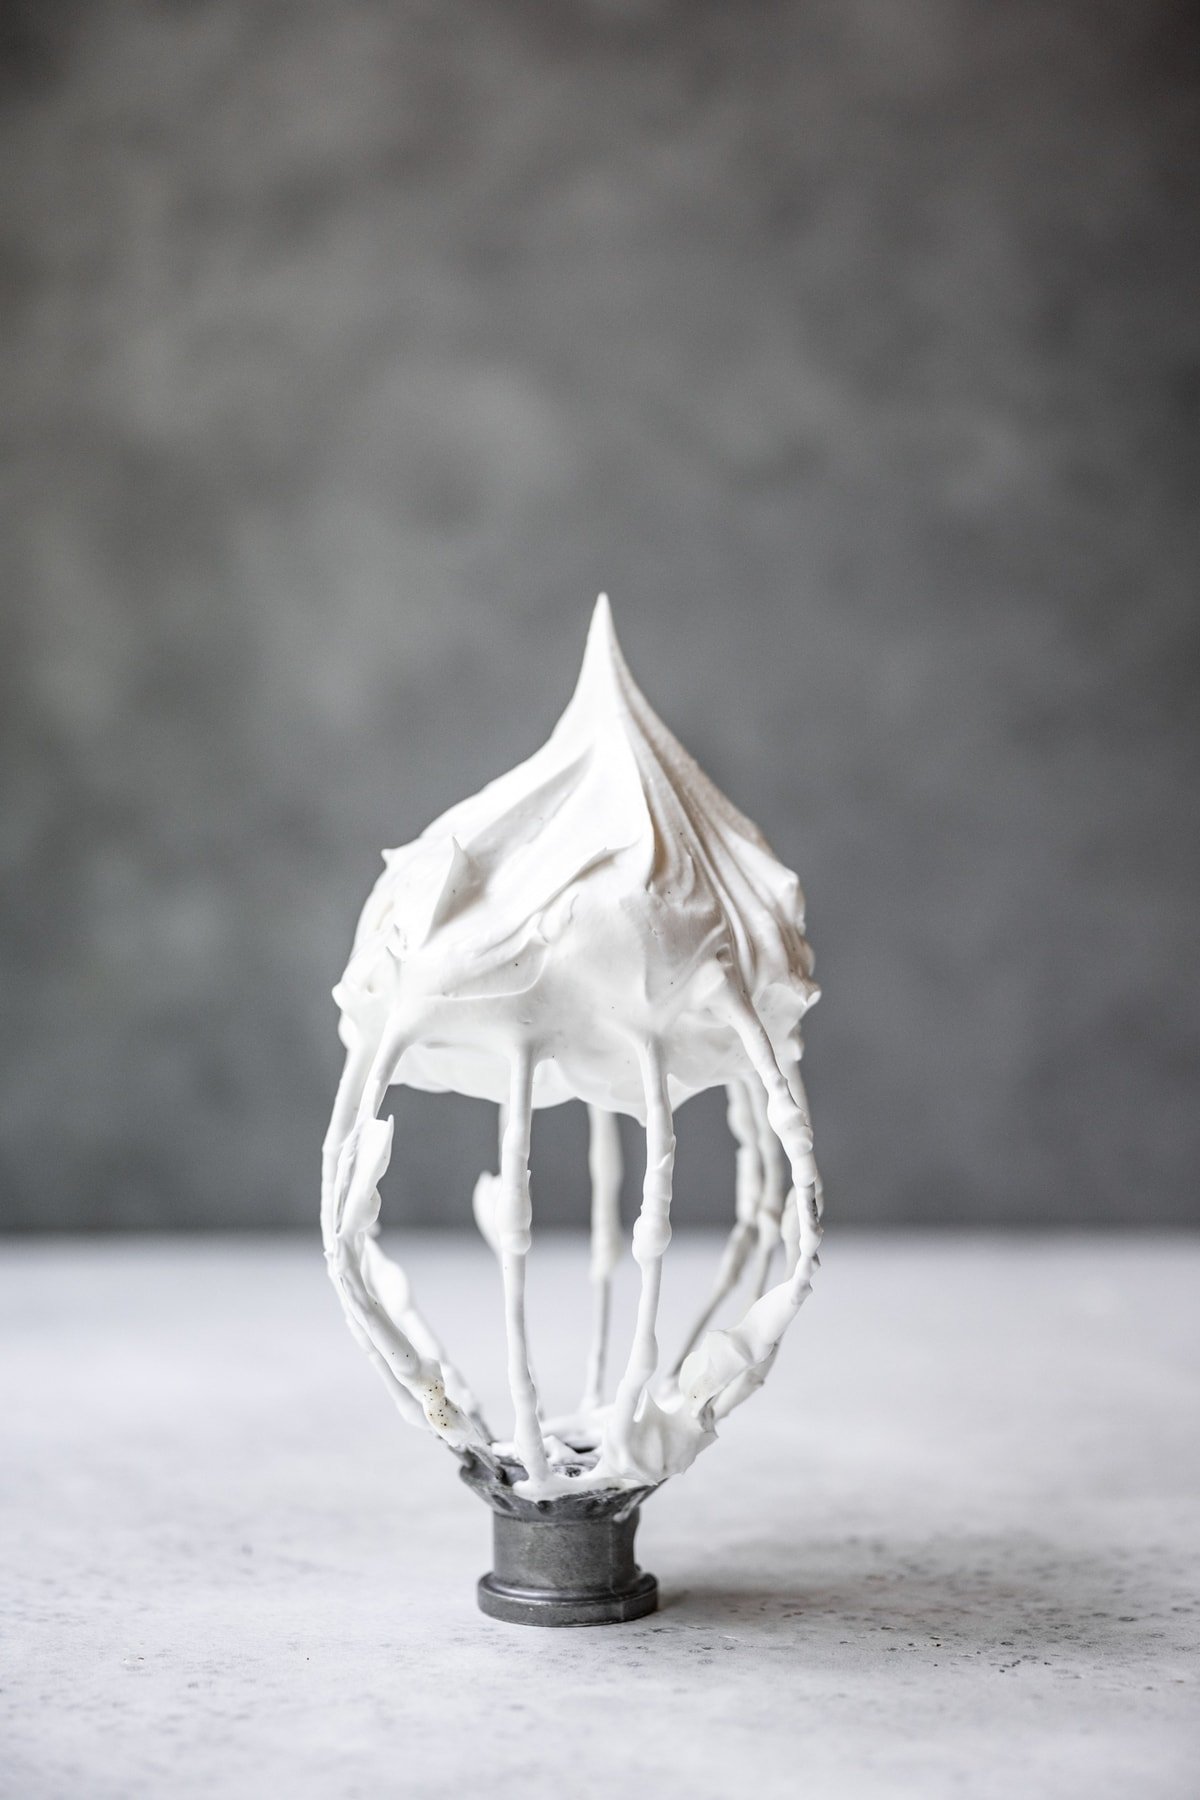
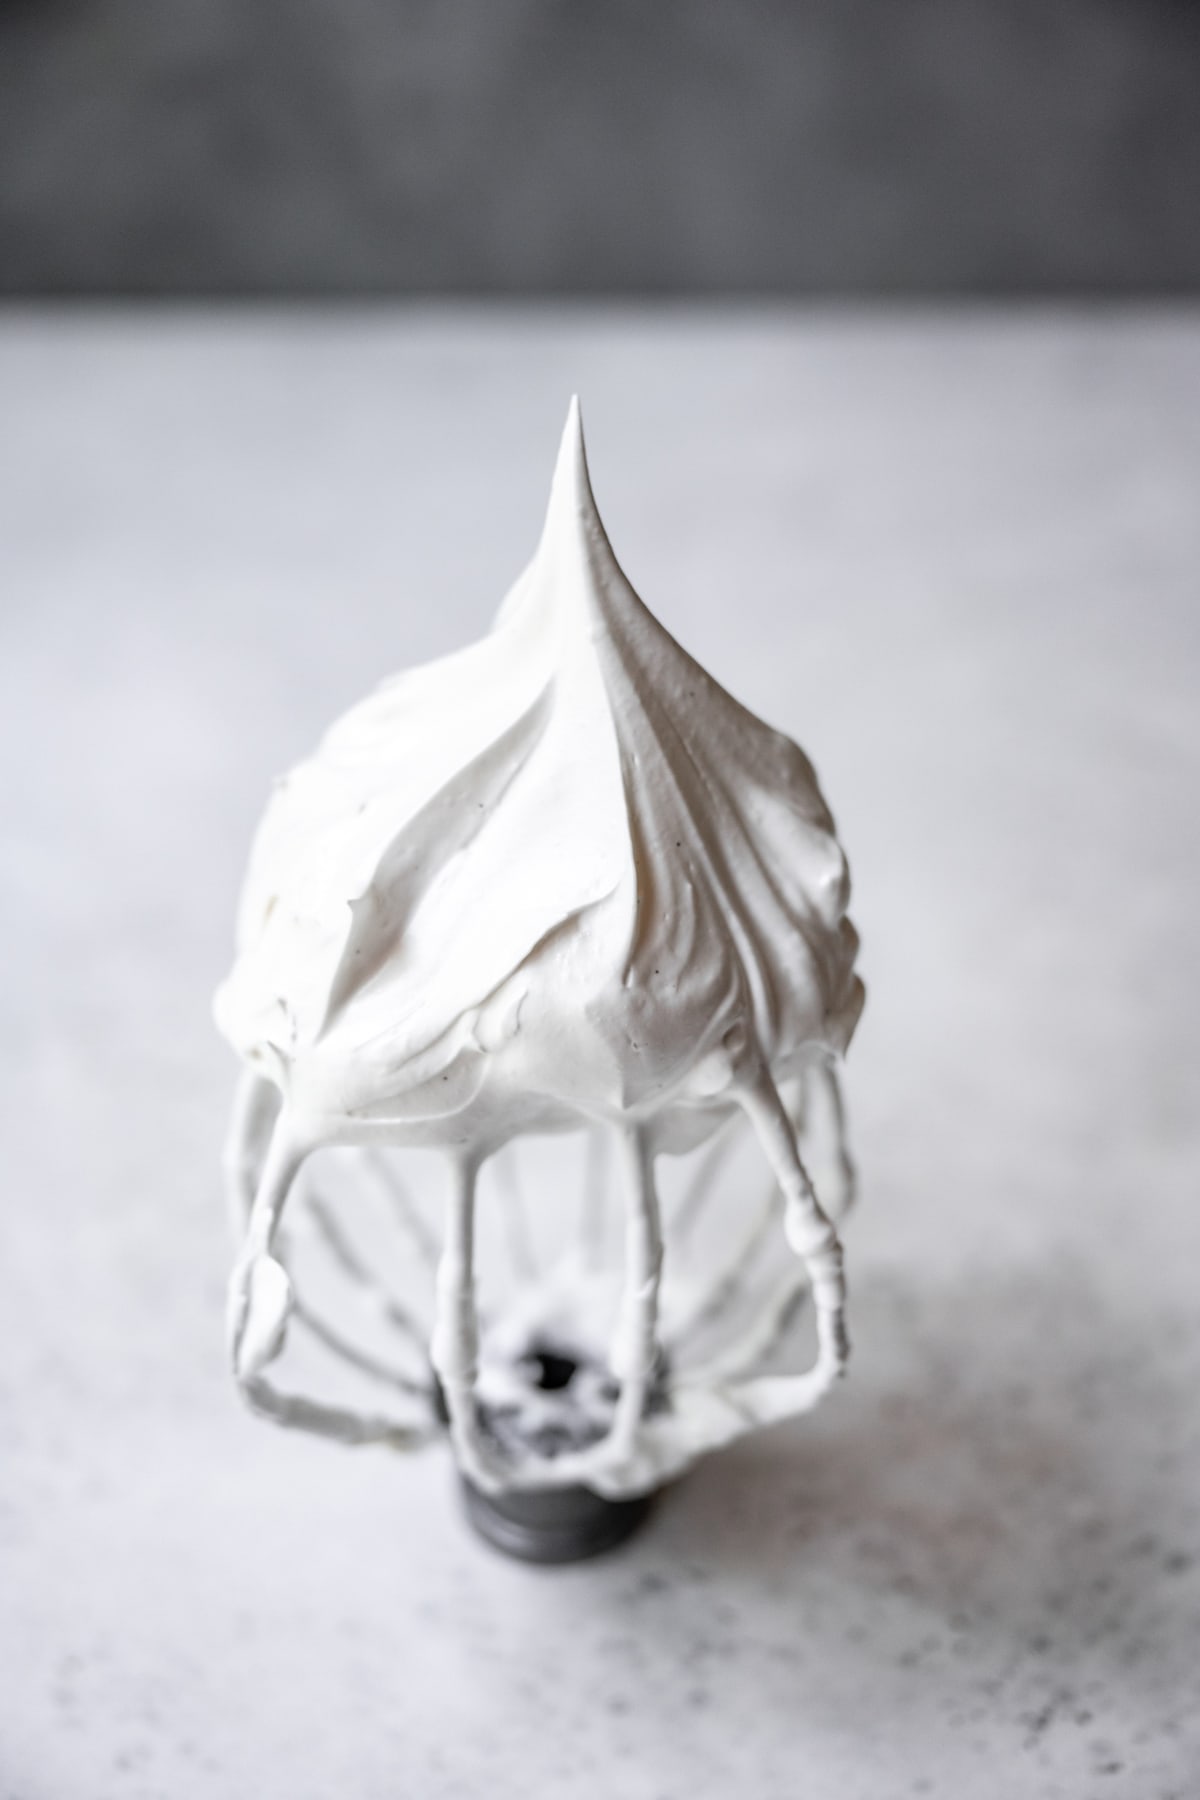
Once the sugar is fully incorporated, add in the xanthan gum and vanilla extract and continue mixing until the mixture forms very stiff peaks. If you turn the bowl upside down, the meringue shouldn't move at all.
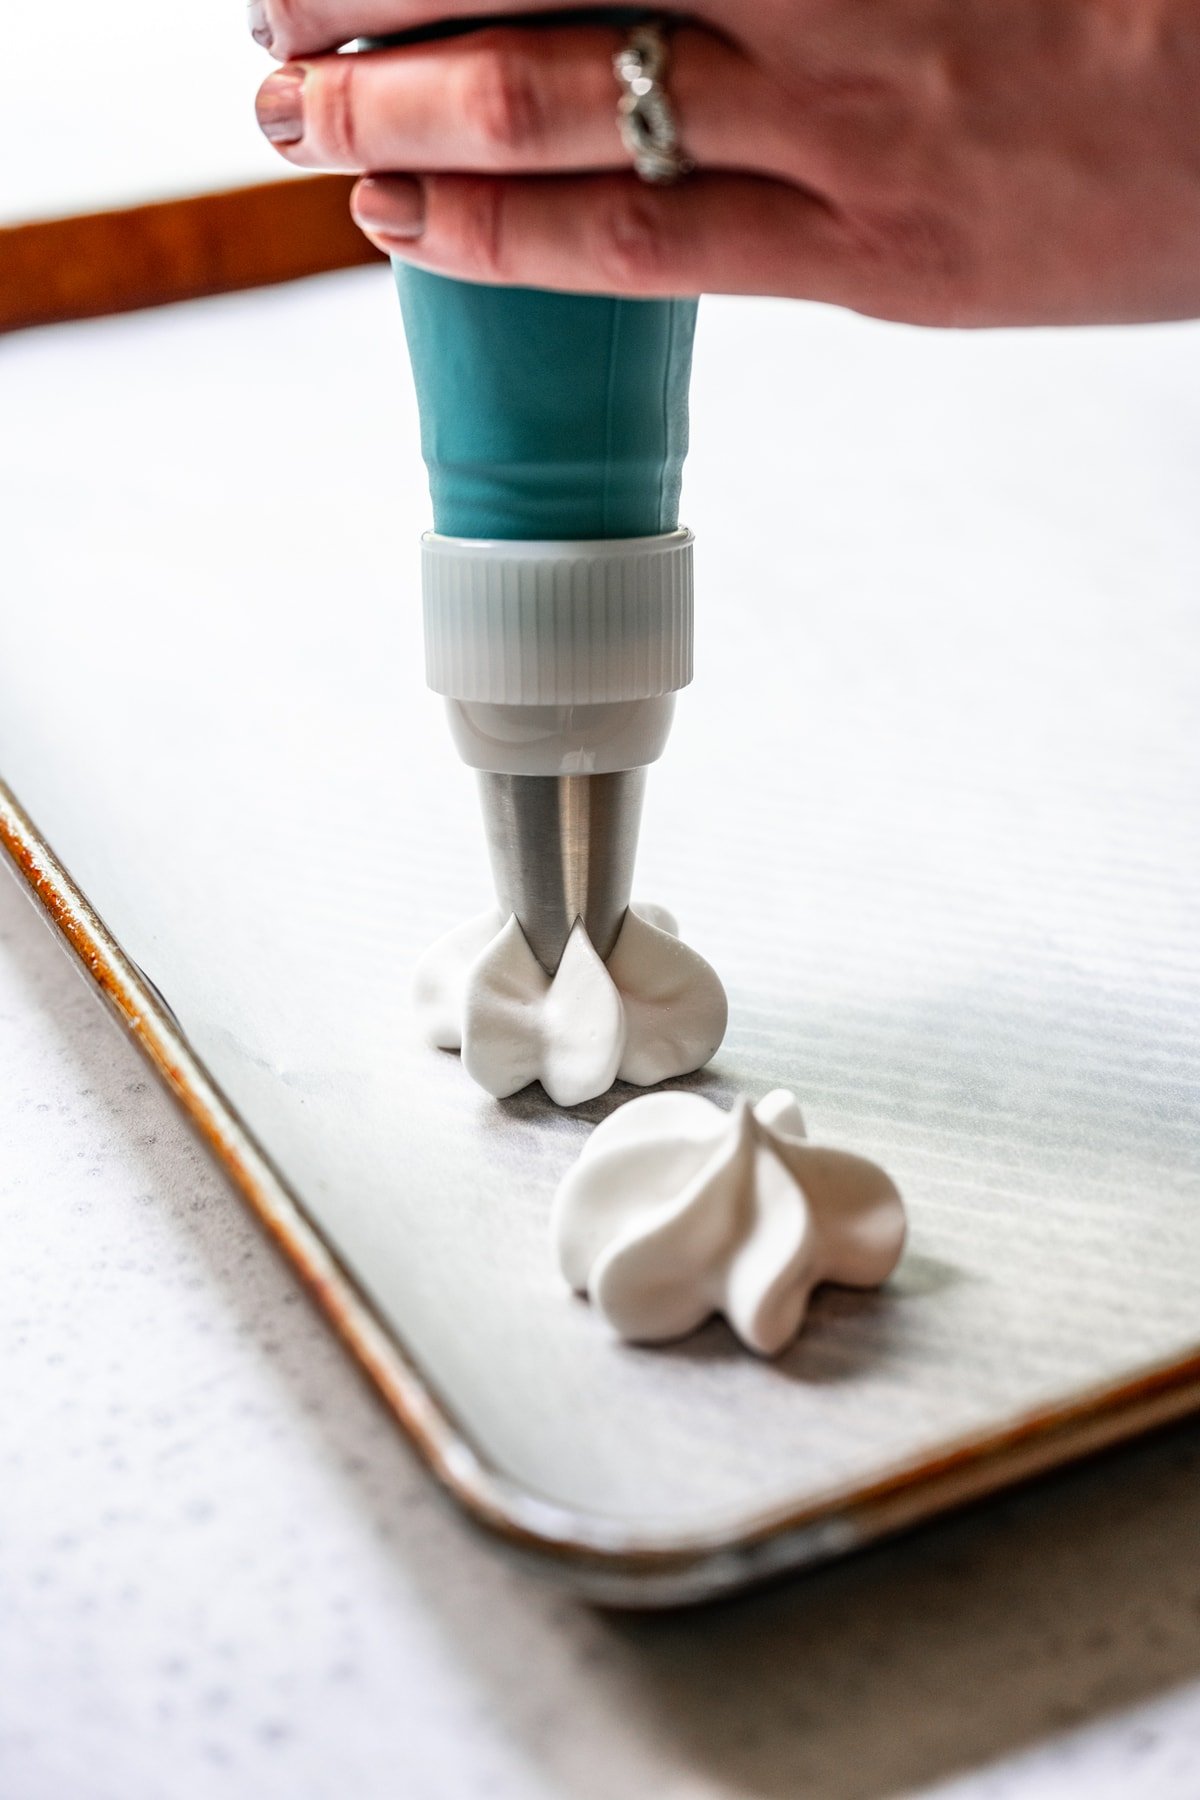
Use a piping bag to pipe small meringues (about a 1-2 inch diameter) evenly onto parchment paper-lined baking sheets. They don't spread when they bake, so they can be piped pretty close together. Any piping tip will do!
Bake the meringues for 2 hours and 15 minutes at 200˚F. Then, turn off the oven and leave them in for another 2 hours (or overnight). This prevents any humidity from affecting the meringues before they dry out.
Tips for perfect vegan aquafaba meringues:
- Use a stand mixer (if you have one). It can take 15-20 minutes for the aquafaba to develop stiff peaks, so we prefer to leave it to the stand mixer. If you're using a hand mixer instead, just be patient - it may take a bit longer than you expect.
- Cream of tartar makes all the difference in stabilizing the meringue. You'll only need ½ teaspoon for an entire batch, but definitely don't skip this!
- Xanthan gum is a key ingredient. We have tried these vegan meringues 20+ times, many times with and without xanthan and they always turn out better with it. Xanthan gum is an all-natural stabilizer and it gives great structure to the meringue so it doesn't deflate at all in the oven. You can find it in many natural grocery stores or online. (We also use it in many gluten free baking recipes.)
- Make sure your canned chickpeas are salt-free! Seems like a no-brainer, but it's easy to miss if you're not paying attention. *Note: we did actually use salted chickpeas one time by accident, and it wasn't too noticeable. However, we still suggest salt-free as various brands differ in taste.
- Fine sugar will dissolve more readily than regular granulated sugar. If you can't find any at your local store, you can actually make it easily at home. Simply add regular sugar to a food processor and process until it's much finer. Re-measure before adding to recipe.
- Add the sugar in very slowly. In order to fully incorporate the sugar, we add a heaping tablespoon every 20-30 seconds until all of the sugar is incorporated. This also keeps the meringue from deflating, which can happen if you dump all of the sugar in at once.
- Bake low and slow. When it comes to baking these meringues, we've had best results with the following process: 1. Bake for 1 hour at 250 degrees, rotating pan once halfway through. After an hour, turn off the oven but leave the meringues in for another full hour. The residual heat will continue to cook them without drying them out too much.
- Be careful with add-ins. We tried a few different batches in which we added in natural food coloring or other powders and they did not turn out nearly as well. Your best bet is to stick with a plain base and drizzle with chocolate + additional toppings once they're finished. If you really want to add color, gel food coloring works best. Avoid anything with oil as this will ruin the meringue.
Storage
These vegan meringues tend to get a bit sticky if they're left at room temperature for too long. This is especially true on hot, humid summer days.
We suggest storing them in an airtight container in the refrigerator, with each layer separated by parchment so they don't stick together. They will last for up to a week in the refrigerator.
More ways to use aquafaba:
Here are a few more of our favorite uses for aquafaba, as well as a few ways to use the actual chickpeas!
- Aquafaba is the key to these perfectly fluffy Vegan + GF Blueberry Pancakes and these waffles!
- This Vegan Dark Chocolate Mousse is one of our all-time favorite recipes.
- Make a Vegan Pisco Sour Cocktail with whipped aquafaba.
A few uses for the chickpeas leftover in the can:
- We love this Moroccan Chickpea Stew for a cozy dinner.
- When all else fails, make a big batch of homemade hummus.
- This Greek Chickpea Salad is one of our most popular recipes for good reason.

If you make these vegan aquafaba meringues, we’d love for you to leave a comment and rating below! We also love to see your creations on Instagram – tag us at @crowded_kitchen so we can see what you’ve been cooking.
Print📖 Recipe

Vegan Meringues
- Total Time: 2 hours 25 minutes
- Yield: 3-4 dozen 1x
- Diet: Vegan
Description
Vegan meringues are surprisingly easy to make and taste exactly like real meringues! The secret ingredient is aquafaba, which whips up into a thick, glossy mixture that perfectly bakes into crispy, sweet, chewy meringues.
Ingredients
- ¾ cup aquafaba (liquid from a can of low-sodium chickpeas)
- ½ tsp cream of tartar
- 1 cup caster sugar
- 1 tsp vanilla extract or vanilla bean paste
- ¼ tsp xanthan gum
Instructions
- Preheat oven to 200˚F and line two baking sheets with parchment paper.
- Start by draining the aquafaba into a bowl. Measure out ¾ cup of aquafaba and add to the bowl of your stand mixer (or a mixing bowl if using a hand mixer).
- Using the whisk attachment, start beating the aquafaba at medium-high speed. For the first minute or two, it will look frothy but won't have much volume.
- After about 5 minutes of continuous mixing, you should see some soft peaks starting to form. At this point, add in the cream of tartar and continue mixing for a few more minutes until the mixture starts to get thick and glossy.
- Next, slowly add in the sugar while the meringue is mixing. Add it in spoonful by spoonful, with about 20-30 seconds between each interval so it has time to fully incorporate.
- Once the sugar is fully incorporated, add in the xanthan gum and vanilla extract and continue mixing until the mixture forms very stiff peaks. If you turn the bowl upside down, the meringue shouldn't move at all.
- Use a piping bag to pipe small meringues (about a 1-2 inch diameter) evenly onto parchment paper-lined baking sheets. They don't spread when they bake, so they can be piped pretty close together.
- Bake the meringues for 2 hours and 15 minutes. Then, turn off the oven and leave them in for another 2 hours (or overnight).
- Store cooled meringues in an an airtight container in the refrigerator with parchment paper between each layer.
Notes
If using a hand mixer, timing may differ (it may take longer for the aquafaba to form stiff peaks).
Do not store the meringues at room temperature. When exposed to moisture, they start to get tacky and sticky. They're still perfectly edible, but difficult to handle and a bit messy!
- Prep Time: 20 minutes
- Cook Time: 4 hours
- Category: Dessert
- Method: Oven
- Cuisine: French
Nutrition
- Serving Size:
- Calories: 162
- Sugar: 39.3 g
- Sodium: 8.4 mg
- Fat: 0 g
- Saturated Fat: 0 g
- Trans Fat: 0 g
- Carbohydrates: 40.6 g
- Fiber: 0.2 g
- Protein: 0 g
- Cholesterol: 0 mg

Christina says
Surprised! Heard about this from the GBBS and thought I would try it. I was scared to add anything in but I thought steeping Chai tea bags in the aquafaba would be ok. They turned out great! The cook time I think was a bit too long bc mine turned out good ahead of time, about 1 hour 15 minutes at 200 degrees then left in a dead oven for 30 more minutes? Maybe it was the size I piped them? In any case, I'm pleased with them.
Lexi says
Glad to hear they worked well!