
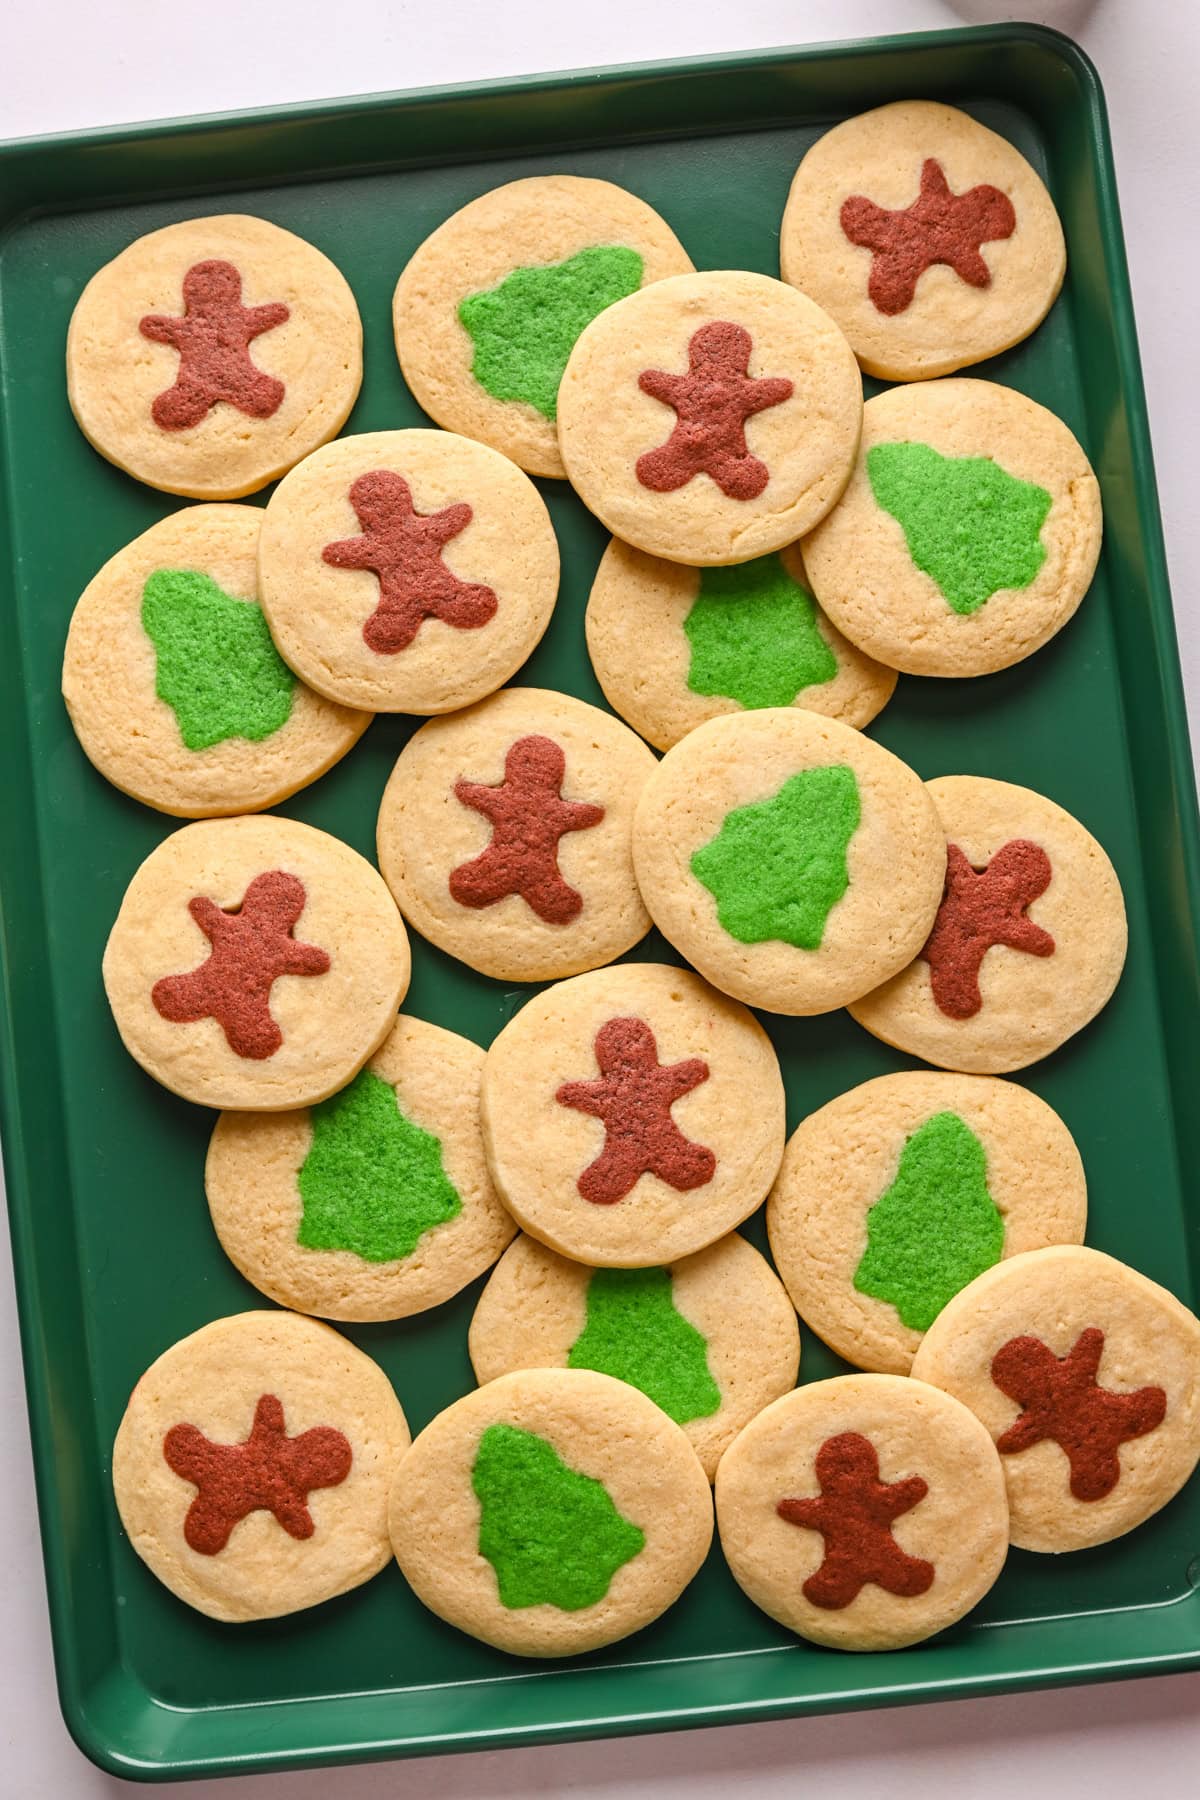
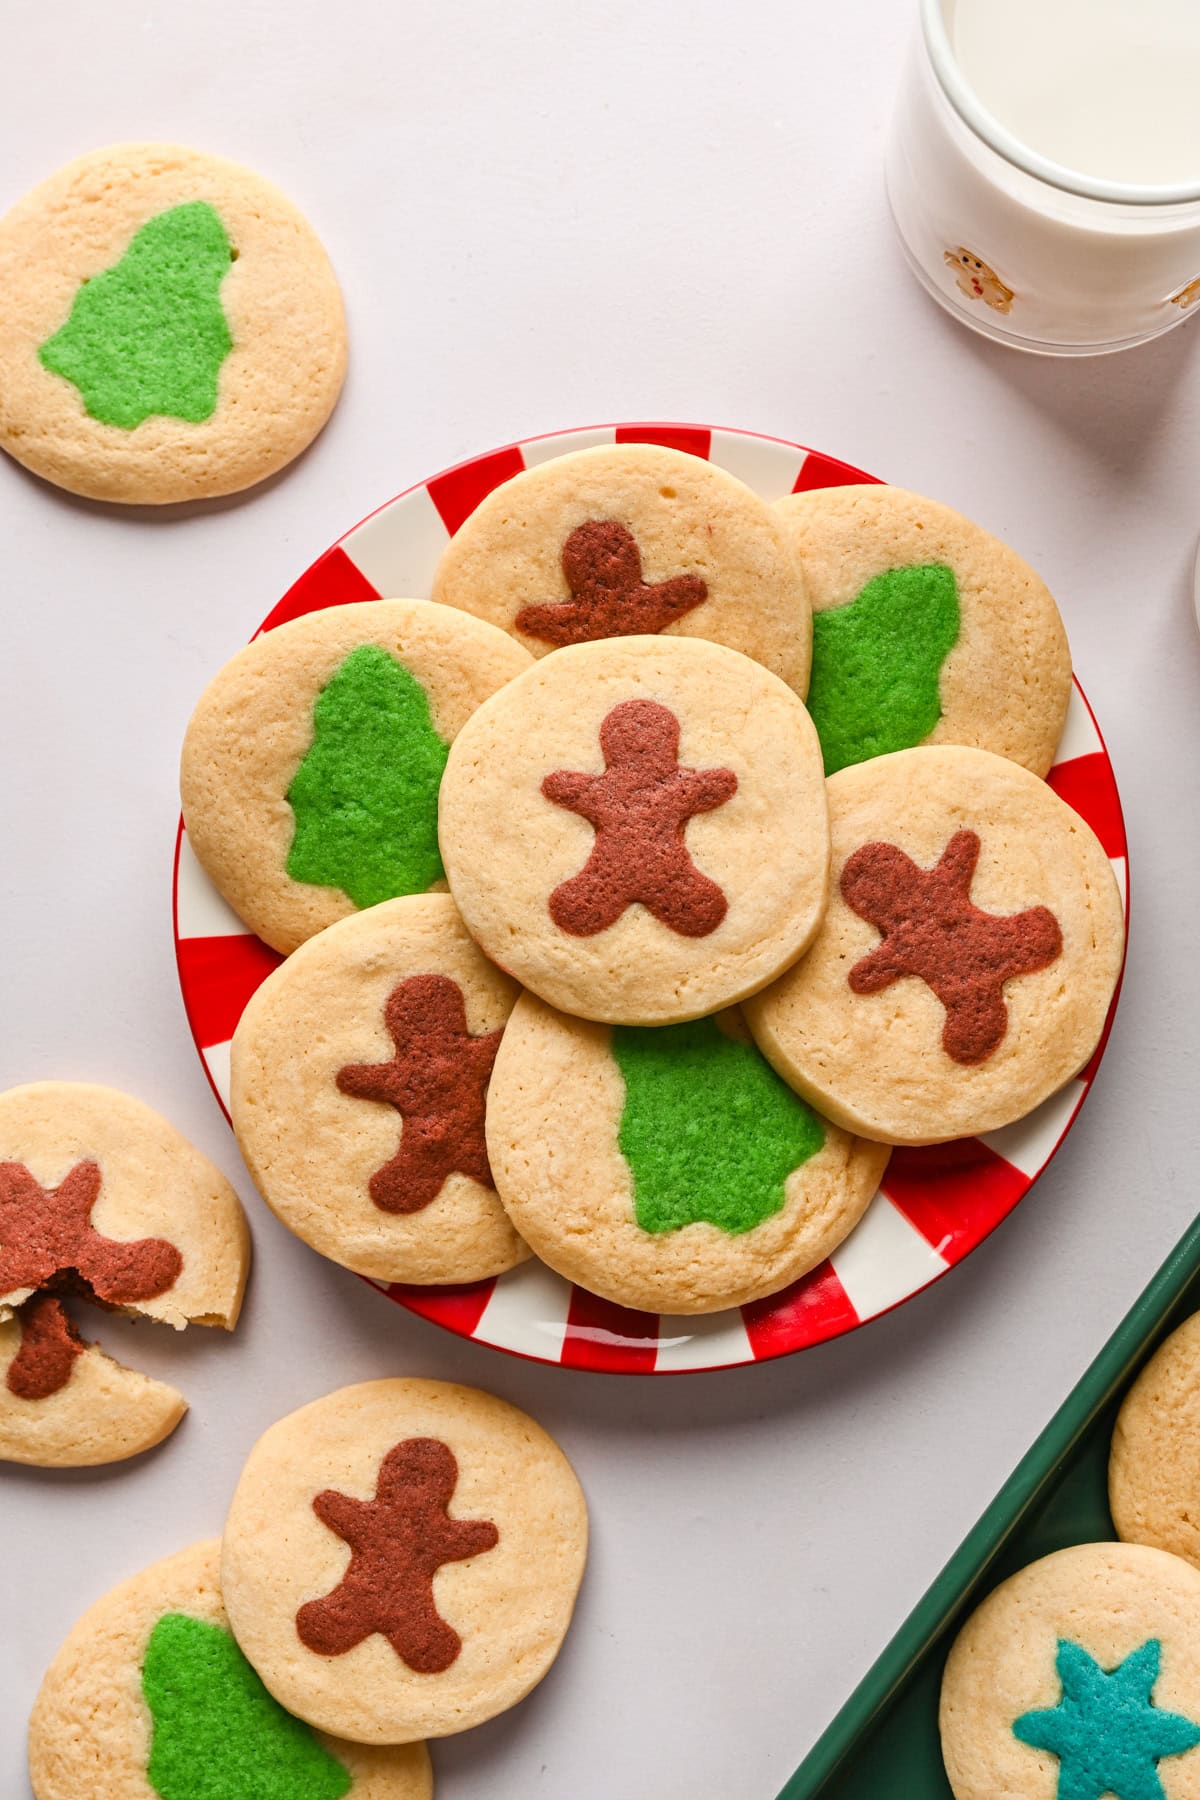
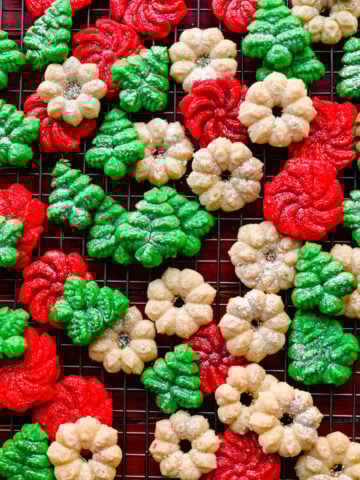
Remember those slice and bake cookies from your childhood that came in a tube? These homemade slice and bake Christmas cookies are surprisingly easy to make, taste better than the original, and are customizable to include your favorite holiday shapes.
Disclosure: Some of the links below are affiliate links. This means that, at zero cost to you, I may earn an affiliate commission if you click through the link and finalize a purchase. Read our full affiliate disclosure here.
This recipe is the very first recipe of our 2025 Recipe Advent Calendar Series! In this series, we're bringing you a brand new, super festive recipe every day from now through December 25th. Don't forget to sign up for our email list so you don't miss a recipe!
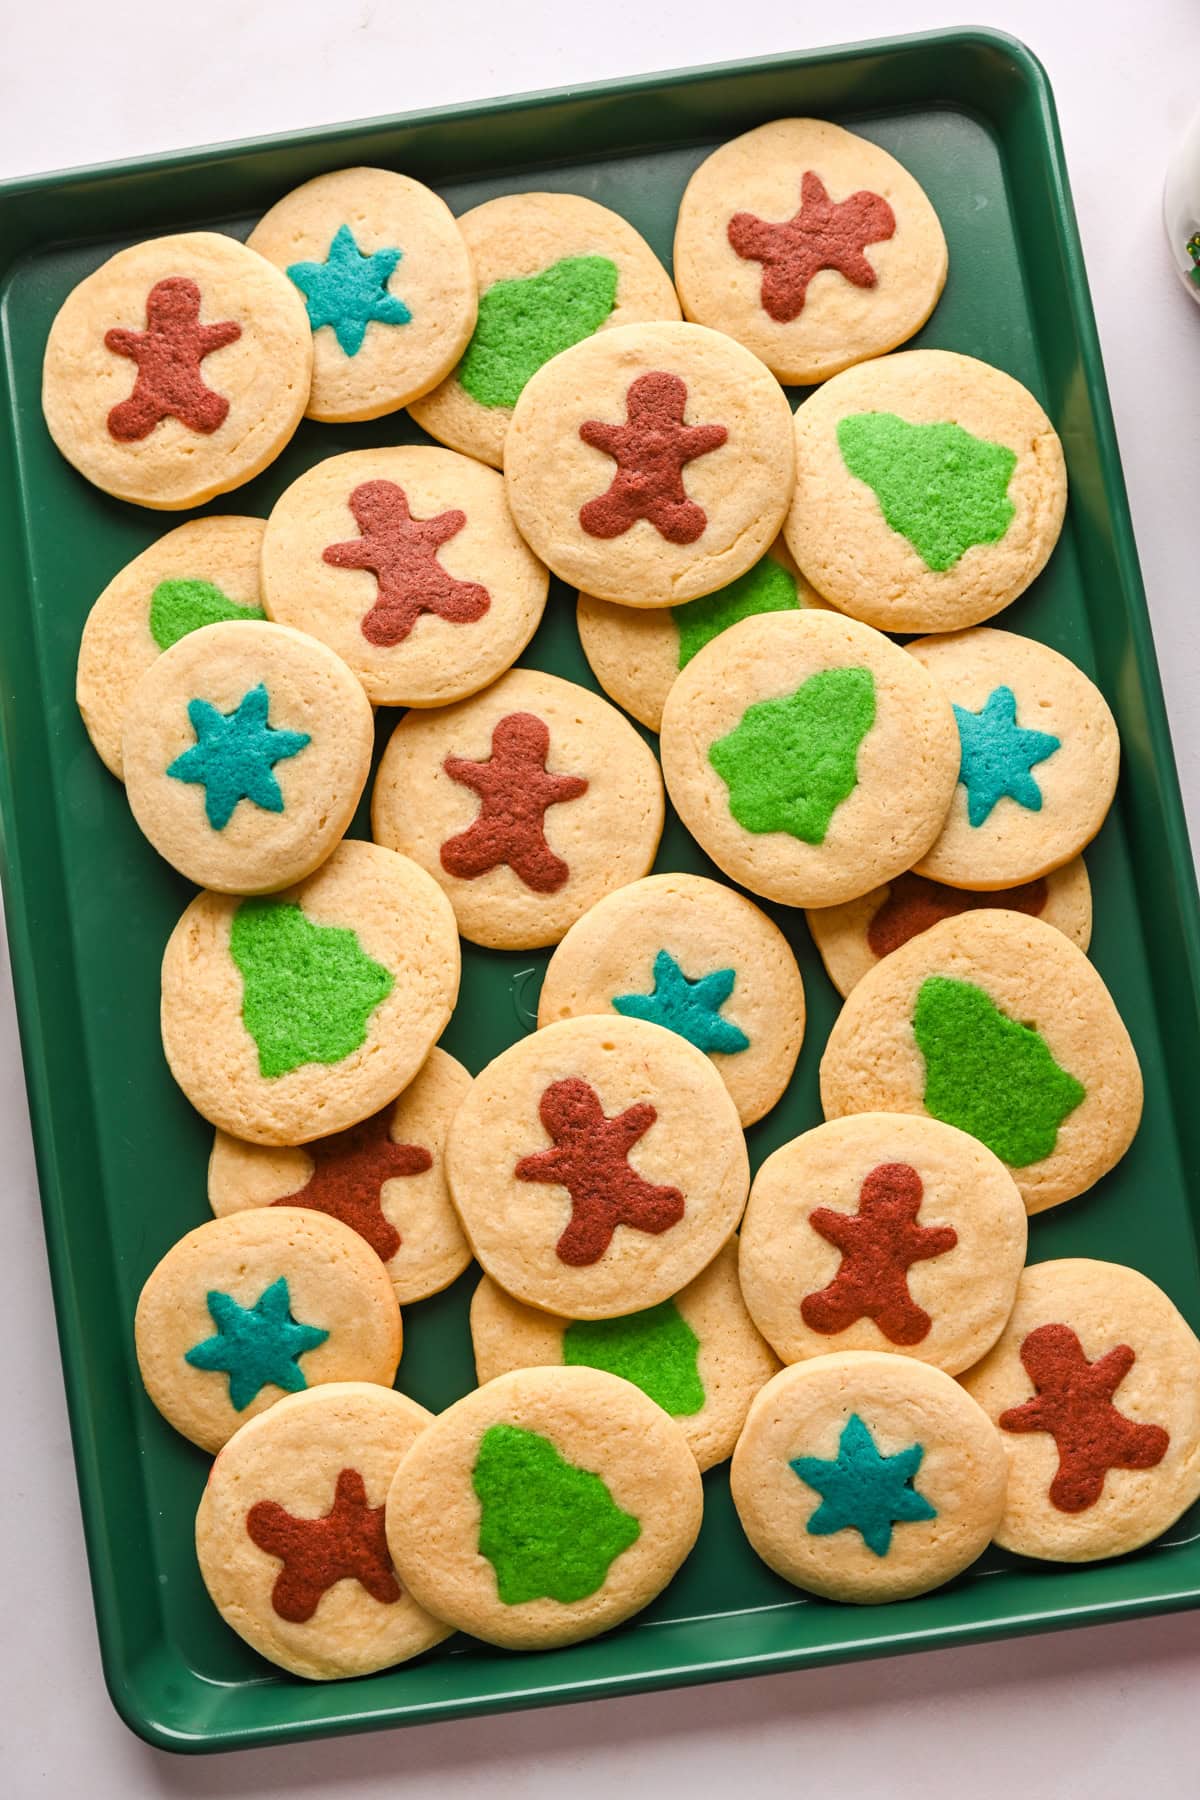
To make these cookies, we whipped up a batch of homemade sugar cookie dough, colored part of it with food coloring, created a "log" of our chosen shapes - Christmas trees and gingerbread men - and placed uncolored dough around it. From there, it's slice, bake, and enjoy.
If you want to get ahead and try a few recipes from last year's series, these are a few favorites:
Slice and Bake Christmas Cookies Ingredients
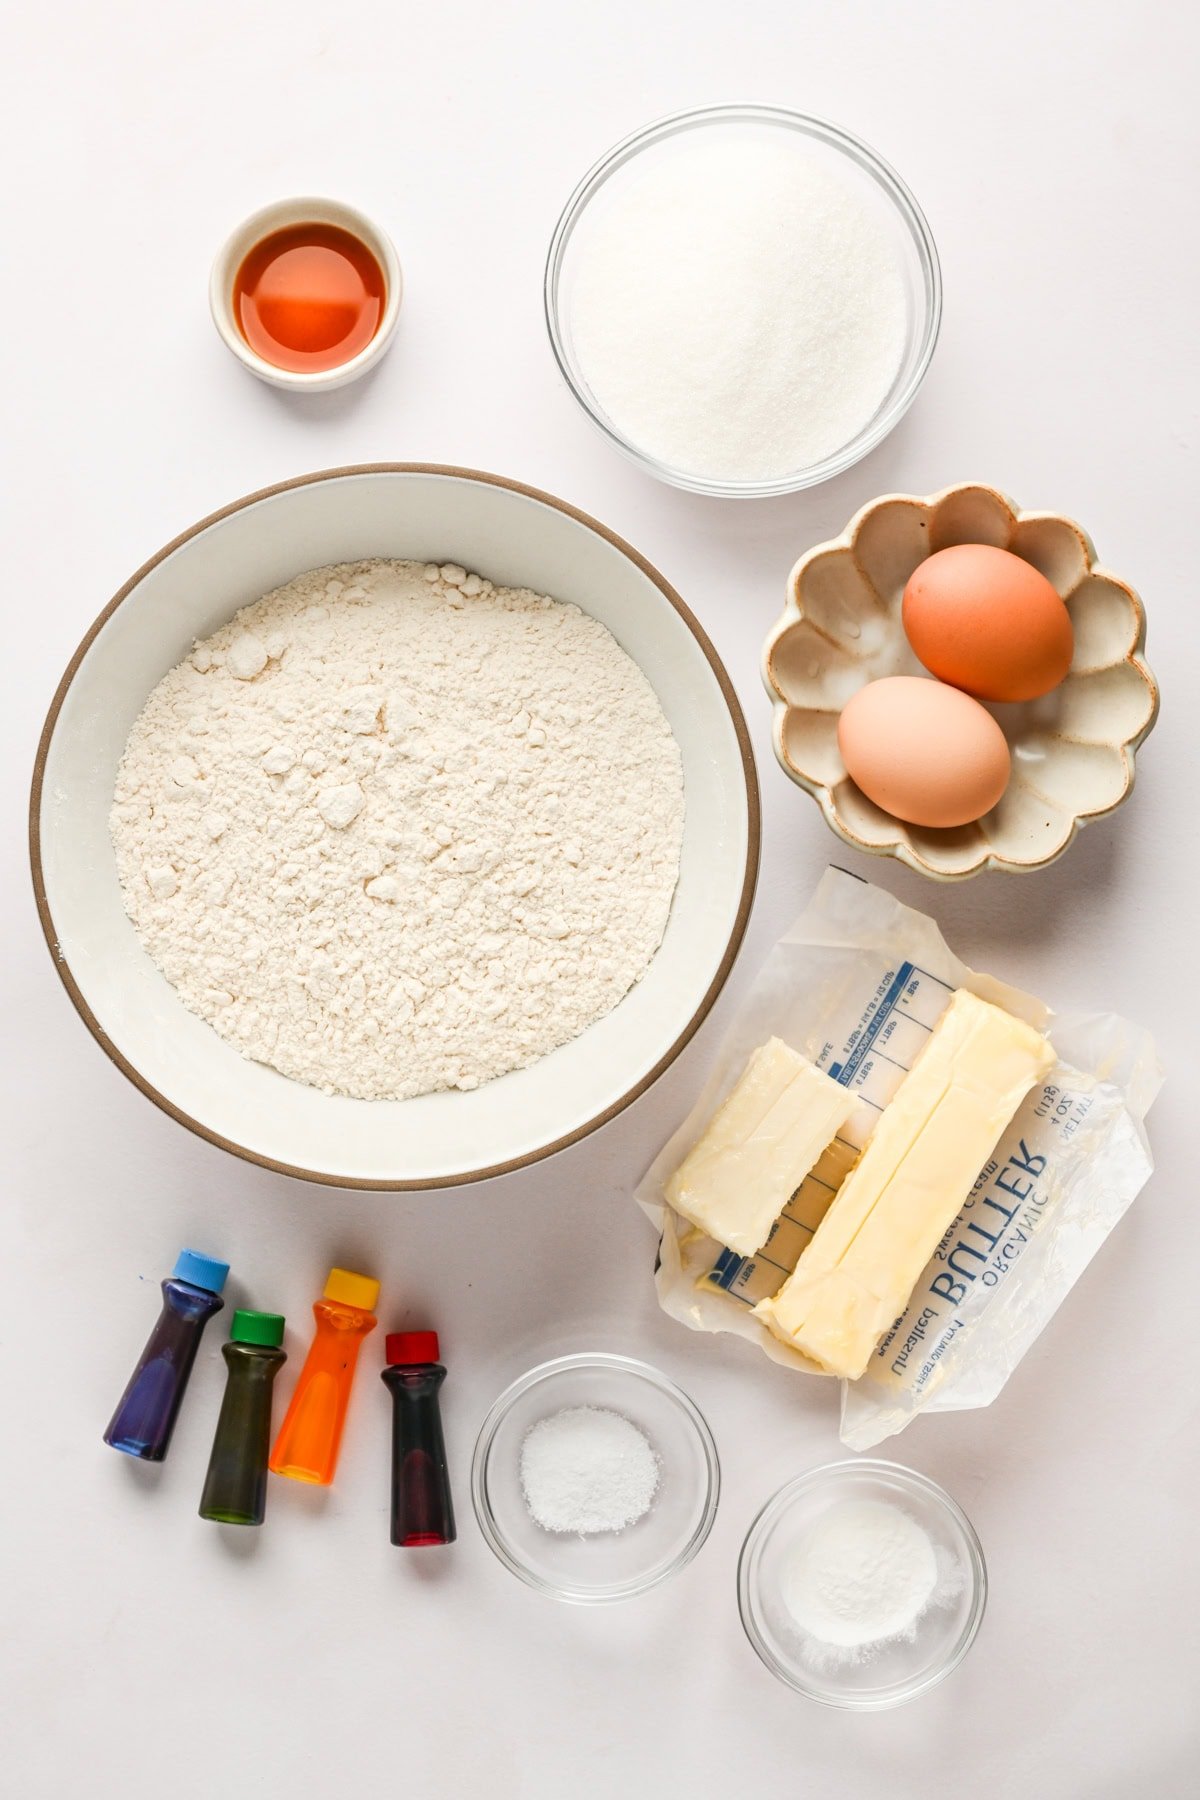
- Flour: We used regular all-purpose flour in this recipe. We have not tested this recipe with gluten free flour.
- Sugar: Regular white granulated sugar is the best choices for this recipe to get the right color and texture.
- Butter: We used unsalted butter that has been softened at room temperature for a few hours.
- Eggs: We used large eggs in this recipe.
- Baking powder: Baking powder provides a touch of leavening to the dough. Just note, baking soda will not have the same effect and it has an off-putting flavor.
- Kosher salt: A touch of salt helps to balance out the flavor of the dough.
- Vanilla extract: Adds a touch of flavor to the dough, to create a delicious sugar cookie flavor. Feel free to add more, or try adding another extract like almond extract for more flavor!
- Food coloring: We used gel food coloring here for super vibrant colors. You can use natural food coloring – just note that the color bakes out a bit in the oven, so you'll have to use a good amount. It may necessitate adding an additional tablespoon or two of flour.
How to Make Slice and Bake Christmas Cookies
Note: This is for one type of cookie, to make additional shapes, you'll need to multiply the quantities in this recipe.
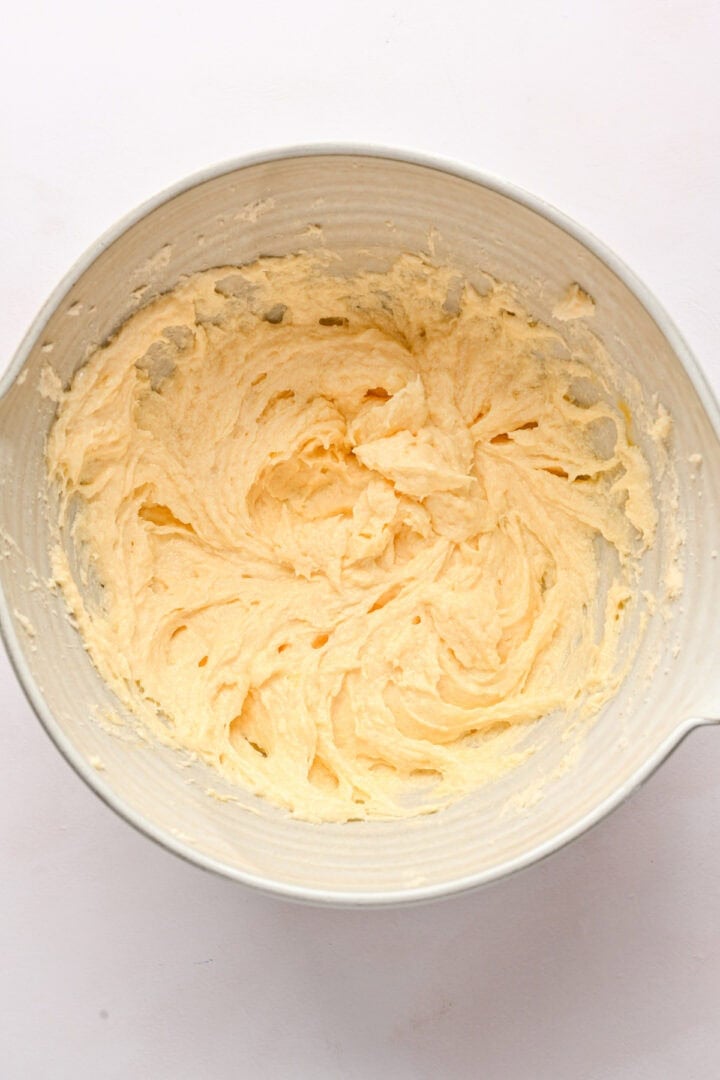
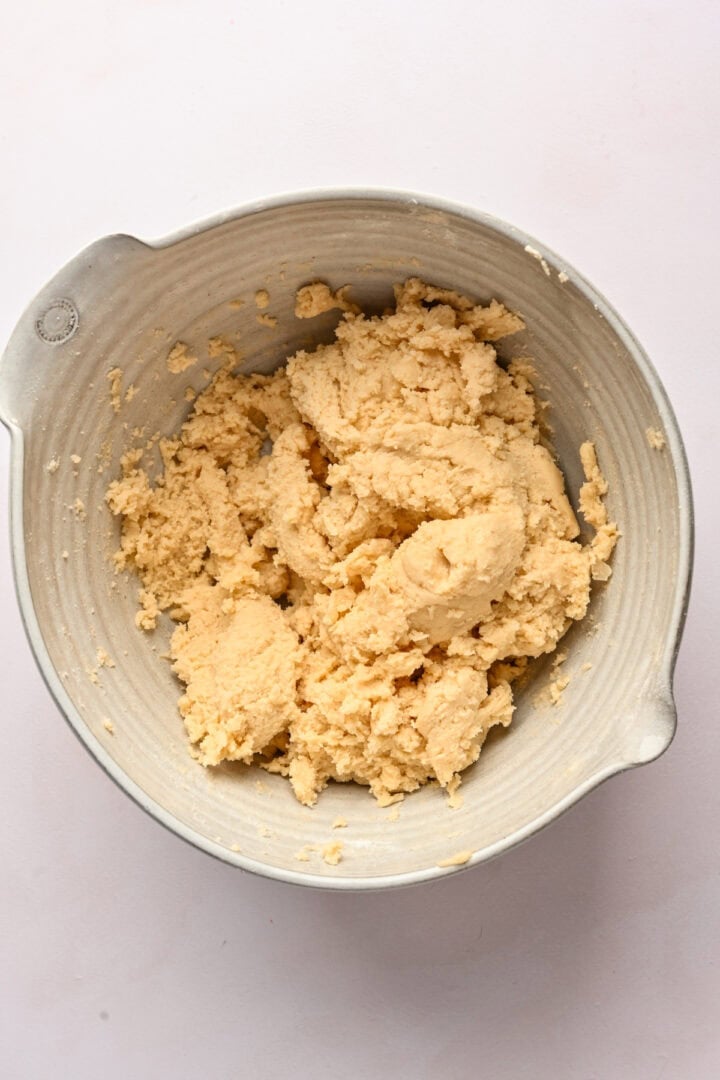
STEP 1: Add butter, sugar and vanilla extract to a large mixing bowl (or stand mixer). Beat at medium speed until light and fluffy, about 3 minutes.
STEP 2: Add in eggs one at a time, mixing just until combined.
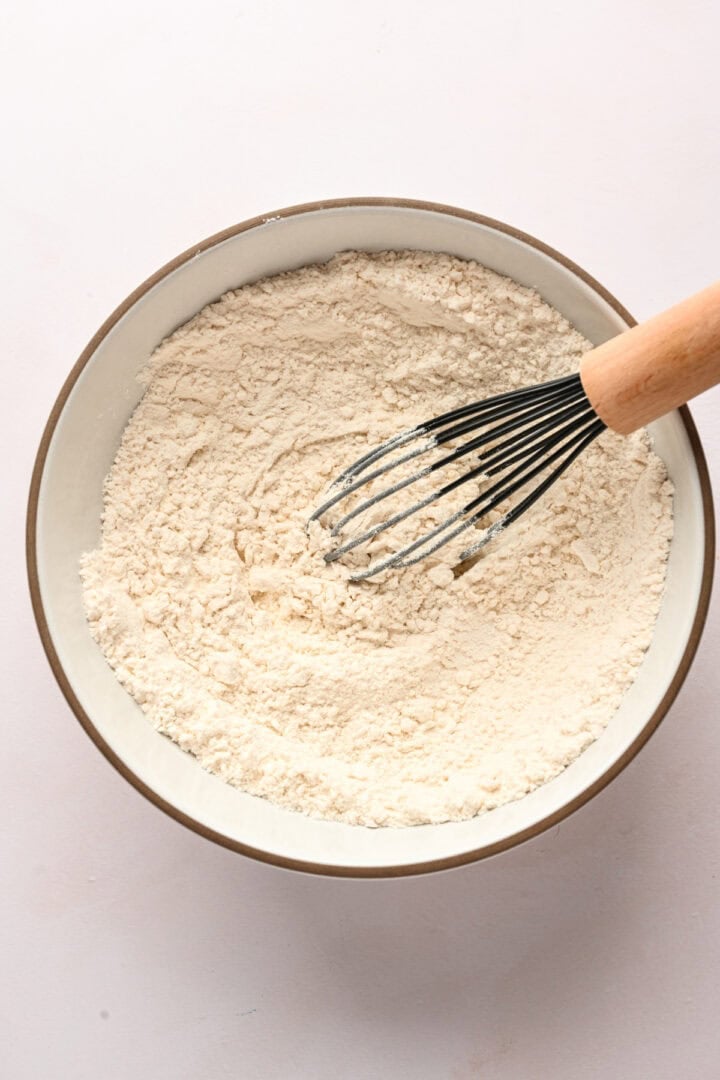
STEP 3: In a separate bowl, whisk together the flour, baking powder and salt.
STEP 4: Add the dry ingredients to the wet ingredients in 3-4 batches, until the dough comes together. Add 1-2 tablespoons more flour if needed if the dough is too wet. It should be very soft, but shouldn't stick to your fingers too much. If you used natural food coloring, you will likely need to add in the additional flour.
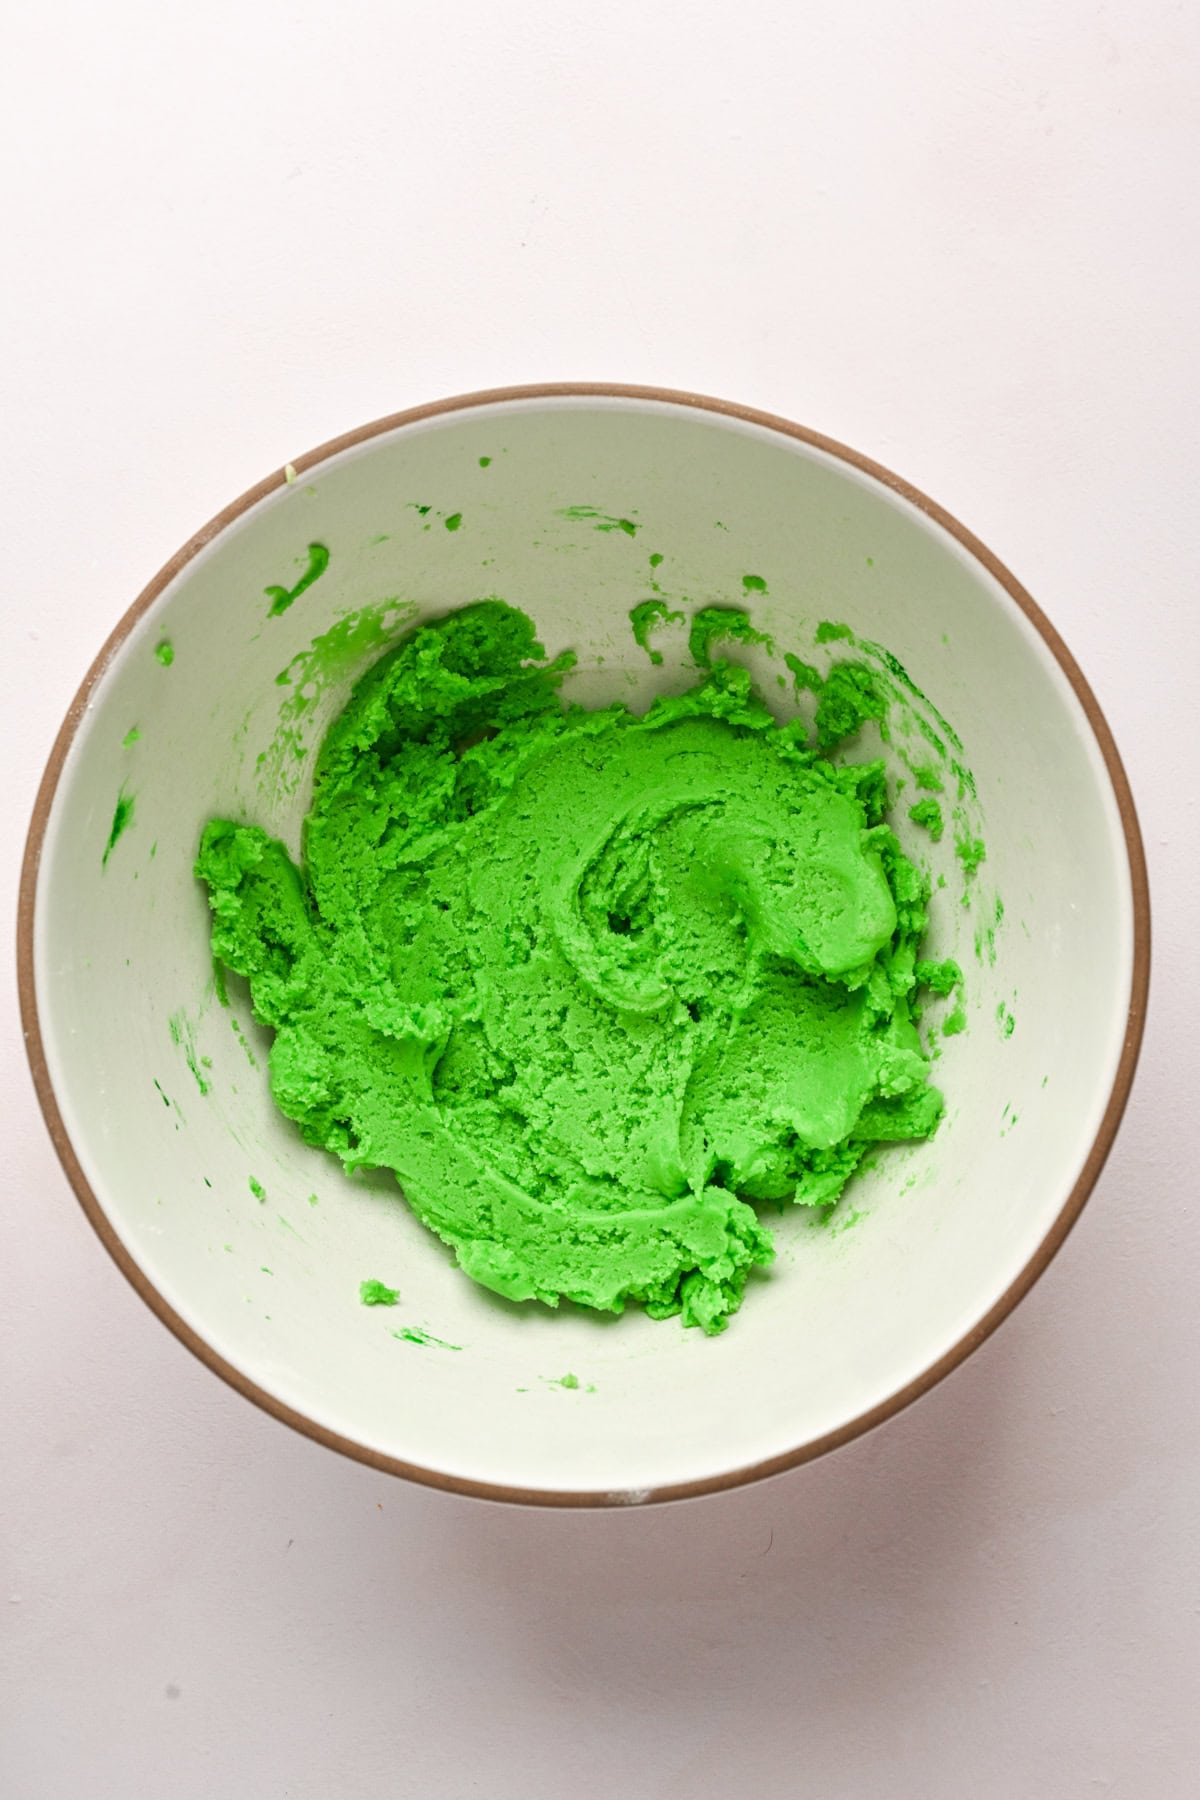
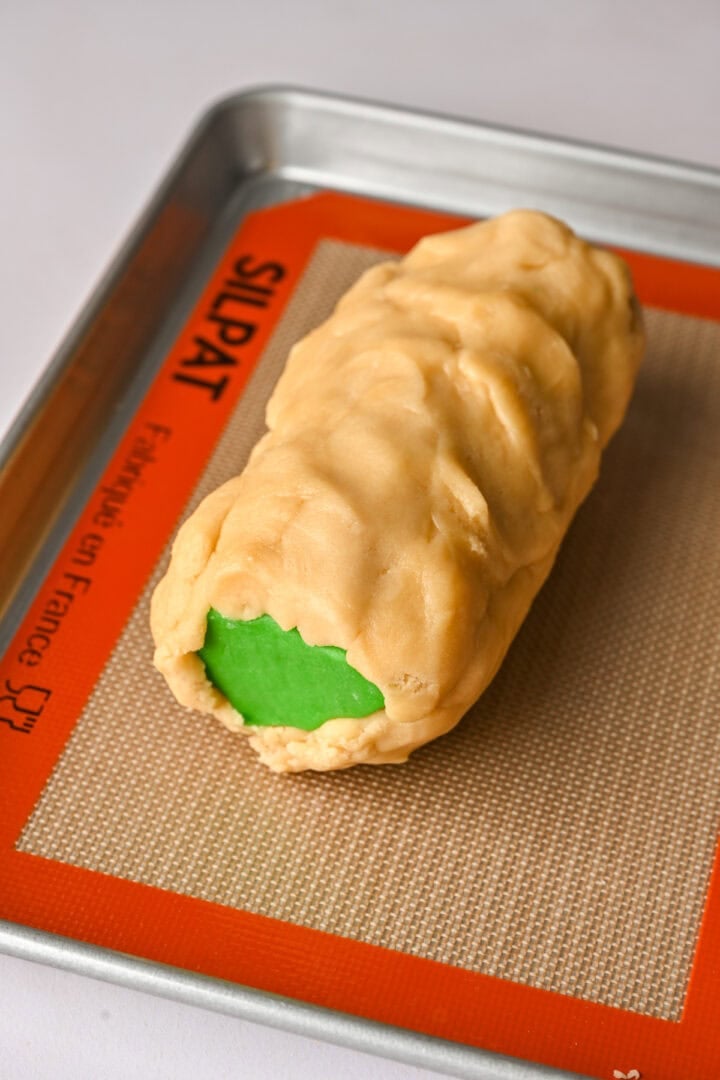
STEP 5: Remove about about 10 ounces (~⅓) of the dough and place in a separate bowl. Add in several drops of food coloring and mix until combined. Add more food coloring to reach desired hue. (Save the remaining ⅔ of plain dough for coating the shapes.)
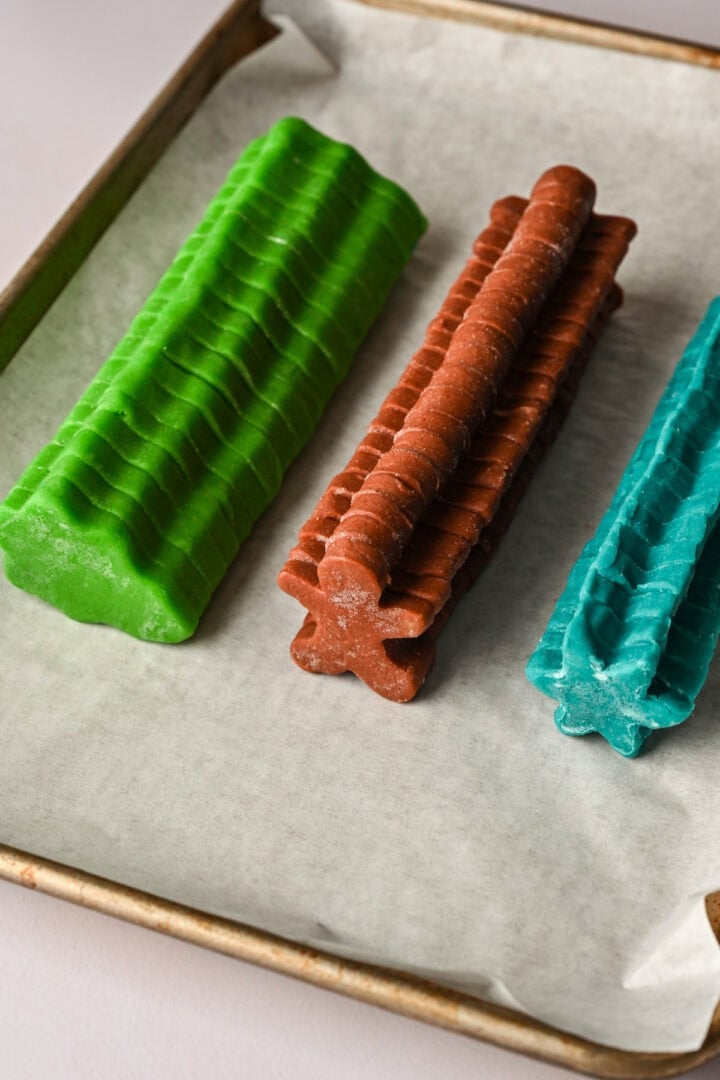
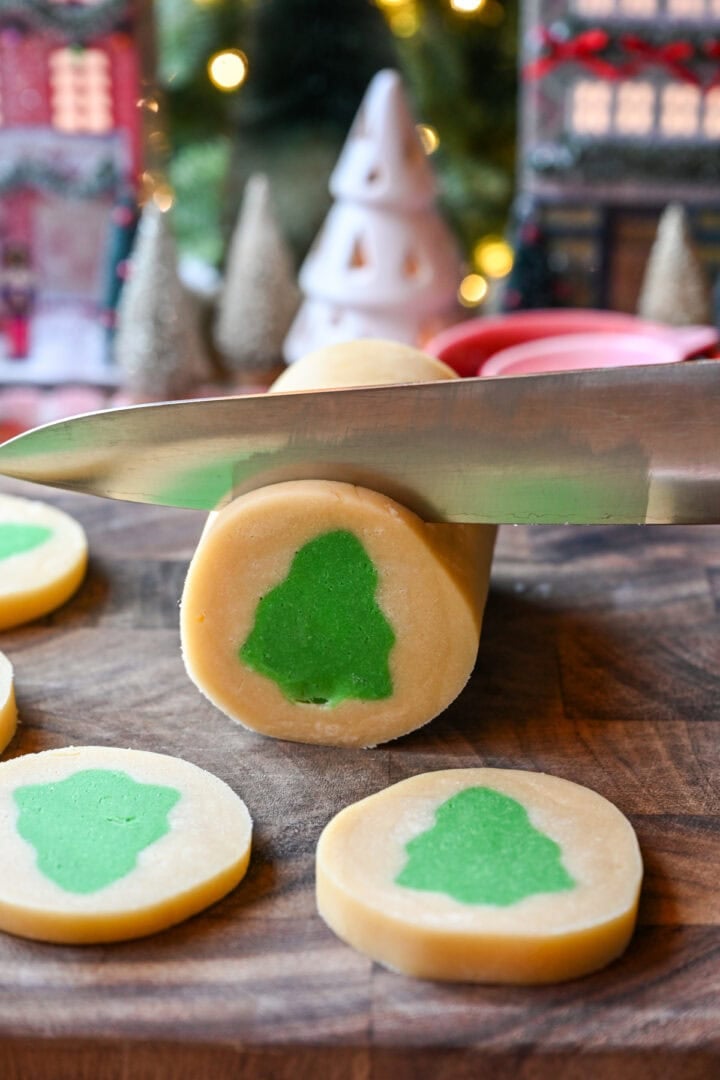
We used green for Christmas trees, brown (green and red mixed together) for gingerbread men, and blue for snowflakes.
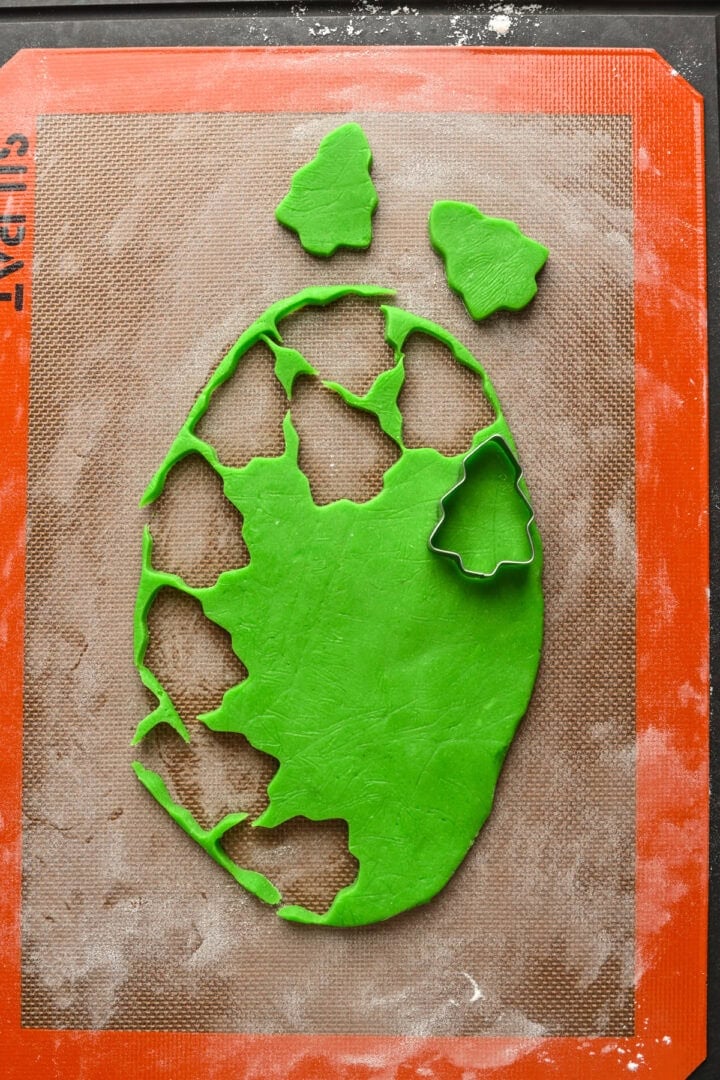
STEP 6: Place the colored dough in the freezer for 5-10 minutes, then roll out into a rectangle about ½-inch thick on a lightly floured surface. Return to the freezer for 20-30 minutes. This will make it much easier to cut out your chosen shape. If the dough is too soft, it will be impossible to push them out from the cutter and not completely mangle them.
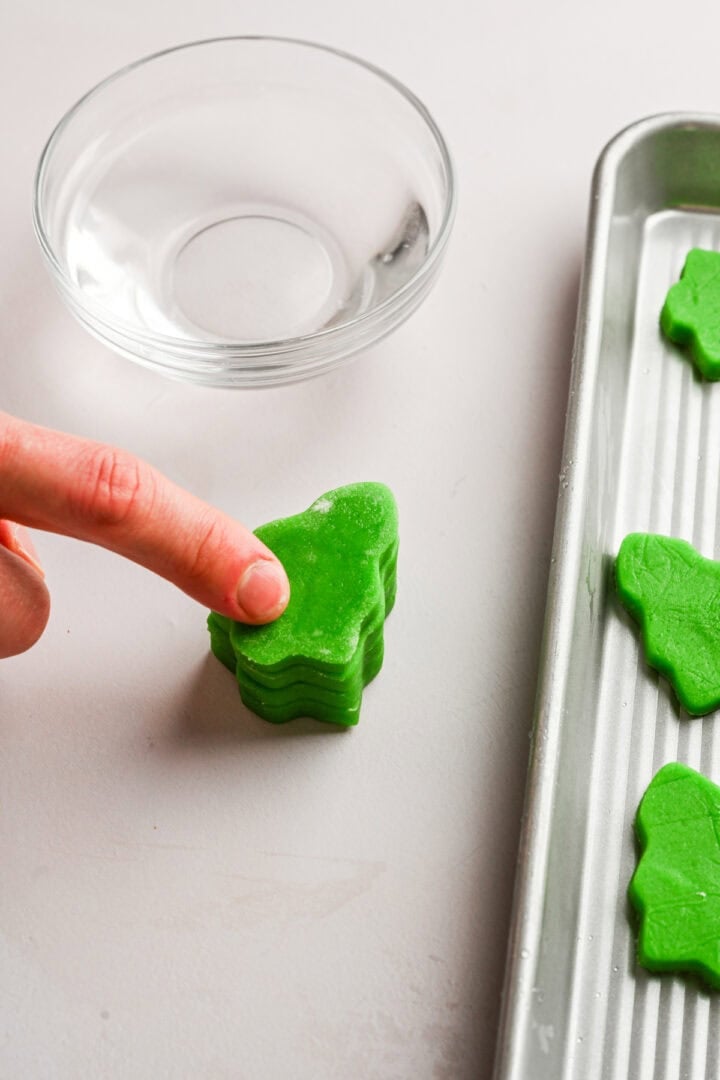
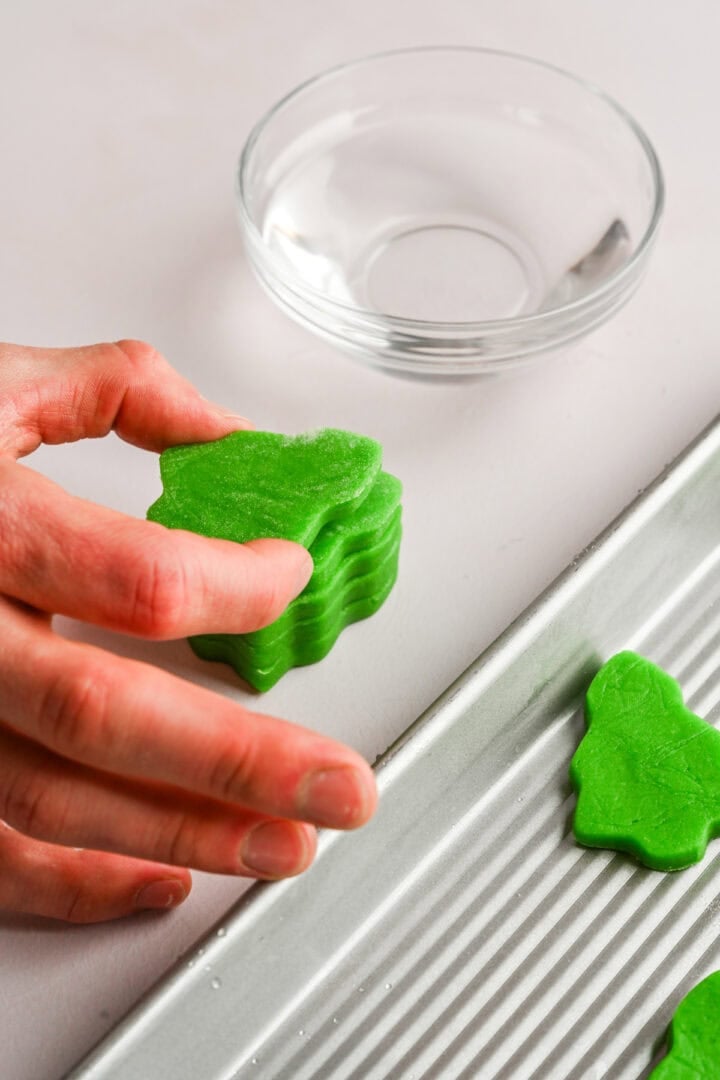
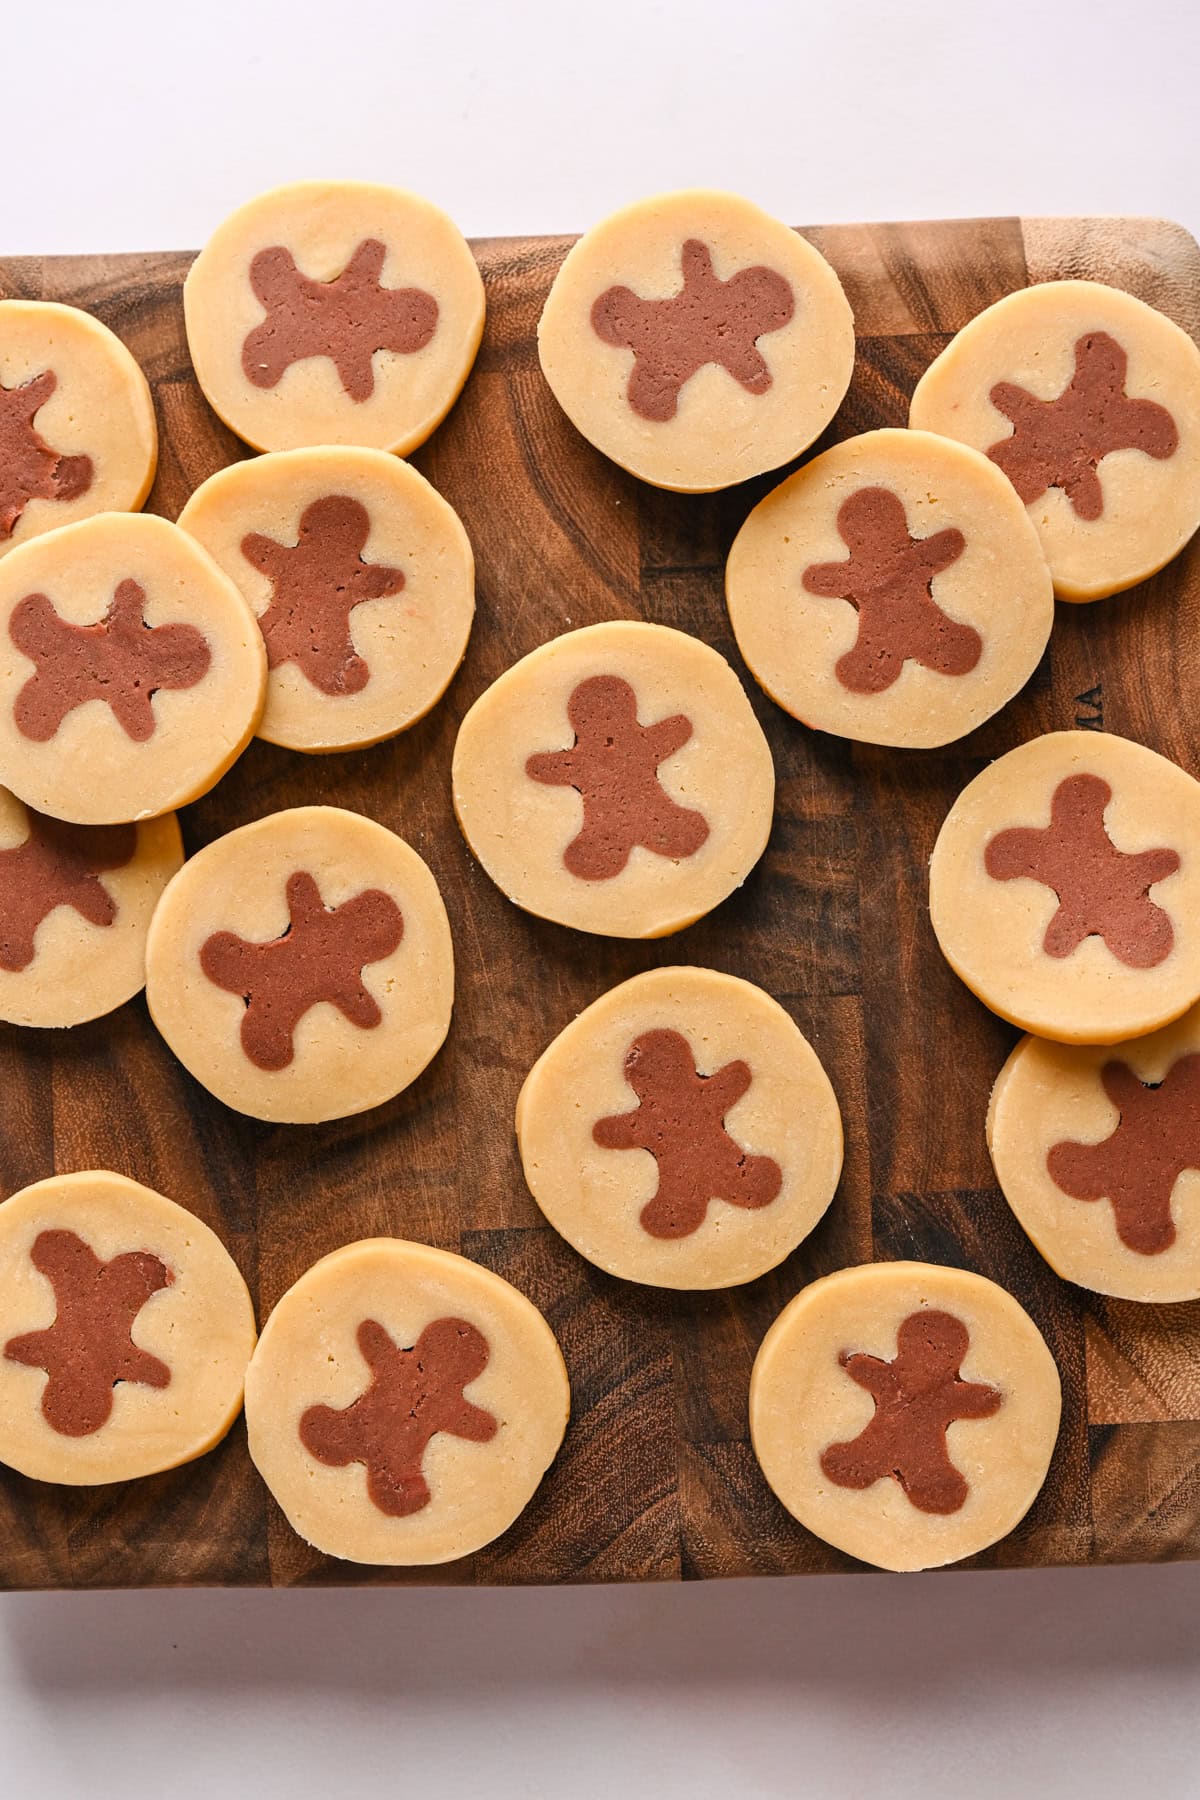
STEP 7: Use a small cookie cutter (roughly 1.5" across) to cut out your shape. Dip a finger in a little bit of water and lightly rub on the floured side of the cookie before adhering another cut out shape.
This helps them stick together, but don’t overdo the water, you only need a tiny amount. Repeat with all cut out shapes until you have a log about 10 inches long.
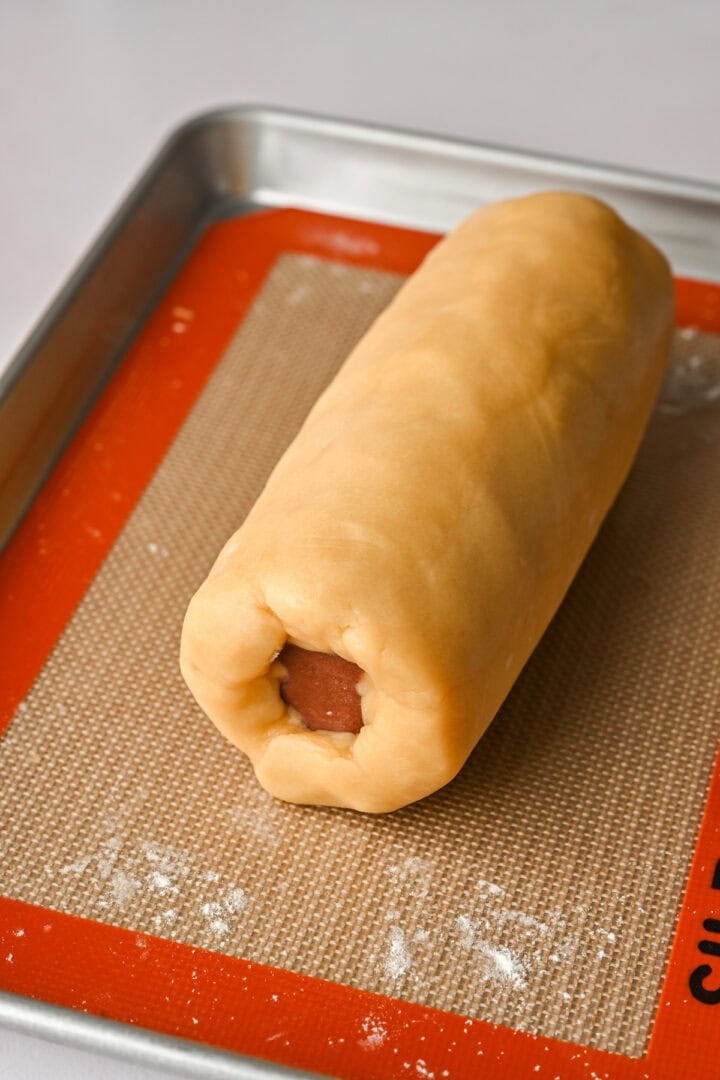
STEP 8: Return the log to the freezer for 2 hours, or until frozen solid (we usually just do this overnight). Remove from freezer and press the plain cookie dough directly onto and around the shape. Make sure to really press it in so you don’t end up with any gaps. Roll into a smooth log.
STEP 9: Wrap in plastic wrap and chill for at least 30 minutes.
STEP 10: Preheat oven to 350˚F and line 2 baking sheets with parchment paper.
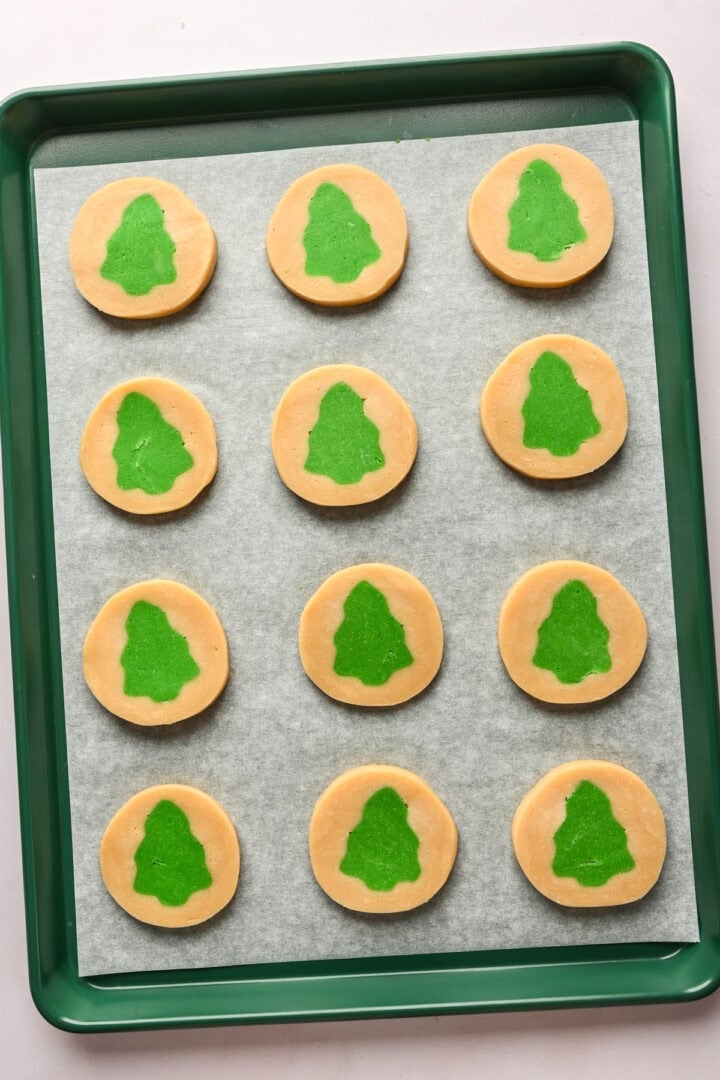
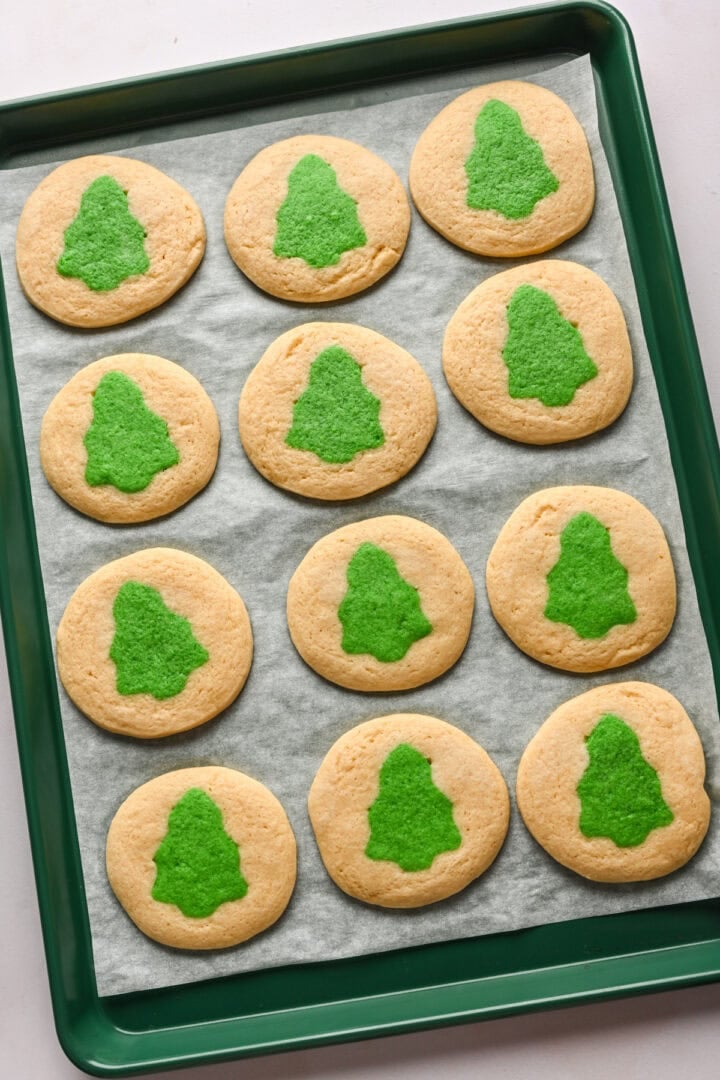
STEP 11: When you’re ready to bake, slice the dough into ¼” rounds, then space 2 inches apart on the baking sheets. Bake for ~12 minutes, or until the bottoms are light golden brown. Remove from the oven and let cool.
Substitutions and Variations
- Gluten free: To make these gluten free, replace the all-purpose flour with a gluten free 1:1 flour. We haven't tested this, but it should work.
- Vegan: Try our vegan sugar cookie dough, but use this process for shaping and baking.
- Shapes: Rounder shapes that don't have too many protruding points work better. Christmas trees and gingerbread men worked really well, snowflakes didn't (it was too difficult to retain the pointed edges.)
- Sugar crust: If you want, you can roll the log in coarse sugar before popping it in the fridge or freezer. Your cookies will have a crunchy sugar crust after baking.
- Add extra flavor to your dough by increasing the quantity of vanilla extract, or try adding in another extract as well, like almond extract.
Tips and FAQ
Be patient! Chilling the dough is key.
If you want your designs to be well-defined, you'll need to chill the colored dough in the freezer for about 15 minutes. If the dough is too soft, it will be nearly impossible to get your shapes out of the cookie cutter without destroying their shape. You'll also need to freeze your "log" of shapes after sticking them together to make sure the shape stays in tact when you add the uncolored dough to the sides. Don't skip the chilling process - it's essential to make sure these turn out perfectly!
More Tips
- Don't refrigerate the plain dough if you're making these in one day. You want it to be super soft so and pliable so it's easy to adhere to the log of cut out shapes. If you are making these over the course of two days, refrigerate the plain dough (covered) overnight, then bring it to room temperature the next day before shaping the log.
- Cookie cutters: These are the cookie cutters we used for the trees and the gingerbread men. We used the smallest size in each set.
- You can make these cookies for any holiday by applying the same process to other shapes: ghosts for halloween, hearts for Valentine's day cookies. Just make sure you use a cookie cutter that's big enough where you'll be able to see the design clearly!
- If you want to eat the raw dough relatively safely, you'll need to bake the flour to pasteurize it, and also use pasteurized eggs.
- Measuring your flour: Be sure your spoon your flour into a measuring cup and level it off with a knife. Alternatively, you can weigh your flour. Your bag of flour should have the weight per serving in the nutrition panel – just multiply this by the quantity of flour needed for this recipe. This will prevent you from using too much flour, which will dry out your cookie dough and make it difficult to shape.
- You can keep the dough in the freezer for up to a few months (as long as it's tightly wrapped) so you can enjoy slice and bake cookies at any time! Let the dough thaw at room temperature for a few minutes before slicing and baking.
- If using natural food coloring, you'll need to add quite a bit, and note that the color may bake out slightly in the oven. This is the brand we typically like to use.
More holiday dessert recipes to try

Tried this recipe?
Please leave a star ⭐️⭐️⭐️⭐️⭐️ rating below and/or a review in the comments section further down the page. You can also stay in touch with us through social media by following us on Instagram, Pinterest, TikTok, Facebook or by subscribing to our newsletter.
📖 Recipe

Slice and Bake Christmas Cookies
- Total Time: 4 hours 12 minutes
- Yield: ~2 dozen cookies
- Diet: Vegetarian
Description
Remember those slice and bake cookies from your childhood that came in a tube? These homemade slice and bake Christmas cookies are surprisingly easy to make, taste better than the original, and are customizable to include your favorite holiday shapes.
NOTE: The quantities below are for one shape, so multiply as desired depending on how many shapes you want to make.
Ingredients
Instructions
- Add butter, sugar and vanilla extract to a large mixing bowl (or stand mixer). Beat at medium speed until light and fluffy, about 3 minutes.
- Add in eggs one at a time, mixing just until combined.
- In a separate bowl, whisk together the flour, baking powder and salt.
- Add the dry ingredients to the wet ingredients in 3-4 batches, until the dough comes together. Add 1-2 tablespoons more flour if needed if the dough is too wet. If you used natural food coloring, you will likely need to add in the additional flour.
- Remove about about 10 ounces (~⅓) of the dough and place in a separate bowl. Add in several drops of food coloring and mix until combined.
- Place the colored dough in the freezer for 5-10 minutes, then roll out into a rectangle about ½-inch thick on a lightly floured surface. Return to the freezer for 30 minutes. This will make it much easier to cut out your chosen shape.
- Use a small cookie cutter (roughly 1.5" across) to cut out your shape. Dip a finger in a little bit of water and rub on the floured side of the cookie before adhering to another cut out shape. This helps them stick together, but don’t overdo the water, you only need a tiny amount. Repeat with all cut out shapes until you have a log about 10 inches long.
- Return the log to the freezer for 2 hours, or until frozen solid. (We typically make these over two days and leave the log in the freezer overnight.) Remove from freezer and press the plain cookie dough directly onto and around the shape. Make sure to really press it in so you don’t end up with any gaps. We like to leave the ends open so we can see how much dough we need to make an even circle around the shape. Roll into a smooth log on a lightly floured surface.
- Wrap the log in plastic wrap and chill in the fridge for at least 30 minutes.
- Preheat your oven to 350˚F and line 2 baking sheets with parchment paper.
- When you’re ready to bake, slice the dough into ¼” rounds, then space 2 inches apart on the baking sheets. Bake for ~12 minutes, or until the bottoms are light golden brown. Remove from the oven and let cool.
Notes
Don't refrigerate the plain dough if you're making these in one day. You want it to be super soft so and pliable so it's easy to adhere to the log of cut out shapes. If you are making these over the course of two days, refrigerate the plain dough (covered) overnight, then bring it to room temperature the next day before shaping the log.
Do not skip the chilling process! It's absolutely essential to making sure these turn out perfectly. If you rush it, the shapes will not be well defined and it will be very difficult to roll into a long.
Cookie cutters: These are the cookie cutters we used for the trees and the gingerbread men. We used the smallest size in each set.
If you want to eat the raw dough relatively safely, you'll need to bake the flour until it reaches 160˚F to pasteurize it, and also use pasteurized eggs.
You can keep the dough in the freezer for up to a few months (as long as it's tightly wrapped) so you can enjoy slice and bake cookies at any time! Let the dough thaw at room temperature for a few minutes before slicing and baking.
Make it vegan: Use our vegan sugar cookie recipe for the dough.
- Prep Time: 4 hours
- Cook Time: 12 minutes
- Category: Cookies
- Method: Oven
- Cuisine: American
Nutrition
- Serving Size: 2 cookies
- Calories: 330
- Sugar: 20.2 g
- Sodium: 80 mg
- Fat: 15.1 g
- Carbohydrates: 44.5 g
- Fiber: 0.9 g
- Protein: 4.6 g
Shantel says
I just want to dye some of the dough different colors, and cut into squares to decorate like presents. Do i just chill for 2hrs? Or 30 mins?
Lexi says
The longer you chill the dough, the better!
Jenny Glynn says
Gorgeous and tasty.
Sarah Flesher says
Quick question, I've seen statements that shortening is a good 1 to 1 replacement for butter if it's unavailable. Is this true for this recipe?
Lexi says
I have not tried it with this recipe, so I don't want to recommend that in case it doesn't work!
Brie W says
This was a super cute and easy recipe, I made it in a day and it came out great. No one believed that they were homemade! I rolled the log in sprinkling sugar and it gave the cookies that extra pop.
Lexi says
So thrilled to hear that! Enjoy! 🙂