
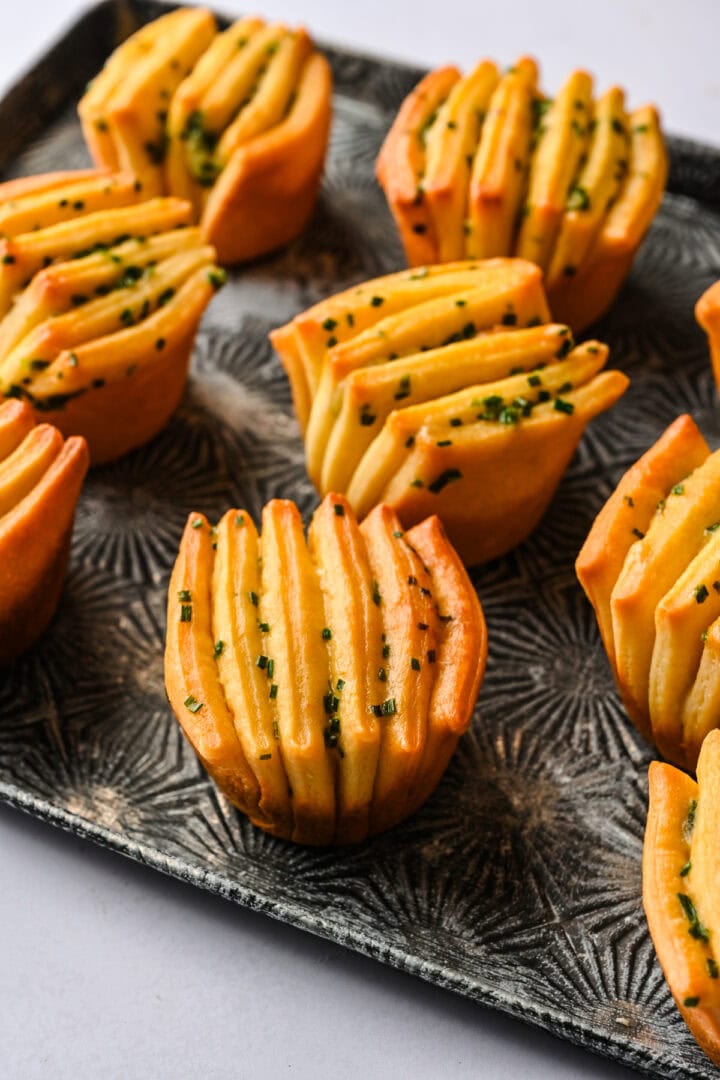
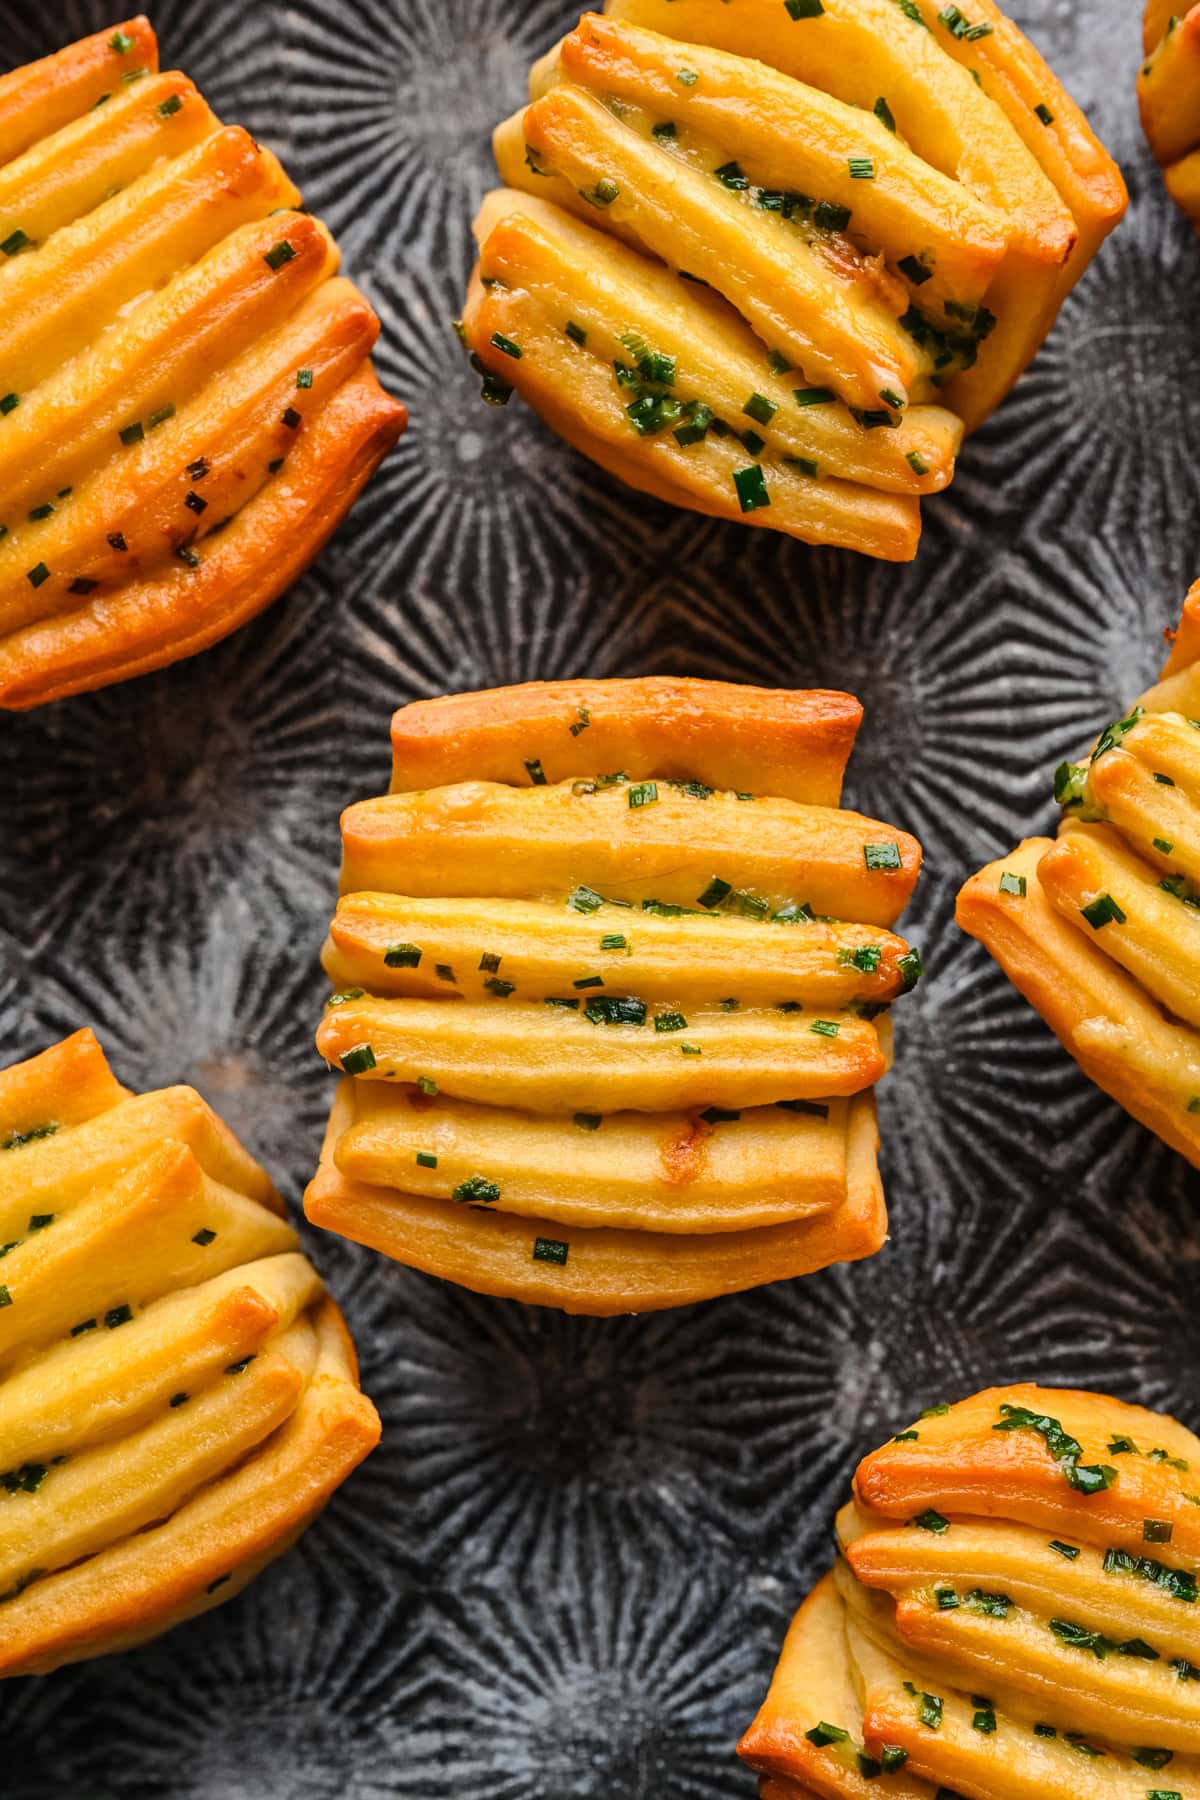
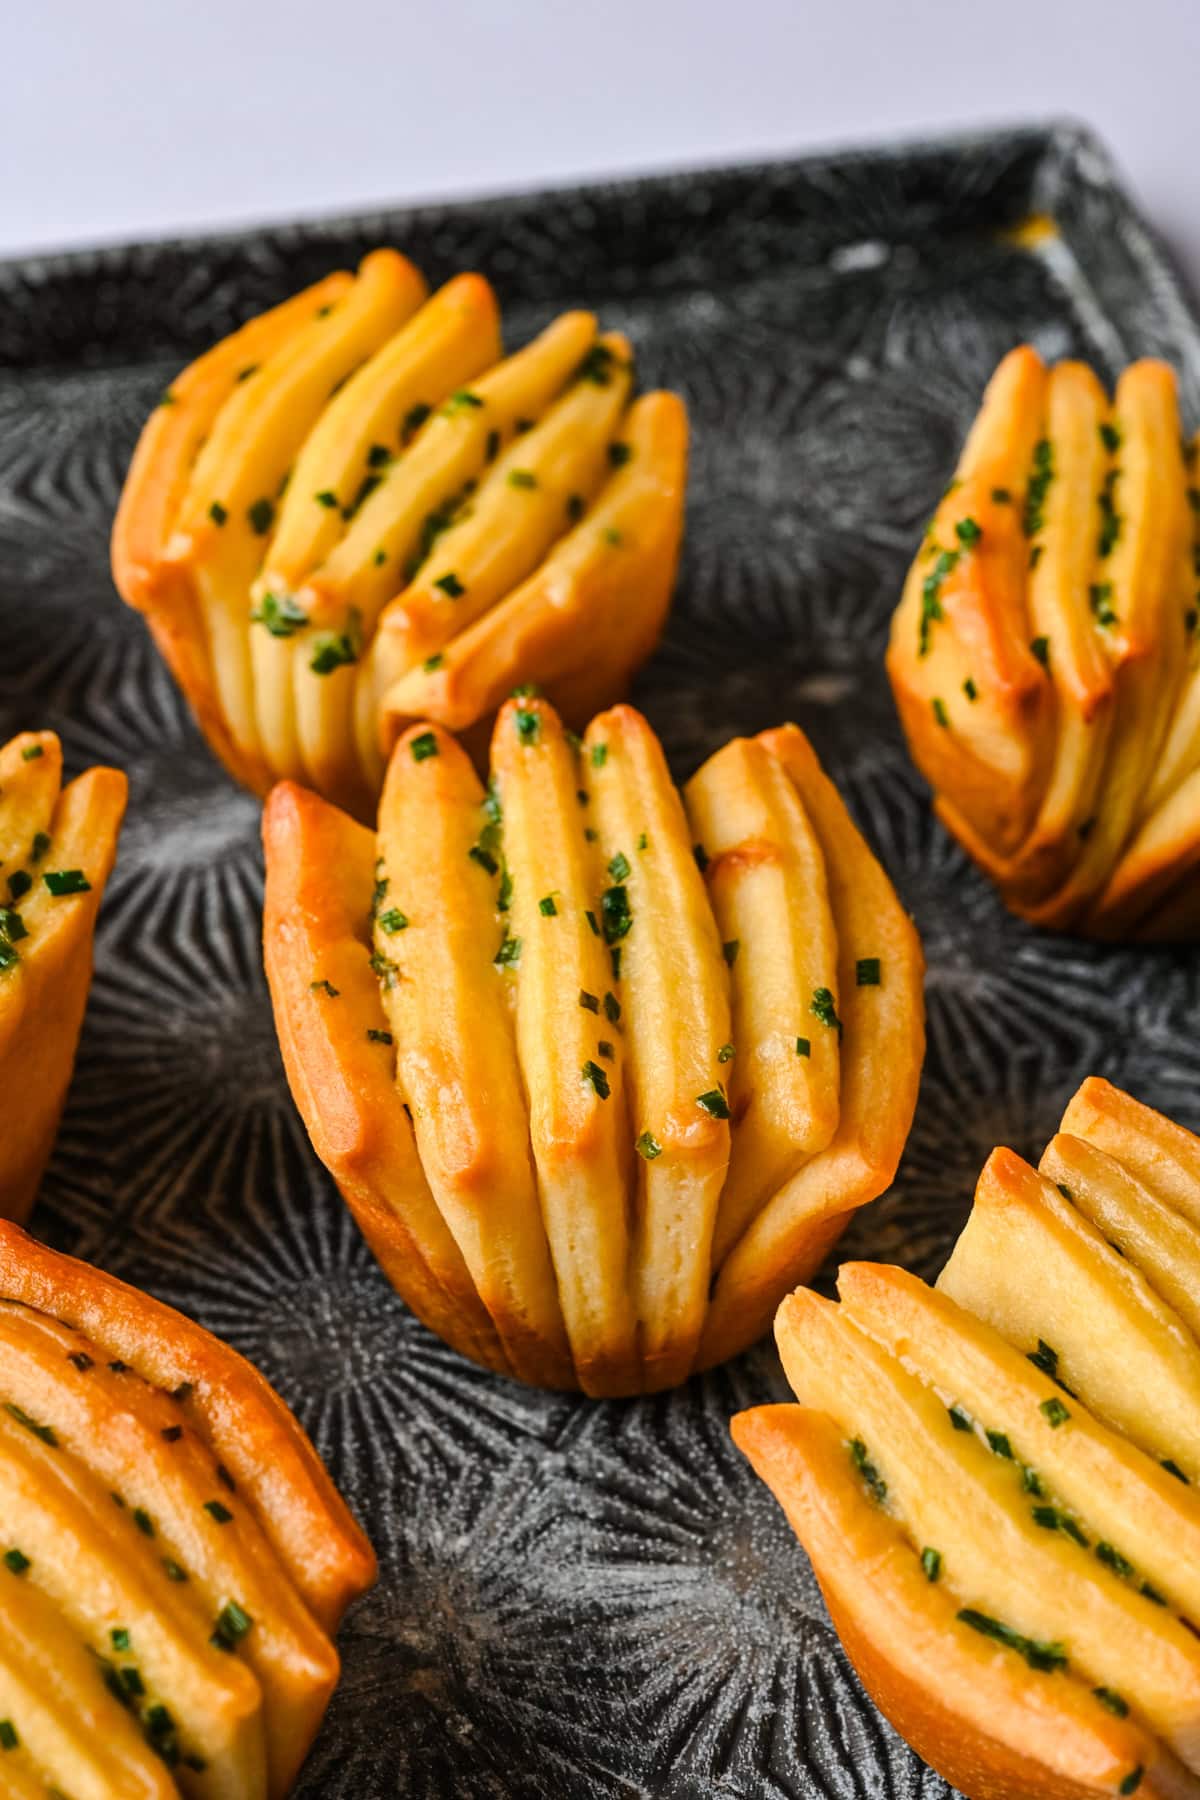
These buttery, garlicky herb fan rolls are super soft, flaky and absolutely delicious! The pull-apart layers capture so much flavor in every bite. Give these a try as a side dish for the holidays, or any special occasion.
Disclosure: Some of the links below are affiliate links. Read our full affiliate disclosure here.
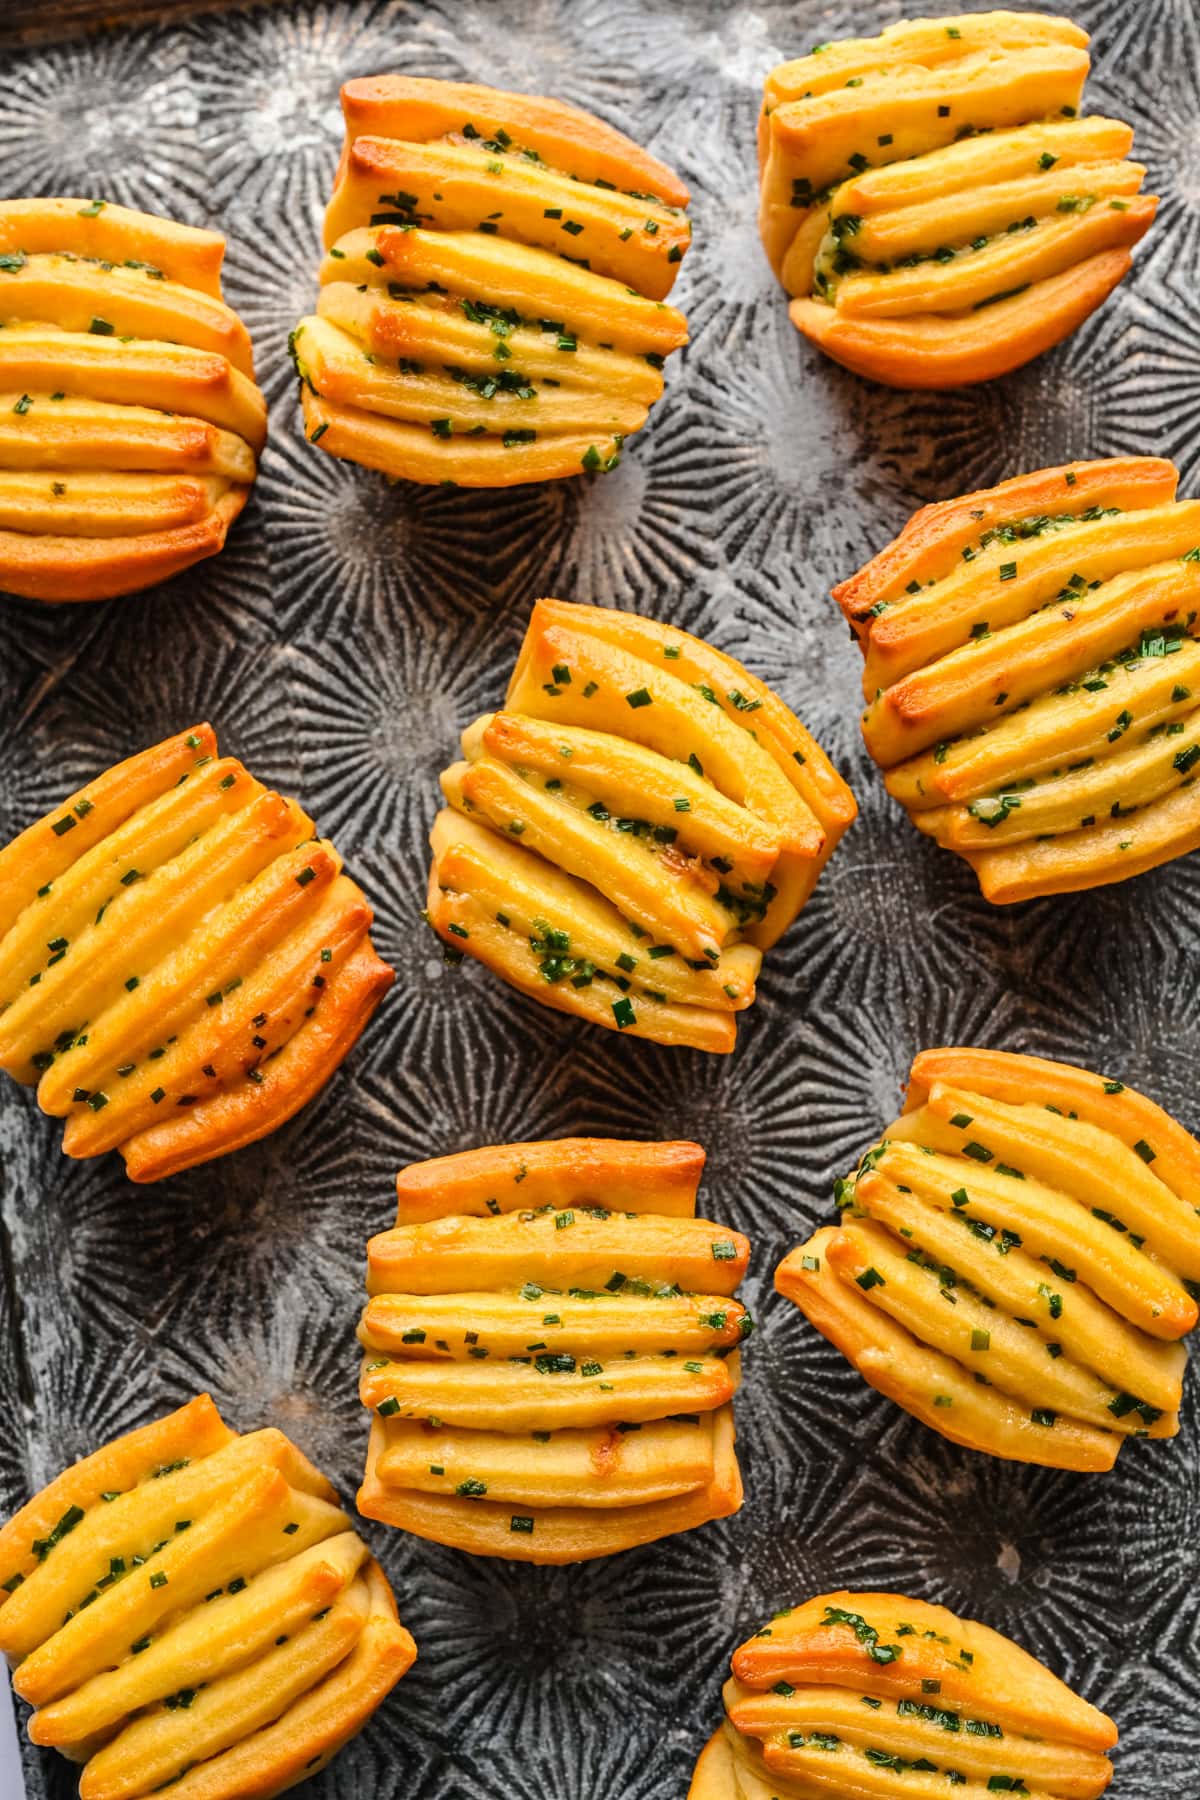
These garlic herb fan rolls are definitely a special occasion recipe, but they're absolutely fantastic. We spread roasted garlic and chive butter between each flaky layer of the roll, you can pull apart the layers and get so much flavor in every bite.
These are fairly time consuming, but most of the time is completely hands off. You just have to let the rolls rise twice, which is why the recipe takes so long! That said, these are 100% worth the effort.
Give these a try for Thanksgiving or Christmas! They're sure to be a hit.
Jump to:
Garlic Herb Fan Roll Ingredients
For the rolls
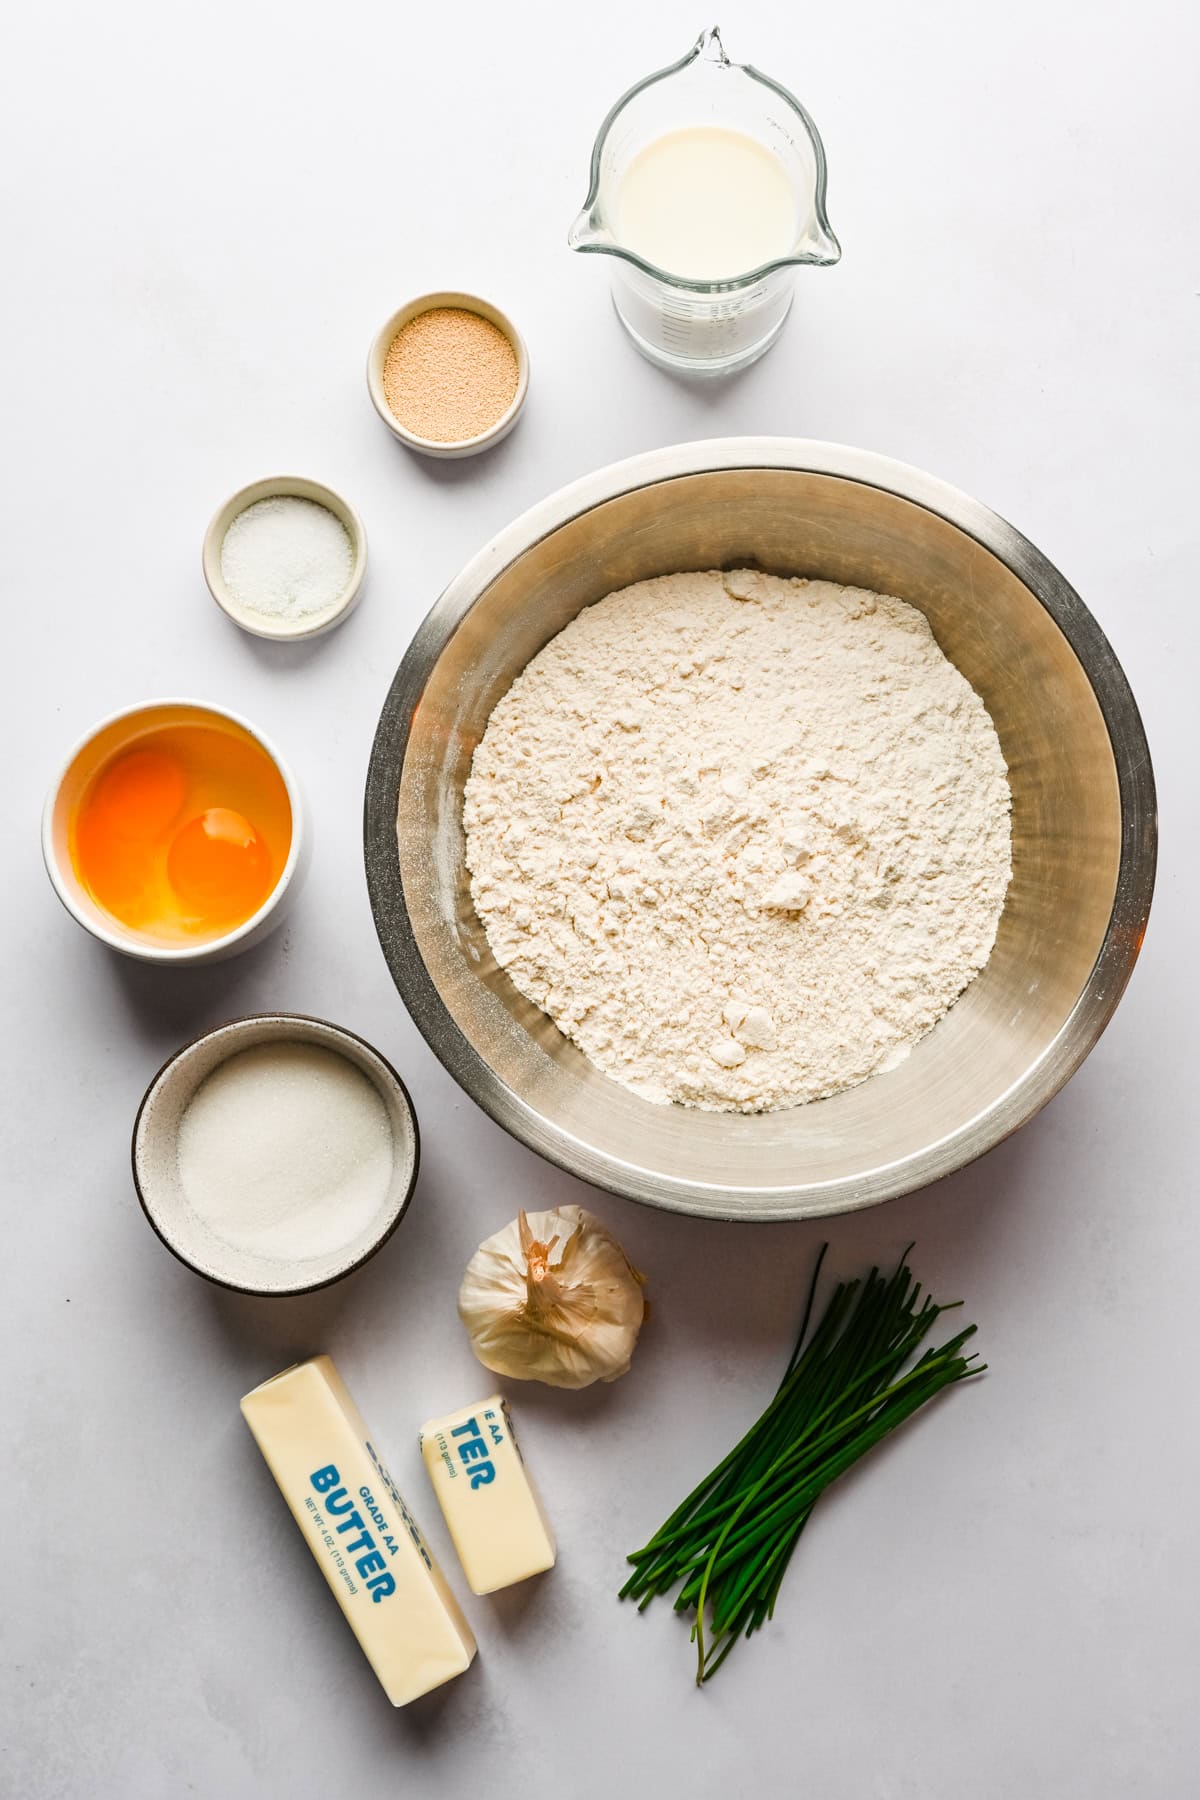
- Milk: Whole milk is best in this recipe. Make sure it's heated to 110-115˚F before adding in the yeast.
- Sugar: Helps activate the yeast and flavors the dough.
- Yeast: This recipe calls for instant yeast, but you can also use active dry yeast.
- Butter: Unsalted is best.
- Eggs: You'll need one whole egg and one egg yolk.
- Flour: We use all purpose flour in this recipe.
- Salt: We use kosher salt – you need quite a bit to make sure your rolls have a lot of flavor. If you're using table salt or fine sea salt, you may want to use a bit less.
For the garlic herb butter
- Butter: Salted or unsalted works here.
- Garlic: We roast an entire head of garlic for this recipe.
- Herbs: We use chives, but feel free to use a mixture of herbs or another herb, like parsley, rosemary or thyme.
How to Make this Garlic Herb Fan Rolls Recipe
PREP: Preheat oven to 400˚F.
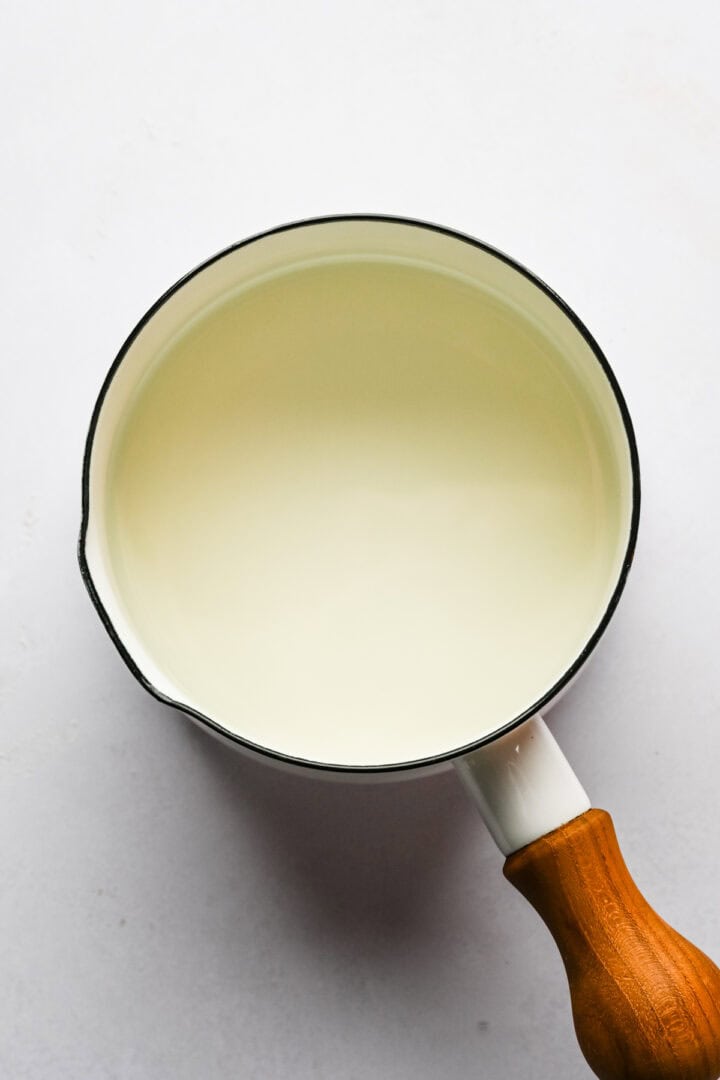
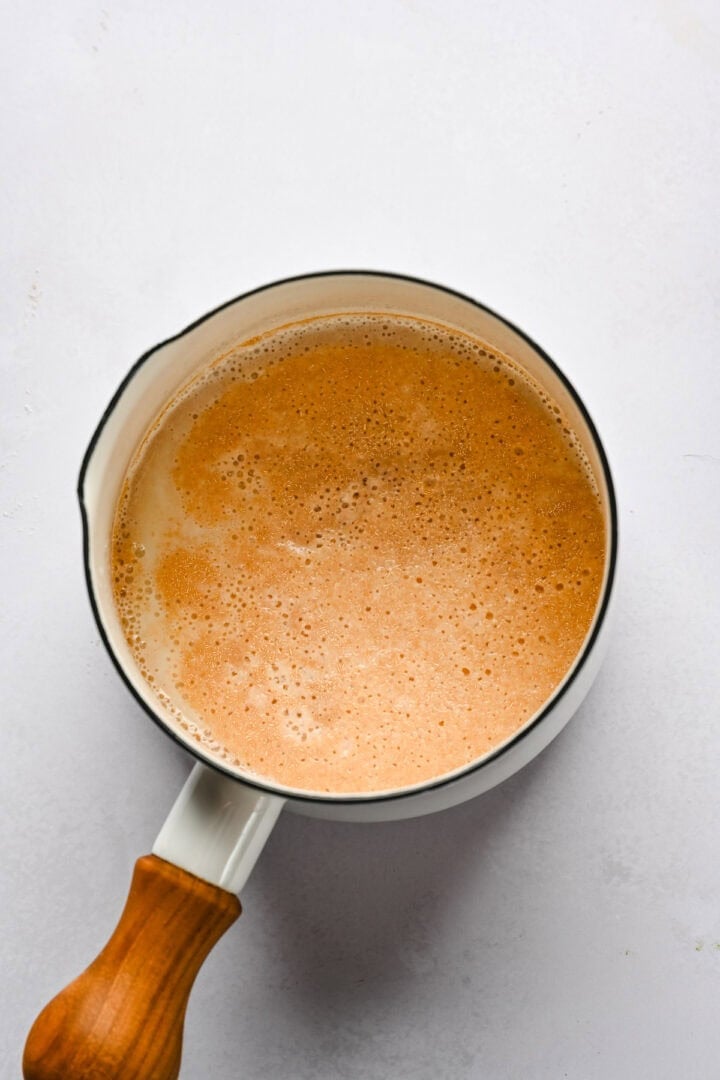
STEP 1: In a small saucepan, heat milk and sugar to 110-115˚F. Make sure it's not hotter than 120˚F, then sprinkle the yeast over the top and let sit for about 10 minutes, until the yeast is foamy.
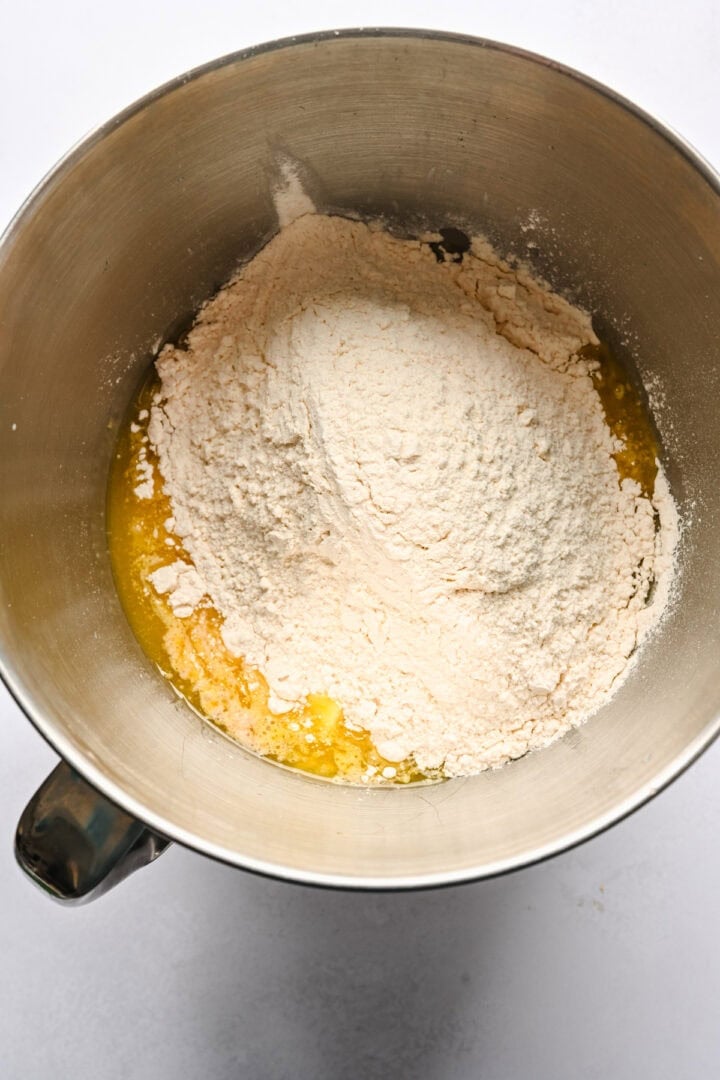
STEP 2: Add the eggs and melted butter to the bowl of a stand mixer and whisk for a few seconds. Add in the milk/yeast mixture, the salt and the flour.
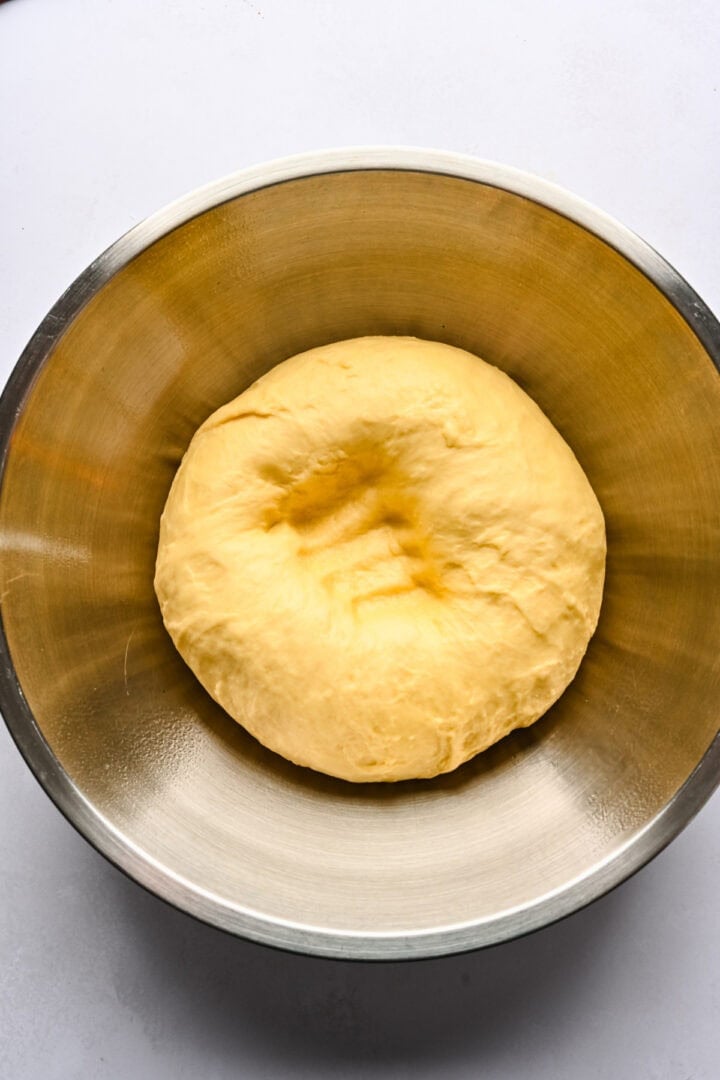
STEP 3: Mix together with a spatula until it forms a shaggy dough, then use the dough hook and turn your mixer to medium-high speed. Knead for about 5 minutes, until the dough is mostly smooth and bounces back when you press on it.
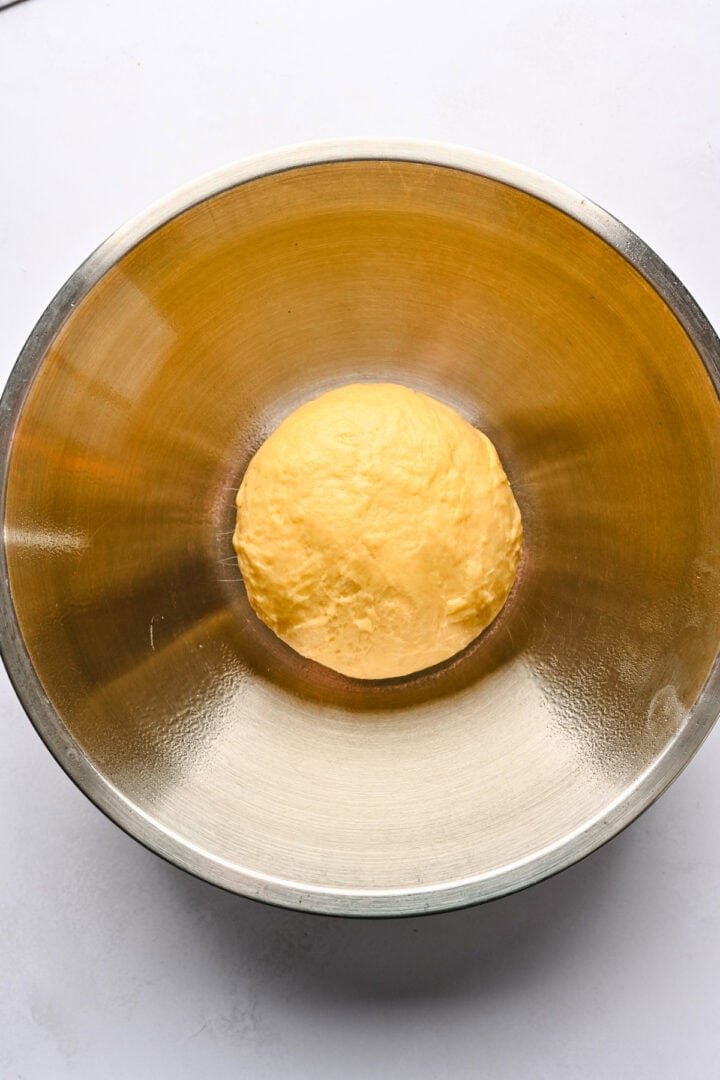
Shape the dough into a ball, place in a greased bowl, cover and let rise in a warm place for 90 minutes, until the dough is doubled in size.
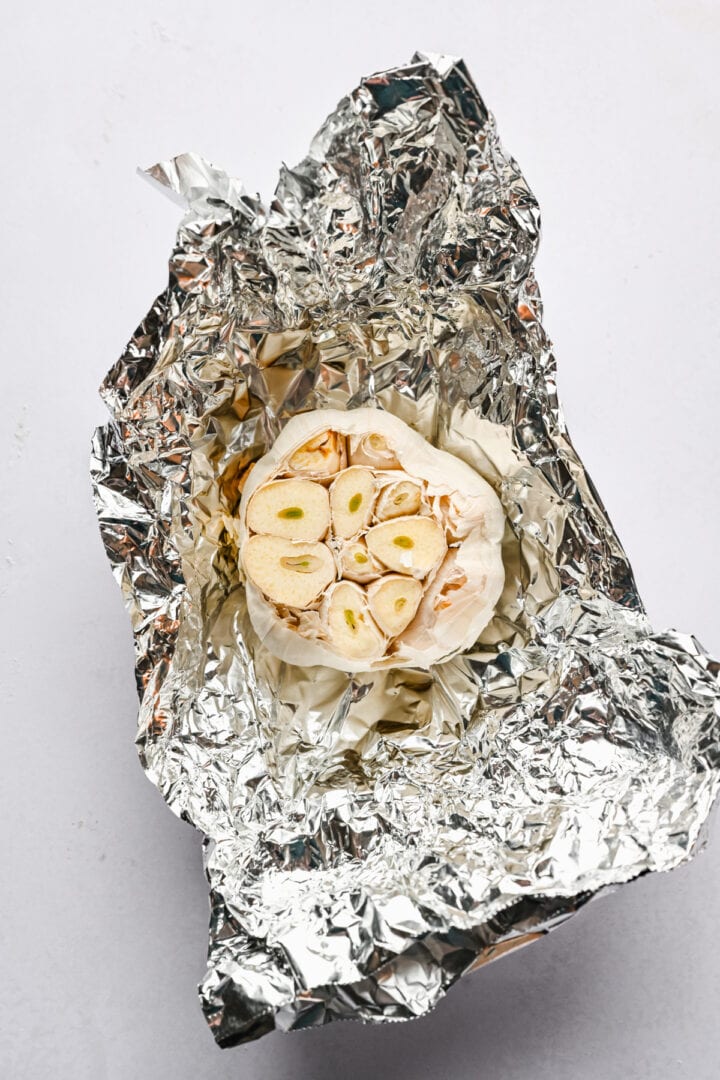
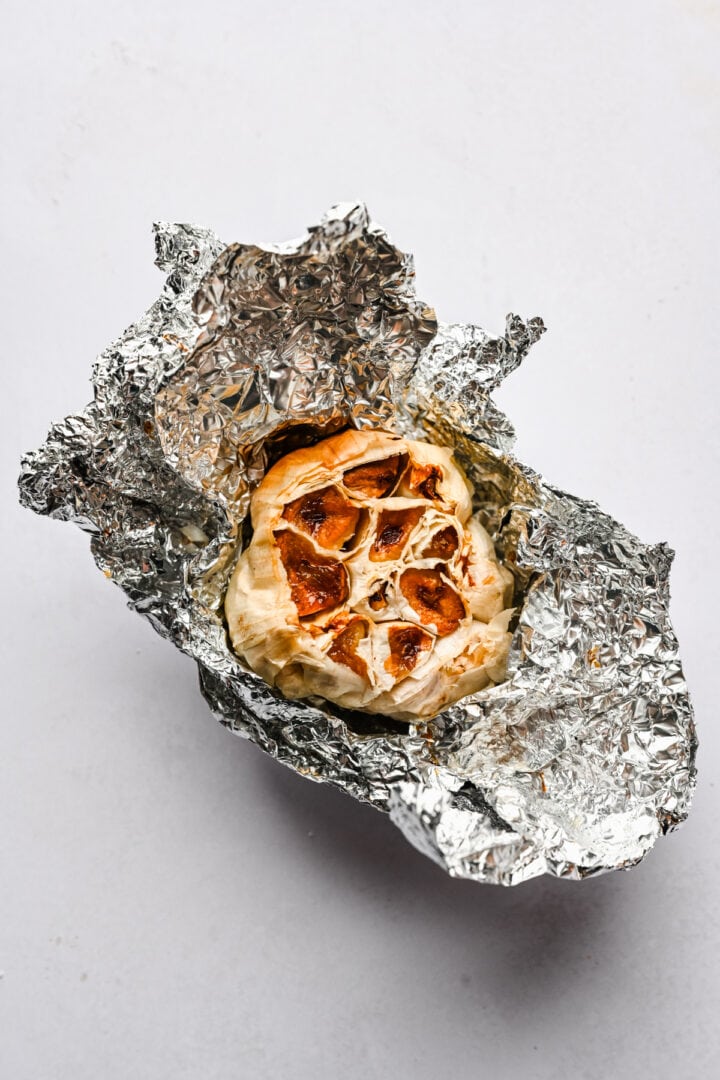
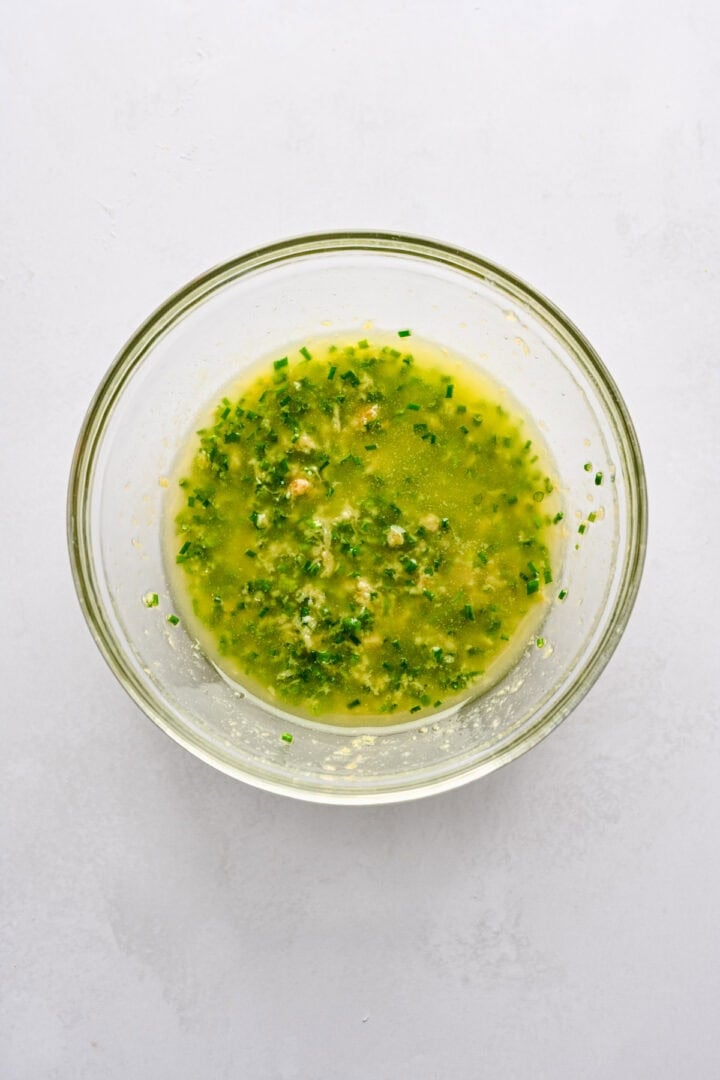
STEP 4: Meanwhile, slice the top off your head of garlic to expose the cloves and wrap tightly in aluminum foil. Roast the garlic for one hour, until the cloves are golden brown and very soft. When the garlic is done roasting, let cool slightly, then squeeze all of the garlic out of the cloves into a bowl and mash with a fork.
In a bowl, whisk together the melted butter, roasted garlic and chives and set aside.
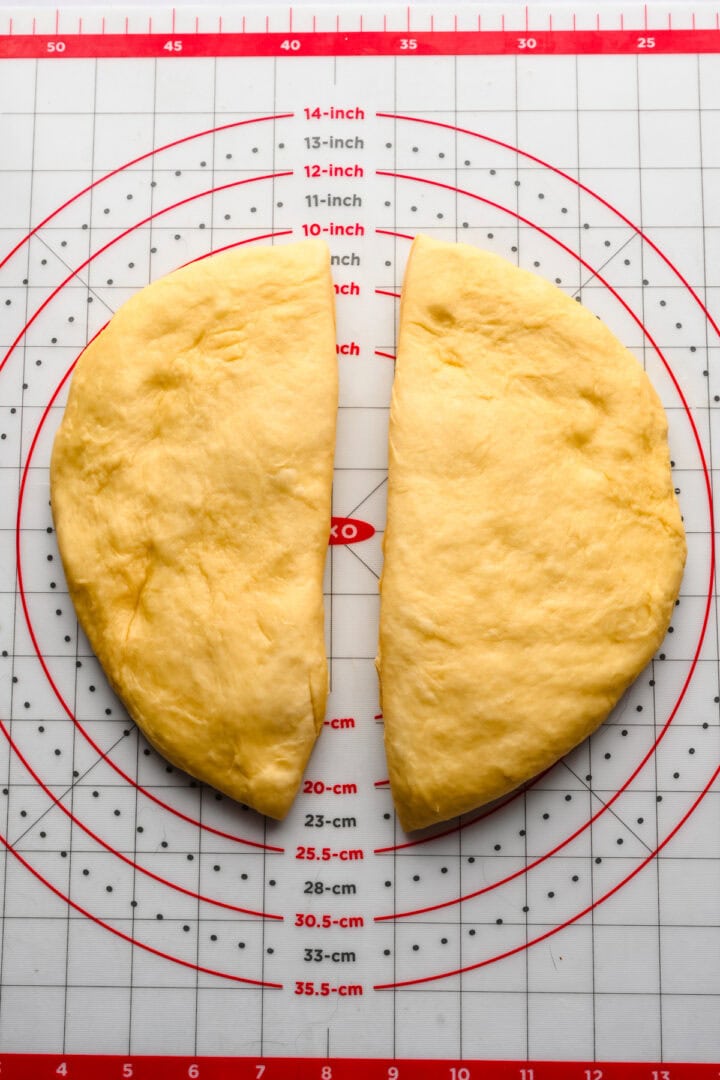
STEP 5: Remove the dough from the bowl and punch it down. Divide the dough into 2 equal-sized pieces.
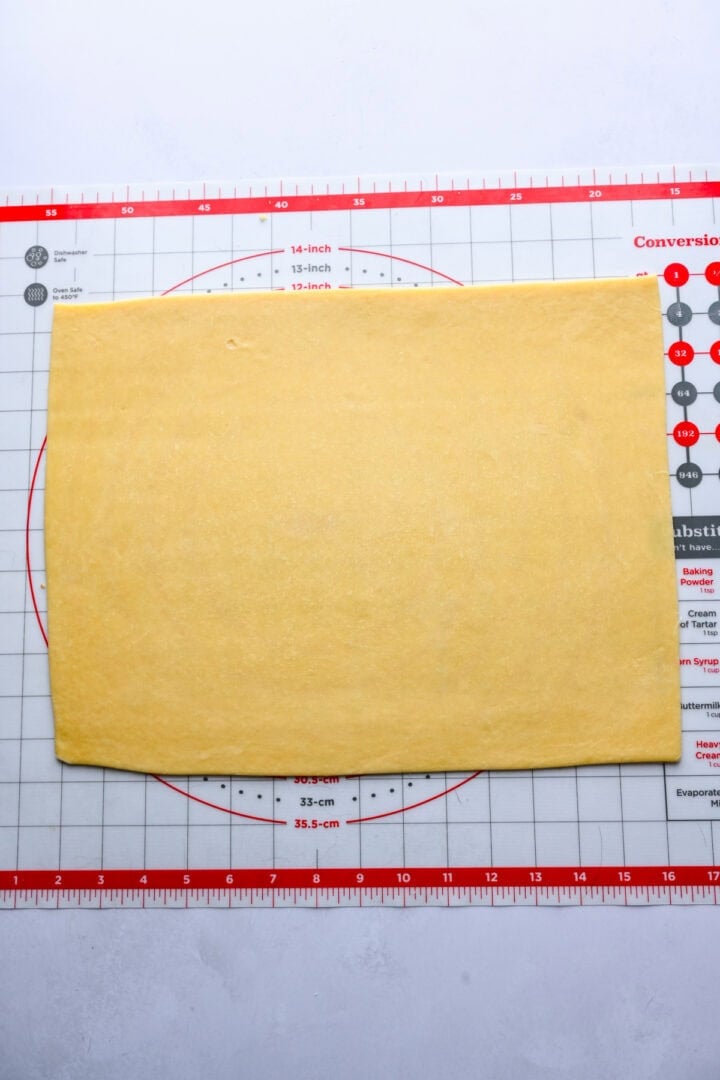
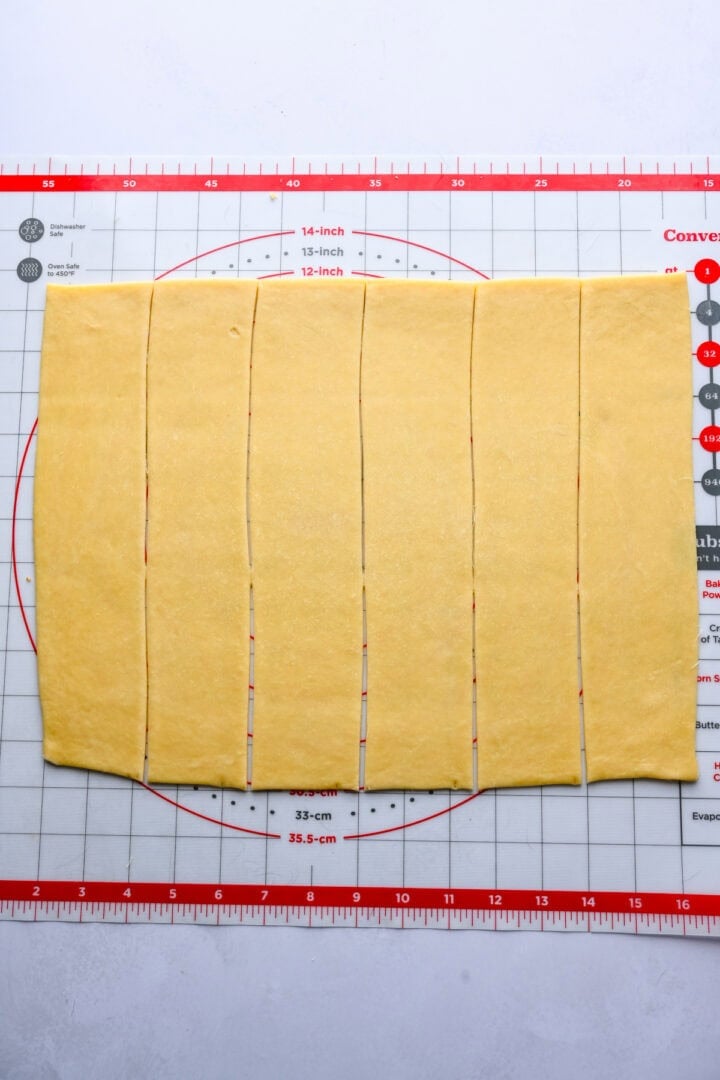
Roll out half of the dough into a rectangle about 16 x 13 inches. Trim the edges of the dough into perfectly straight lines to form a 15 x 12 inch rectangle.
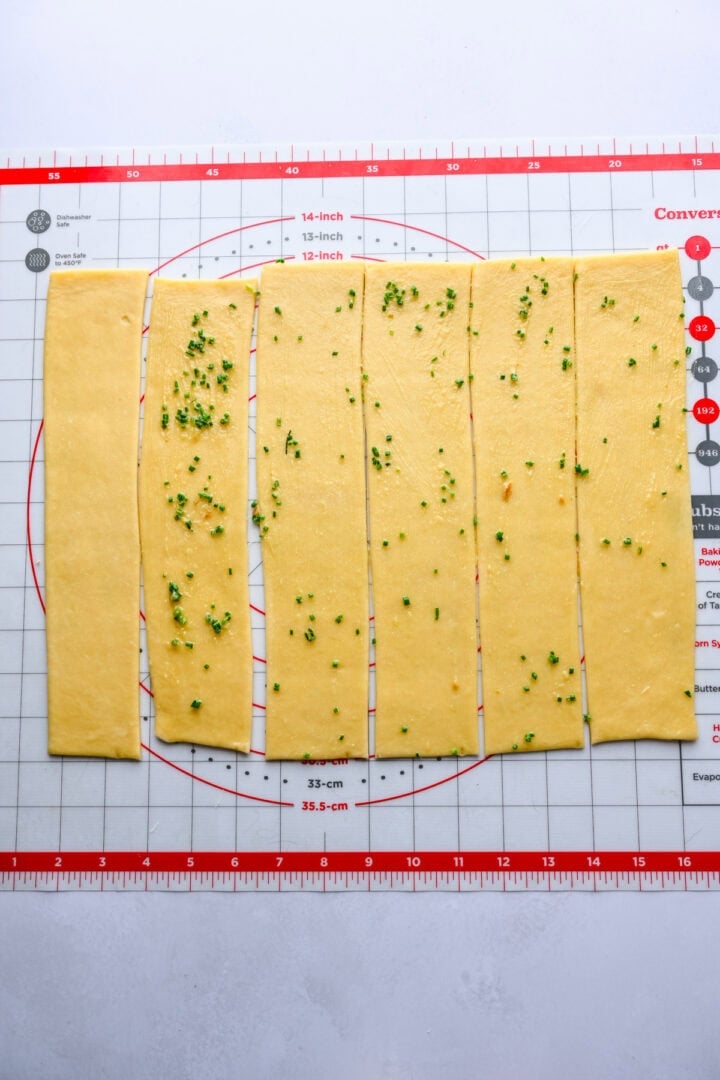
STEP 6: Cut the dough into 6 2.5-inch strips (cut on the long, 15" side) using a pizza cutter or knife. Leave one strip of dough untouched, then brush the other 5 strips with the garlic butter. You don't need much – just enough to coat the strip of dough in a thin layer all the way to the edges.
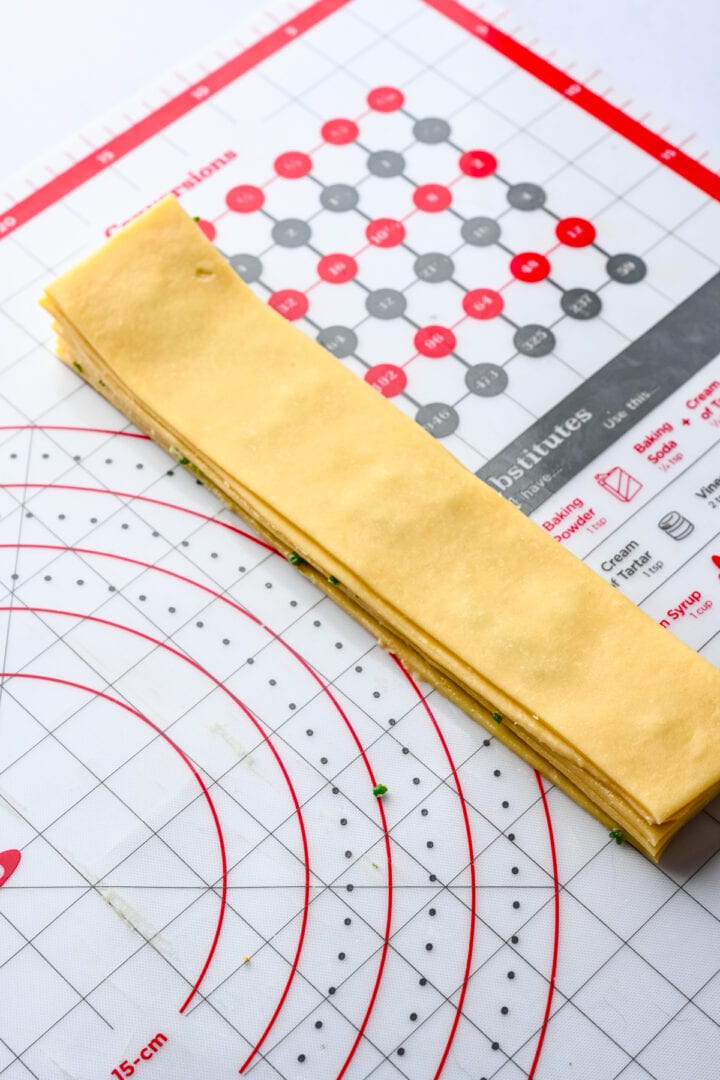
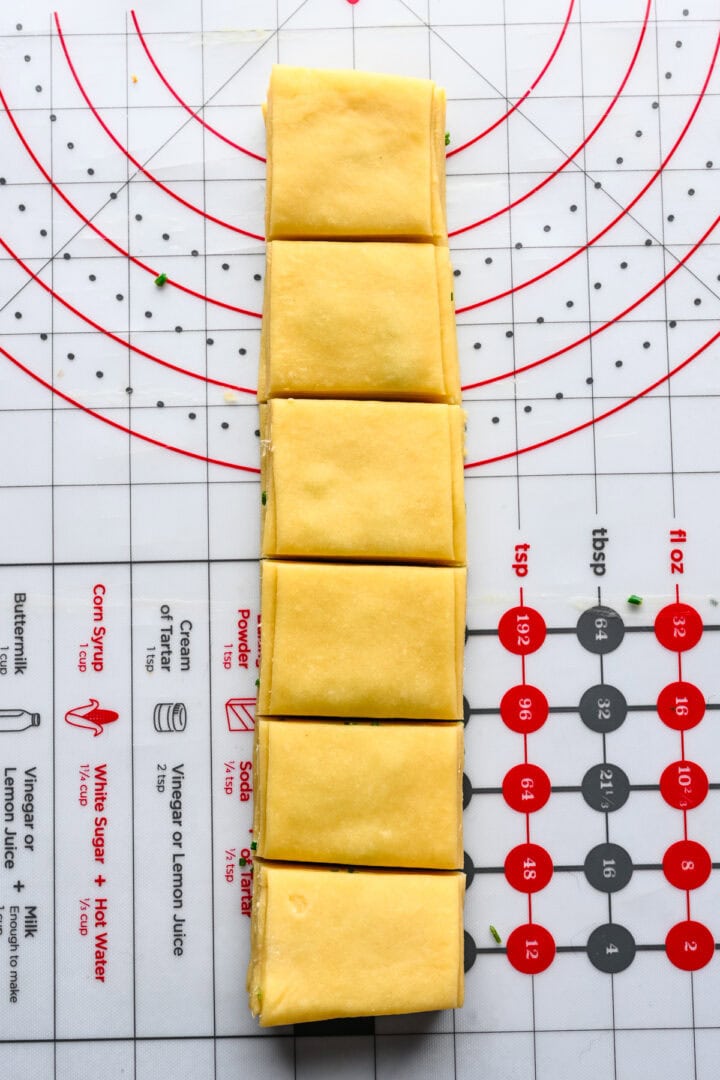
Stack the strips of dough, placing the plain strip on top. Cut into 2-inch rectangles with a sharp knife. Make sure to cut straight through the dough so you don't compress the layers. Repeat with the other half of the dough to make 12 total rolls.
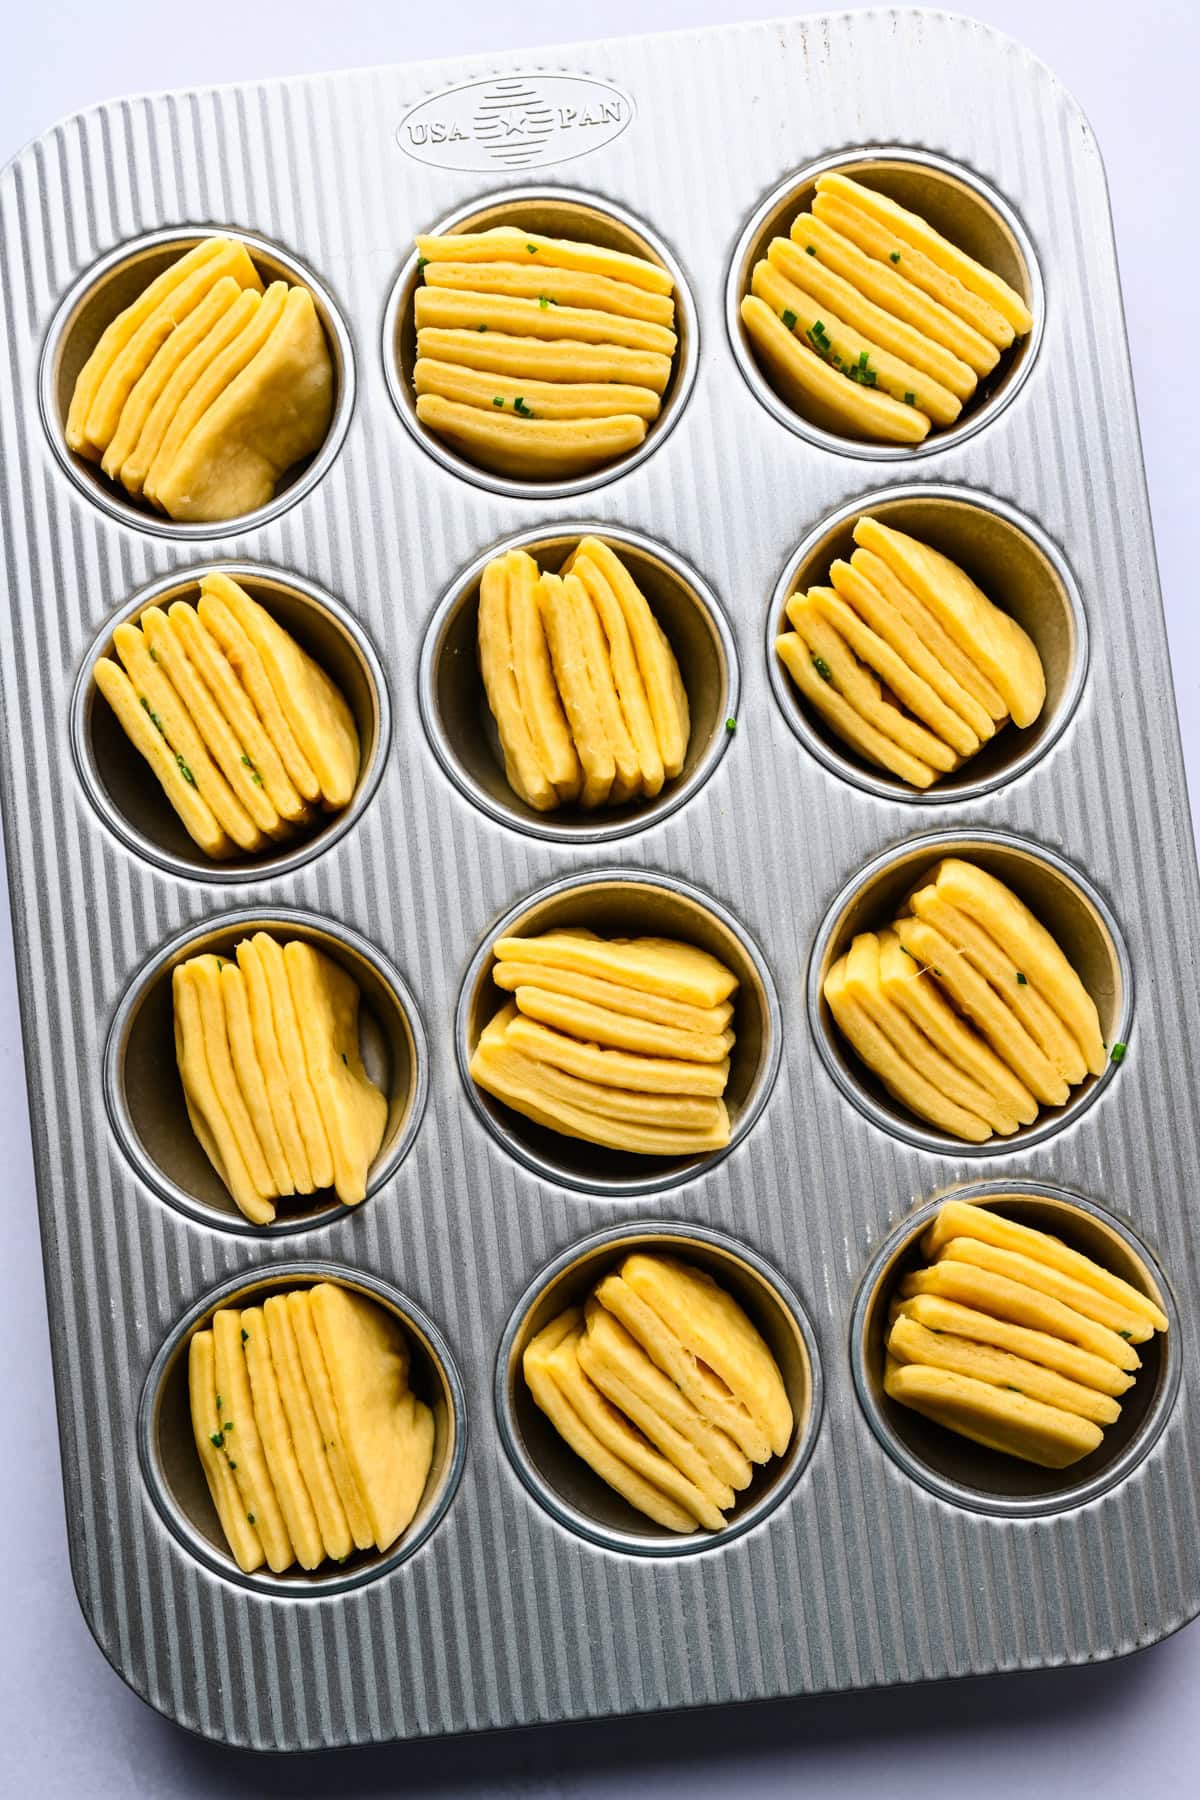
STEP 7: Place each fan roll in a greased muffin tin, cut side facing up. Cover and let rise in a warm place for 60-90 minutes. Meanwhile, preheat oven to 350˚F.
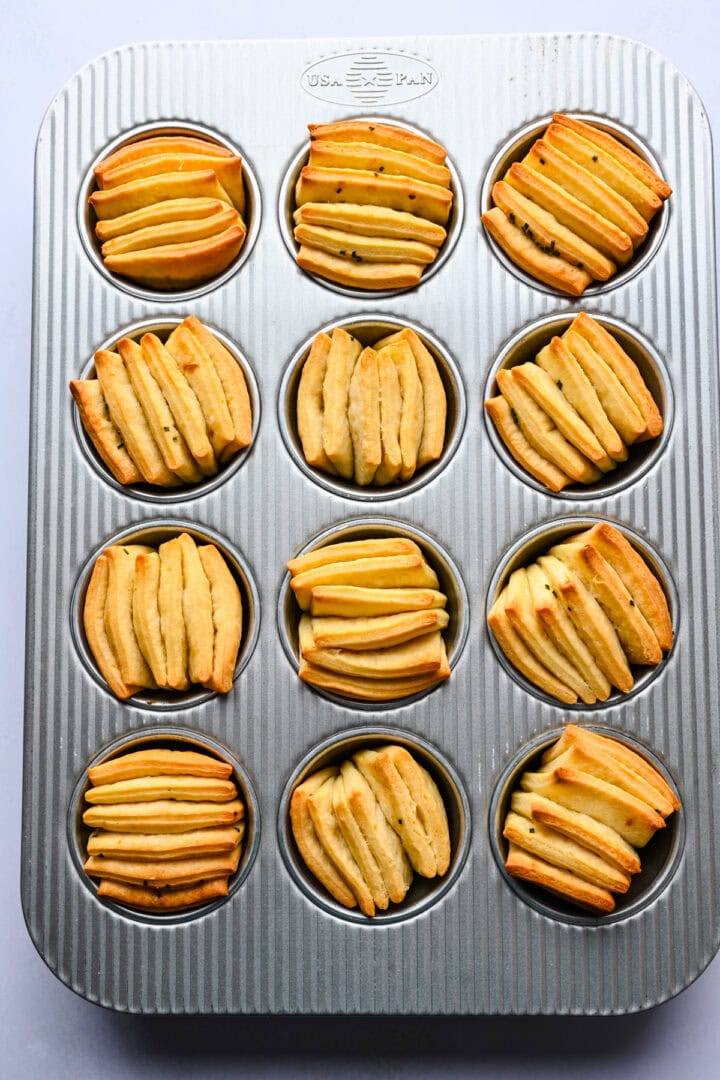
STEP 8: Once the rolls are done rising, transfer to the oven and bake for 16-18 minutes, until they start to turn golden brown on top. As soon as the rolls come out of the oven, brush with more garlic chive butter (you will have to melt the butter again in the microwave before doing this). Let cool slightly, then enjoy!
What to Serve with Garlic Herb Fan Rolls
Serve these garlic herb fan rolls along other hearty side dishes like:
- Crispy Roast Potatoes
- Shaved Brussels Sprout Salad with Candied Pecans
- Roasted Carrots with Green Goddess Feta Dip
- Onion Tarte Tatin
- Burrata, Prosciutto and Red Wine Poached Pear Salad
Equipment
A silicone pastry mat with a grid is tremendously helpful for making these fan rolls. It's the perfect surface for rolling out the dough, and you can use the measurements on the mat to ensure you're rolling and cutting everything to the proper size. We use it all the time for our baking recipes!
A thermometer will help you ensure that your milk mixture isn't too hot or cold, both of which can affect the yeast.
These nonstick muffin tins are the best we've ever used! We still grease the tins just so be safe, but we've never had any issues with sticking.
Storage
Let the fan rolls cool completely, then store in an airtight container at room temperature for 2 days. For longer storage, keep them in the refrigerator for 5 days.
You can also store these in the freezer for about a month. To reheat frozen rolls, place the rolls in a 300˚F oven for about 20 minutes, until warmed through.
Tips and FAQ
Top tip
Be patient when rolling and cutting the dough. The key to making these fan rolls correctly is getting all of the measurements right!
More tips
- Make ahead: Follow the steps of this recipe up through step 11, when you cut the stacked rolls. Place in a greased muffin tin, cover, and refrigerate overnight. In the morning, take the rolls out of the oven and bring to room temperature, then let them rise for an hour in a warm place before baking.
- Don't use flour when rolling out the dough. There's enough butter in this dough that it shouldn't stick to whatever surface you're rolling it out on. (For best results, we suggest using silpat.) If you end up with flour on one side of the dough, the strips of dough will not adhere together properly.
- If your rolls start browning prematurely in the oven, cover the top with aluminum foil about halfway through baking.
- Use a sharp knife to cut the rolls once they are stacked. If your knife is too dull, it may compress the layers, and they won't fan out properly when baking.
More side dish recipes
Looking for other recipes like this? Try these:


Tried this recipe?
Please leave a star ⭐️⭐️⭐️⭐️⭐️ rating below and/or a review in the comments section further down the page. You can also stay in touch with us through social media by following us on Instagram, Pinterest, TikTok, Facebook or by subscribing to our newsletter.
📖 Recipe

Garlic Herb Fan Rolls
- Total Time: 0 hours
- Yield: 12 rolls 1x
- Diet: Vegetarian
Description
These buttery, garlicky herb fan rolls are super soft, flaky and absolutely delicious! The pull-apart layers capture so much flavor in every bite. Give these a try as a side dish for the holidays, or any special occasion.
Ingredients
Fan Rolls:
- ¾ cup whole milk
- ½ cup granulated sugar
- 1 envelope (7 grams) instant yeast
- 1 whole egg + 1 egg yolk
- 8 tablespoons unsalted butter, melted and slightly cooled
- 3 ½ cups all purpose flour
- 2 teaspoons kosher salt
Garlic Herb Butter:
- 1 head of garlic
- 2 tablespoons finely chopped chives
- 4 tablespoons unsalted butter, melted
Instructions
- Preheat oven to 400˚F.
- In a small saucepan, heat milk and sugar to 110-115˚F. Make sure it's not hotter than 120˚F, then sprinkle the yeast over the top and let sit for about 10 minutes, until the yeast is foamy.
- Add the eggs and melted butter to the bowl of a stand mixer and whisk for a few seconds. Add in the milk/yeast mixture, the salt and the flour.
- Mix together with a spatula until it forms a shaggy dough, then use the dough hook and turn your mixer to medium-high speed. Knead for about 5 minutes, until the dough is mostly smooth and bounces back when you press on it.
- Shape the dough into a ball, place in a greased bowl, cover and let rise in a warm place for 90 minutes, until the dough is doubled in size.
- Meanwhile, slice the top off your head of garlic to expose the cloves and wrap tightly in aluminum foil. Roast the garlic for one hour, until the cloves are golden brown and very soft. When the garlic is done roasting, let cool slightly, then squeeze all of the garlic out of the cloves into a bowl and mash with a fork.
- In a bowl, whisk together the melted butter, roasted garlic and chives and set aside.
- Remove the dough from the bowl and punch it down. Divide the dough into 2 equal-sized pieces.
- Roll out half of the dough into a rectangle about 16 x 13 inches. Trim the edges of the dough into perfectly straight lines to form a 15 x 12 inch rectangle.
- Cut the dough into 6 2.5-inch strips (cut on the long, 15" side) using a pizza cutter or knife. Leave one strip of dough untouched, then brush the other 5 strips with the garlic butter. You don't need much – just enough to coat the strip of dough in a thin layer all the way to the edges.
- Stack the strips of dough, placing the plain strip on top. Cut into 2-inch rectangles with a sharp knife. Make sure to cut straight through the dough so you don't compress the layers. Repeat with the other half of the dough to make 12 total rolls.
- Place each fan roll in a greased muffin tin, cut side facing up. Cover and let rise in a warm place for 1 hour-90 minutes.
- Meanwhile, preheat oven to 350˚F.
- Once the rolls are done rising, transfer to the oven and bake for 16-18 minutes, until they start to turn golden brown on top. As soon as the rolls come out of the oven, brush with more garlic chive butter (you will have to melt the butter again in the microwave before doing this). Let cool slightly, then enjoy!
Notes
Make ahead: Follow the steps of this recipe up through step 11, when you cut the stacked rolls. Place in a greased muffin tin, cover, and refrigerate overnight. In the morning, take the rolls out of the oven and bring to room temperature, then let them rise for an hour-90 minutes in a warm place before baking.
Don't use flour when rolling out the dough. There's enough butter in this dough that it shouldn't stick to whatever surface you're rolling it out on. (For best results, we suggest using silpat.) If you end up with flour on one side of the dough, the strips of dough will not adhere together properly.
If your rolls start browning prematurely in the oven, cover the top with aluminum foil about halfway through baking.
Storage: Let the fan rolls cool completely, then store in an airtight container at room temperature for 2 days. For longer storage, keep them in the refrigerator for 5 days.
You can also store these in the freezer for about a month. To reheat frozen rolls, place the rolls in a 300˚F oven for about 20 minutes, until warmed through.
- Prep Time: 30 minutes
- Rising Time: 2 ½ hours
- Cook Time: 15 minutes
- Category: Side Dishes
- Method: Oven
- Cuisine: American
Nutrition
- Serving Size: 1 roll
- Calories: 284
- Sugar: 9.3 g
- Sodium: 222.1 mg
- Fat: 12.3 g
- Carbohydrates: 38.1 g
- Fiber: 1.2 g
- Protein: 5.3 g
annikins says
These are nice but very sweet for garlic buns , I would cut the sugar by at least half. Mine did not rise very well either, I may have had some dodgy yeast but it was a new bottle.
I will try them again with the adjusted sugar content because they are tasty .