
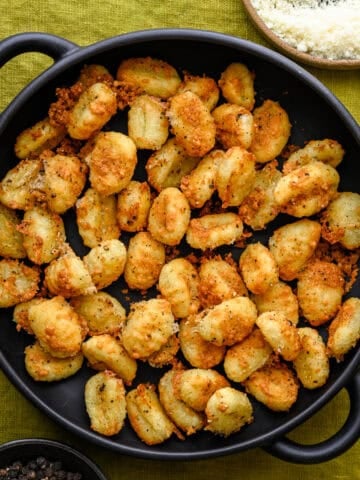
These Cheddar Gougères are essentially French cheese puffs made with choux pastry, and they're absolutely delicious! Crisp on the outside, light, puffed and airy on the inside and perfectly cheesy, these are a lovely appetizer to enjoy with wine or cocktails.

Gougères (pronounced goo-zhehr) may look (and sound) fancy, but once you get the process down, they're surprisingly easy. They make for a delightful and sophisticated finger food – especially perfect for a holiday appetizer!
They can be enjoyed plain, but since they are hollow, they can also stuffed with filling or cut in half and served mini sandwich-style. You can also freeze them before baking and bake just before serving, so they're a great make-ahead recipe!
Jump to:
Why We Love This Recipe
- Make ahead recipe: You can make the dough, pipe it and freeze for up to 2 months! Simply bake the frozen puffs straight from the freezer when you're ready to serve.
- Perfect holiday appetizer: These cheddar gougères are a great finger food to add to your Thanksgiving, Christmas or New Year's spread. They can be enjoyed plain or with fillings, and it's easy to make a big batch!
- Quick and easy: You only need 8 ingredients and about 15 minutes to make the batter. As long as you closely follow the instructions (they can be temperamental if you miss just one step), these are surprisingly simple.
Ingredients
Here's what you'll need to make these cheddar gougères:
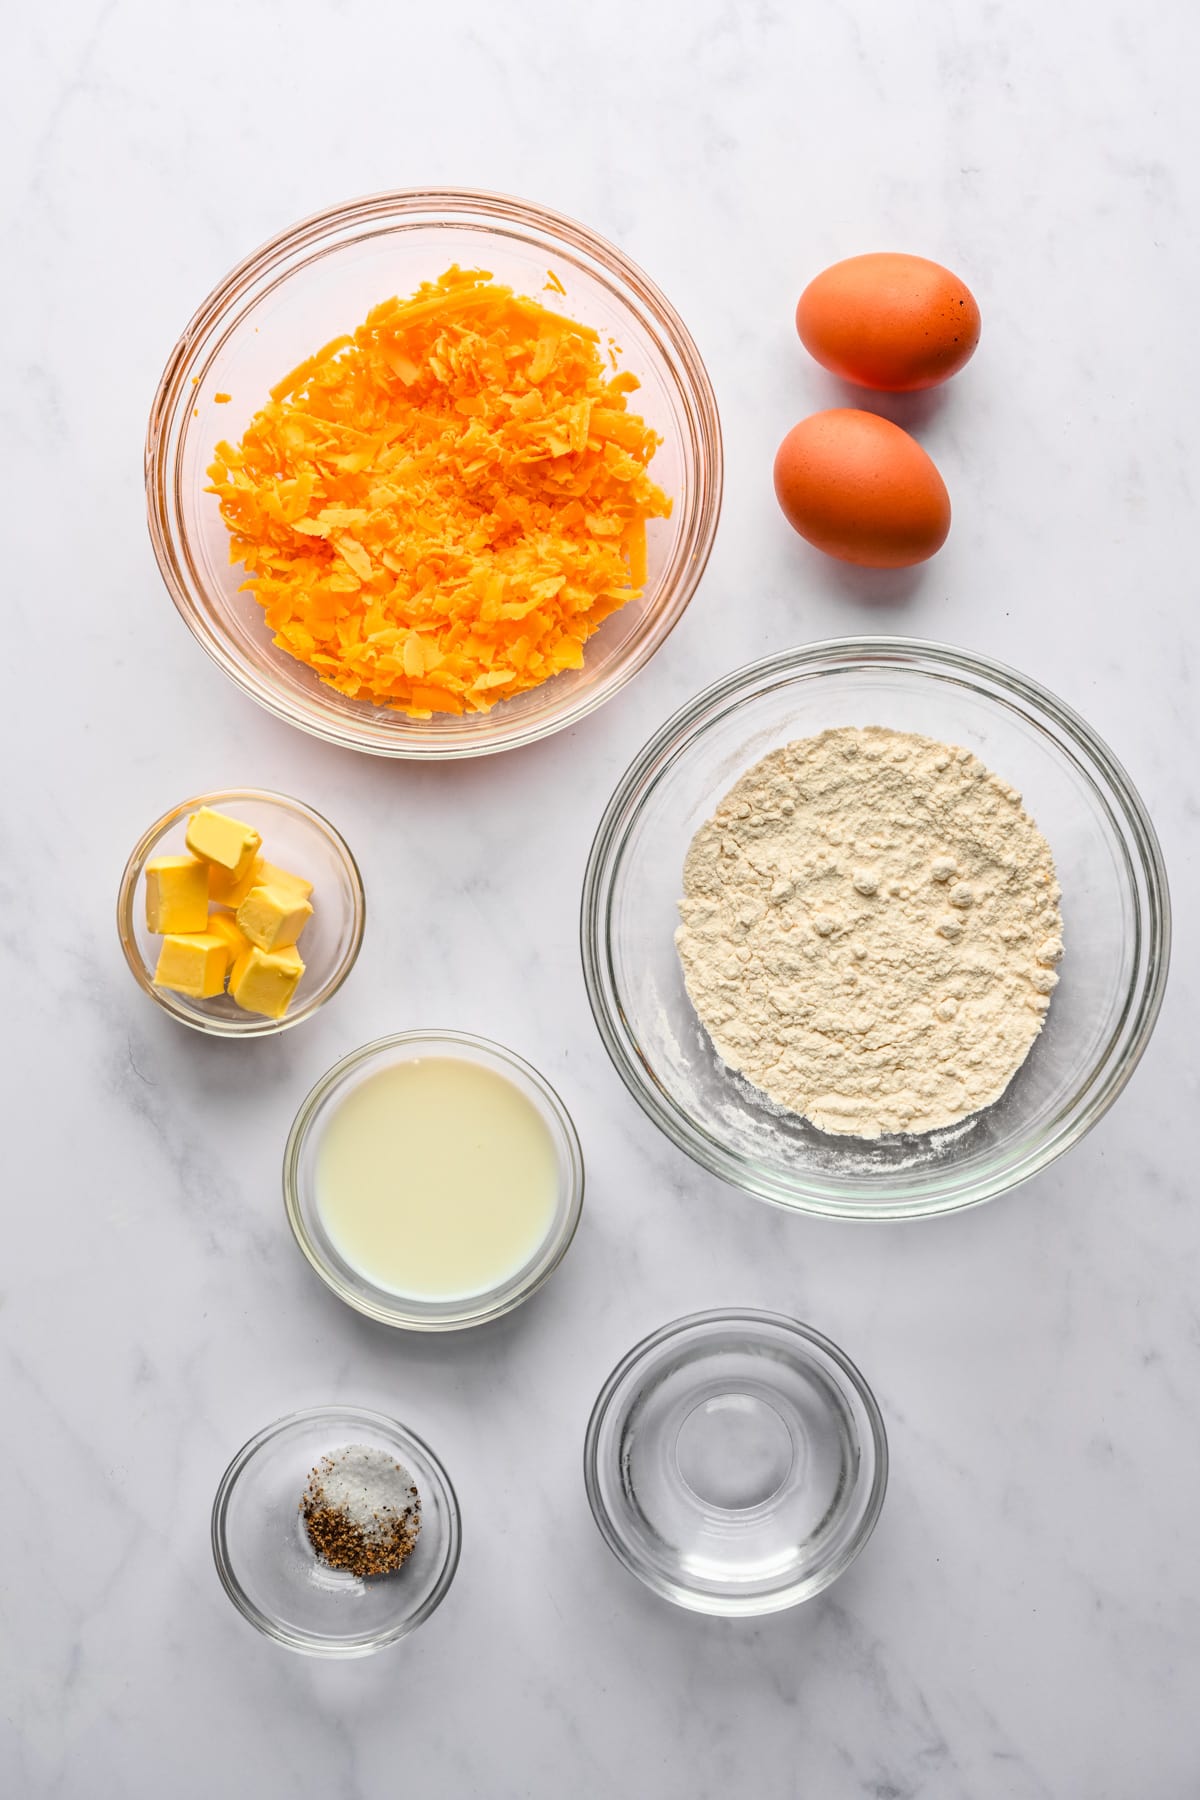
- Cheese
- Eggs
- Butter
- AP Flour
- Milk
- Water
- Salt and Pepper
Ingredient Notes
- Cheddar cheese: Gougères are traditionally made with gruyère cheese, but we love making them with extra sharp cheddar or parmesan too. You can definitely sub in gruyère or even gouda if preferred. An aged, low moisture cheese is best.
- We suggest shredding your cheddar from a block of cheese. The pre-shredded stuff is typically coated with anti-caking agents, which can prevent it from melting as well.
- Butter: Use a good quality, European-style butter. We used unsalted butter, so if you're using salted, only add ¼ teaspoon of salt instead of ½ tsp.
- Flour: Regular all purpose flour is best here. We haven't tried it, but you should also be able to use 1:1 gluten free flour.
- Eggs: We used 2 large eggs, but note that you may not end up using all of the egg, especially since many are different sizes. It's important to pay attention to the consistency of the dough before adding more egg – if you add too much, the dough will be too runny and they won't puff up.
- The eggs should be at room temperature.
- Milk: We used whole milk in this recipe.
Step-by-step Instructions
PREP: Preheat to 500˚F and line a sheet pan with parchment paper or a silicone mat.
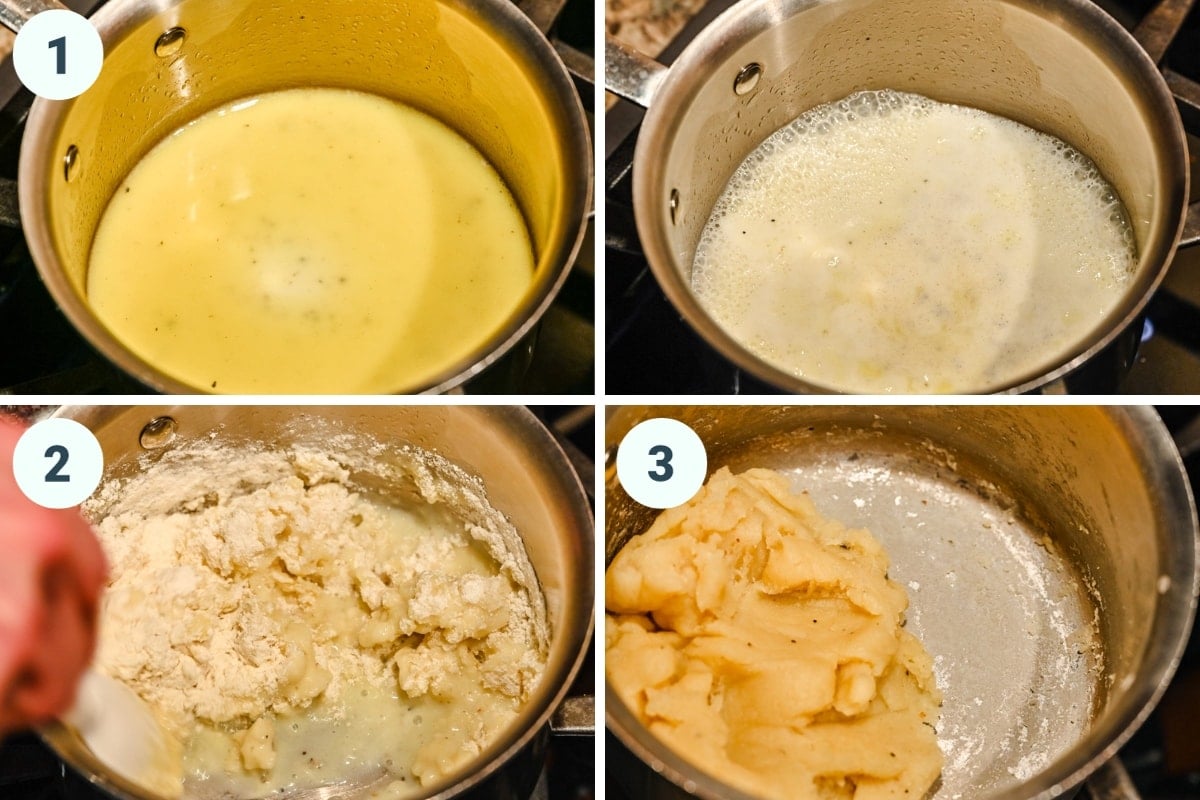
STEP 1: In a stainless steel saucepan over low heat, combine butter, water, milk, salt and pepper. Once butter is melted, bring the mixture to a boil.
STEP 2: Add in all of the flour, whisking or stirring vigorously and remove from heat right away. Continue mixing until thoroughly combined – there should be no streaks of flour.
STEP 3: Return to medium heat and cook for a few minutes, stirring often, until a thin film covers the bottom of the pan and the dough pulls away from the sides easily (see photos in post for reference). You've made what's called a panade.
STEP 4: Transfer the dough / panade to a separate mixing bowl and stir, spreading the dough up the sides of the bowl (to help steam evaporate). Keep stirring and spreading for a few minutes to cool the dough – it needs to be below 140˚F to prevent the eggs from cooking. To test if your panade is the right consistency and you can move ahead, stick a tablespoon measuring spoon into the dough – if it sticks straight up without moving, it's ready.
STEP 5: In a separate small bowl, beat the eggs with a whisk. Pour ~¾ of the egg mixture into the dough and beat with an electric mixer on low speed at first, then increase to medium speed. The mixture will separate at first but will come back together into a sticky dough.
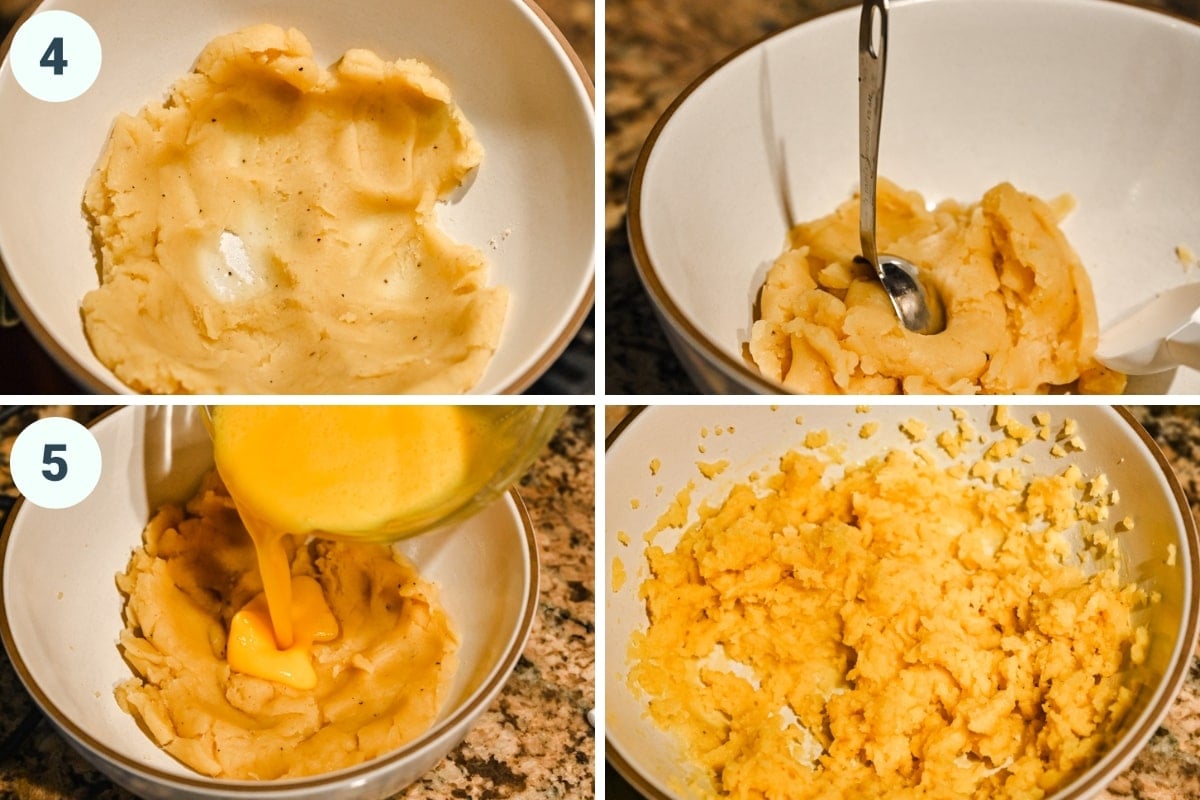
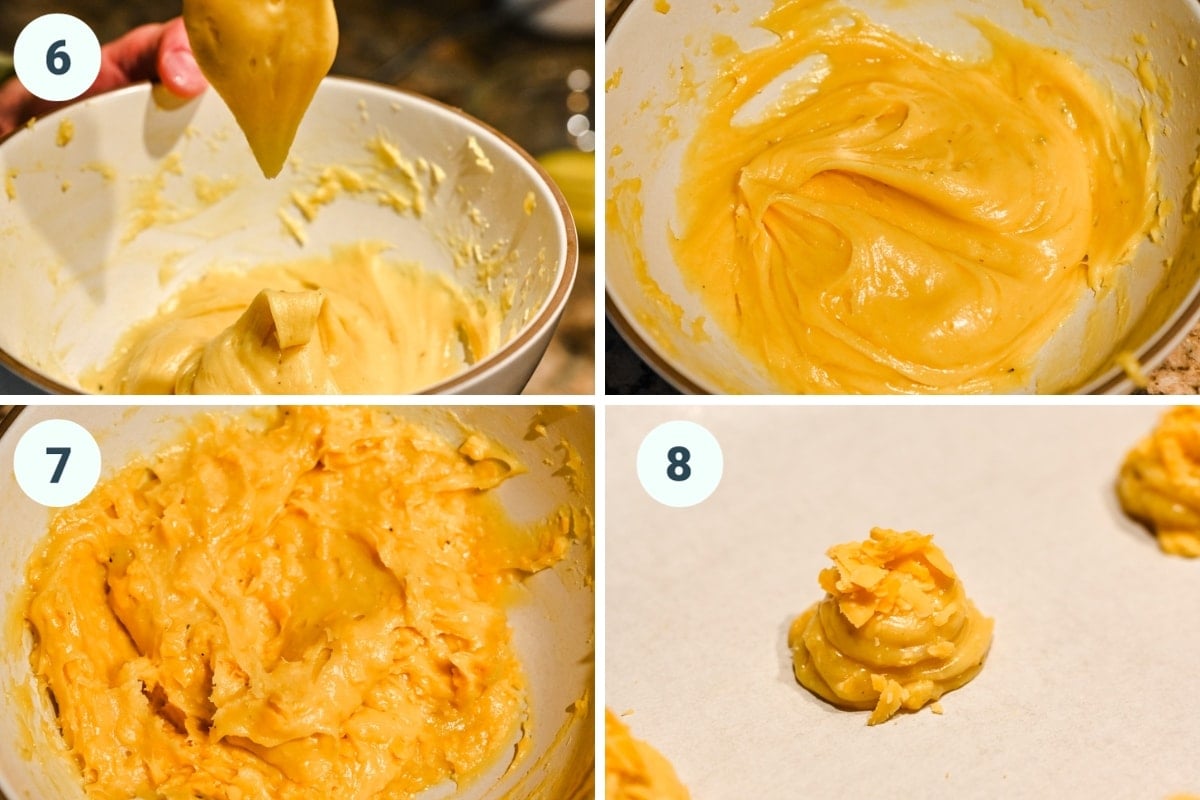
STEP 6: Keep adding additional egg until the dough is glossy but still firm enough to hold its shape if you run a finger through it. You may end up with leftover egg, or you may need a little more egg. To test if the dough is ready, get some dough on a spatula and lift it straight up. The dough should form a "v" (see photos above for reference). Congratulations, you've made pâte à choux!
STEP 7: Stir in 2.5 oz of the cheddar cheese. Transfer the dough to a piping bag with a ½-inch round tip.
STEP 8: Pipe about 1 ½ tablespoons of dough onto silpat or parchment paper, keeping the tip in the same place and keeping the bag vertical. Wet the tip of your fingers and gently flatten the tops of each puff (otherwise they will burn). Sprinkle remaining cheddar cheese on top.
STEP 9: Place in the 500˚F oven, then immediately turn the oven off*. Set a timer for 15 minutes and do NOT open the door of the oven. After 15 minutes, turn oven back on to 350˚F and bake for another 10 minutes. Optional: after 5 minutes, stab each one with a knife to create small slit - this will make them crispier on the inside by letting the steam inside escape.

Serving Suggestions
While these cheddar gougères are fantastic on their own (especially served with champagne or a cocktail), they can also be stuffed or topped with other ingredients. Here are a few suggestions:
- Fill them with a light and creamy cheese mixture, like whipped herb goat cheese. You can use a piping bag to pipe the filling directly into the hollow gougère, or you can cut it in half and add the filling to the center.
- Top/fill with a dollop of crème fraîche, smoked salmon, lemon zest and a sprinkle of herbs.
- Slice in half and serve mini sandwich-style, with fillings like prosciutto, caramelized onions, more cheese, etc.
- They also make a great addition to a cheese or charcuterie board.
FAQs
Disclosure: Some of the links below are affiliate links. This means that, at zero cost to you, I will earn an affiliate commission if you click through the link and finalize a purchase.
Yes! You can make the dough ahead of time, pipe it onto parchment paper, freeze and then transfer the unbaked puffs to a freezer-safe container for up to 3 months. (We like to use these vacuum seal bags to keep them as fresh as possible.)
When you're ready to bake, simply transfer the frozen puffs to parchment paper and bake as instructed. No need to thaw the dough - they may just need an extra minute or two in the oven.
These are best served warm. To reheat them, place them in a 350˚F oven for about 5 minutes, until warmed through.
We haven't personally tried this recipe with gluten free flour, but it should work. We always use this Bob's Red Mill gluten free 1:1 flour for baking!
There are a few reasons this could happen:
1. The dough was too wet. The dough should be thick, smooth and shiny before piping. If you don't let enough moisture evaporate in the earlier steps, or add in too much egg, they will not puff up in the oven. Make sure to look at the process photos above to see what the choux dough should look like!
2. Opening the oven door during baking: This will release stem and prevent them from puffing.
3. Size: If the gougères were piped too big or too small, they may not puff properly.
4. Humidity or altitude can both affect choux dough.
Expert Tips
- Don't use pre-shredded cheese. Pre-shredded is typically coating with anti-caking agents, which prevents it from melting as well. It's best to shred your own with a cheese grater before adding to this recipe. We used a coarse shred.
- Don't open the oven while they are baking: This is crucial during the first 15 minutes of baking. They need steam to rise, so if you crack open the oven even just for a second, they could collapse.
- Choux readiness: Your choux will be ready once you can successfully perform the finger test or the V test with your spatula. The dough should be glossy, but pretty thick. The key here is to add the eggs a little bit at a time once you think it's almost ready. You made need more than or less than the 2 eggs listed in this recipe, depending on how much water you evaporated from the panade.
- Storage: Once baked, let them cool completely, then store in an airtight container at room temperature for up to 24 hours. After 24 hours, it's best to freeze them (as they tend to get soggy in the refrigerator). You can freeze them and then reheat at 350˚F for about 10 minutes, until warmed through and crisp again.

Related Recipes


Tried this recipe? Please leave a star ⭐️⭐️⭐️⭐️⭐️ rating below and/or a review in the comments section further down the page.
📖 Recipe

Cheddar Gougeres
- Total Time: 45 minutes
- Yield: 16-20 1x
- Diet: Vegetarian
Description
These Cheddar Gougères are essentially French cheese puffs made with choux pastry, and they're absolutely delicious! Crisp on the outside, light, puffed and airy on the inside and perfectly cheesy, these are a lovely appetizer to enjoy with wine or cocktails.
Ingredients
- 3 tablespoons unsalted butter, cut into ½-inch cubes
- ¼ cup water
- ¼ cup whole milk
- ¼ tsp black pepper
- ½ tsp salt
- 2 large eggs, room temperature
- ½ cup all purpose flour
- 3 oz extra sharp cheddar cheese, divided (it's best to shred your own from a block of cheese instead of buying pre-shredded)
Instructions
- Preheat to 500˚F and line a sheet pan with parchment paper.
- In a stainless steel saucepan over low heat, combine butter, water, milk, salt and pepper.
- Once butter is melted, bring the mixture to a boil. Add in all of the flour, whisking or stirring vigorously and remove from heat right away. Continue mixing until thoroughly combined – there should be no streaks of flour.
- Return to medium heat and cook for a few minutes, stirring often, until a thin film covers the bottom of the pan and the dough pulls away from the sides easily (see photos in post for reference).
- Transfer the dough to a separate mixing bowl and stir, spreading the dough up the sides of the bowl (to help steam evaporate). Keep stirring and spreading for a few minutes to cool the dough – it needs to be below 140˚F to prevent the eggs from cooking.
- In a separate small bowl, beat the eggs with a whisk. Pour ~¾ of the egg mixture into the dough and beat with an electric mixer on low speed at first, then increase to medium speed. The mixture will separate at first but will come back together into a sticky dough. Keep adding additional egg until the dough is glossy but still firm enough to hold its shape if you run a finger through it. You may end up with leftover egg, or you may need a little more egg. To test if the dough is ready, get some dough on a spatula and lift it straight up. The dough should form a "v" (see photos above for reference).
- Stir in 2.5 oz of the cheddar cheese. Transfer the dough to a piping bag with a ½-inch round tip.
- Pipe about 1 ½ tablespoons of dough onto silpat or parchment paper, keeping the tip in the same place and keeping the bag vertical. Wet the tip of your fingers and gently flatten the tops of each puff (otherwise they will burn).
- Sprinkle remaining cheddar cheese on top. Place in the 500˚F oven, then immediately turn the oven off. Set a timer for 15 minutes and do NOT open the door of the oven. After 15 minutes, turn oven back on to 350˚F and bake for another 10 minutes. Optional: after 5 minutes, stab each one with a fork - this will make them crispier on the inside.
Notes
Don't open the oven while they are baking: This is crucial during the first 15 minutes of baking. They need steam to rise, so if you crack open the oven even just for a second, they could collapse.
Storage: Once baked, let them cool completely, then store in an airtight container at room temperature for up to 24 hours. After 24 hours, it's best to freeze them (as they tend to get soggy in the refrigerator). You can freeze them and then reheat at 350˚F for about 10 minutes, until warmed through and crisp again.
Make ahead: You can make the dough, pipe it, then freeze and transfer to a freezer safe container for up to 2-3 months. You can bake them straight from the freezer – it just may take an extra minute or two.
Choux readiness: Your choux will be ready once you can successfully perform the finger test or the V test with your spatula. The dough should be glossy, but pretty thick. The key here is to add the eggs a little bit at a time once you think it's almost ready. You made need more than or less than the 2 eggs listed in this recipe, depending on how much water you evaporated from the panade.
See blog post for troubleshooting, FAQs and step-by-step photos of what the dough should look like at every stage.
Nutrition information provided is an estimate. It may vary based on cooking method and specific ingredients used.
H/t to reddit user texnessa for this specific cooking process.
- Prep Time: 20 minutes
- Cook Time: 25 minutes
- Category: Appetizer
- Method: Oven
- Cuisine: French
Nutrition
- Serving Size: 3 gougeres
- Calories: 70
- Sugar: 0.3 g
- Sodium: 90.1 mg
- Fat: 4.9 g
- Carbohydrates: 3.6 g
- Fiber: 0.1 g
- Protein: 2.7 g
Katy says
Was a hit at potluck. I had no leftovers. The recipe made 18 gougeres. I did not have a piping bag, so I placed them on the pan using a spoon. It took an additional 5 min to cook, so I may have added more egg than needed.