
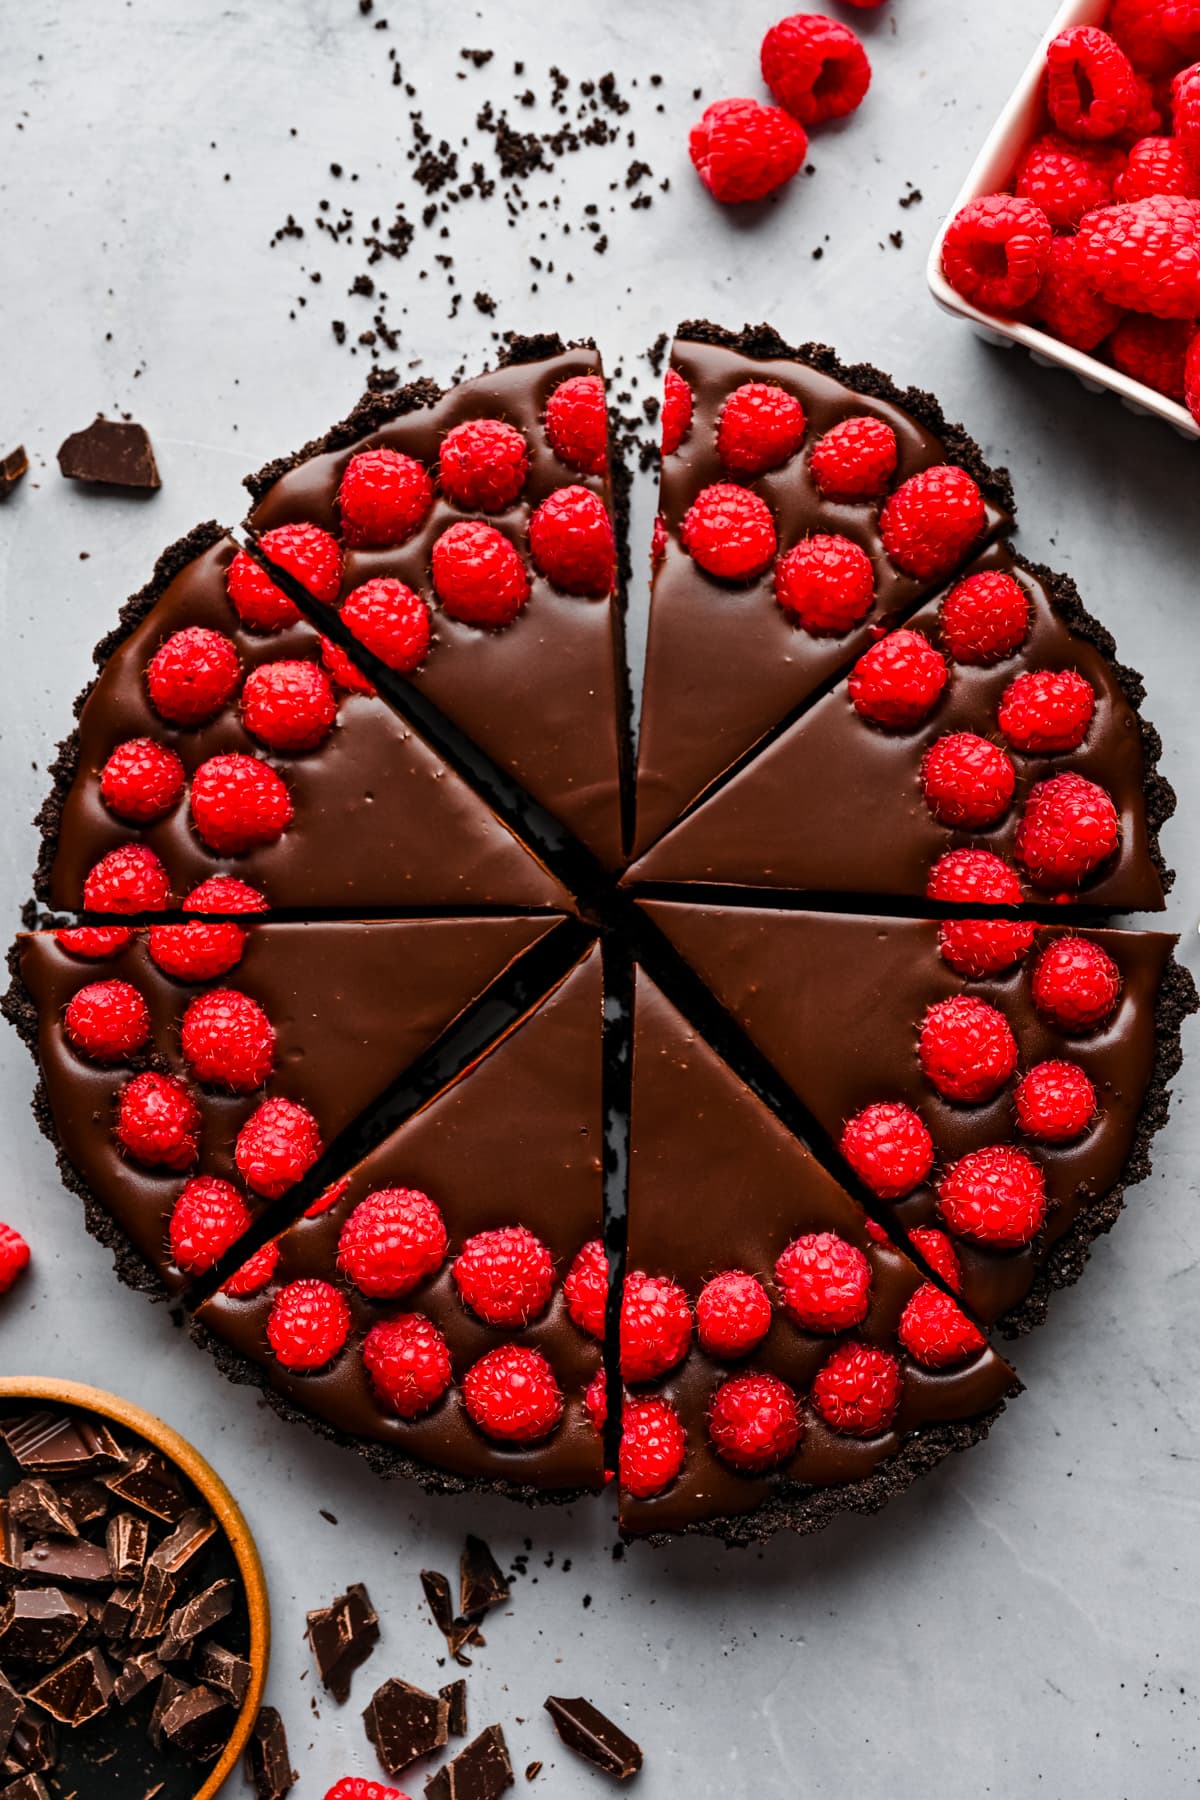
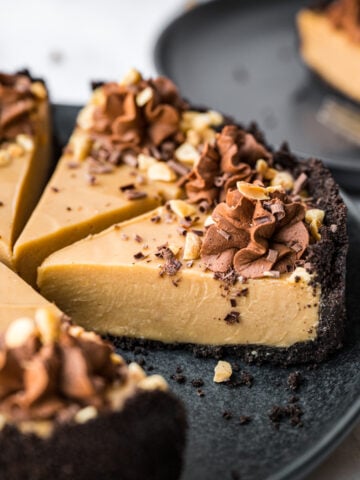
This delicious no bake Chocolate Raspberry Tart is made with just 6 ingredients, and it comes together quickly and easily in just a few simple steps! It can be made dairy free (with coconut cream) or regular heavy cream.
This post is sponsored by Domino®️ Sugar. All opinions are our own.
Jump to:
Why We Love This Recipe
- Quick and easy: This chocolate raspberry tart may look fancy, but it only requires a few simple steps and just 6 ingredients. There's no baking involved either! This is a great recipe for all skill levels.
- Dairy free: This recipe is naturally dairy free, using full fat coconut milk for a creamy, rich filling. It can also easily be made gluten free with one simple swap. You can also use regular heavy cream in place of coconut milk if preferred.
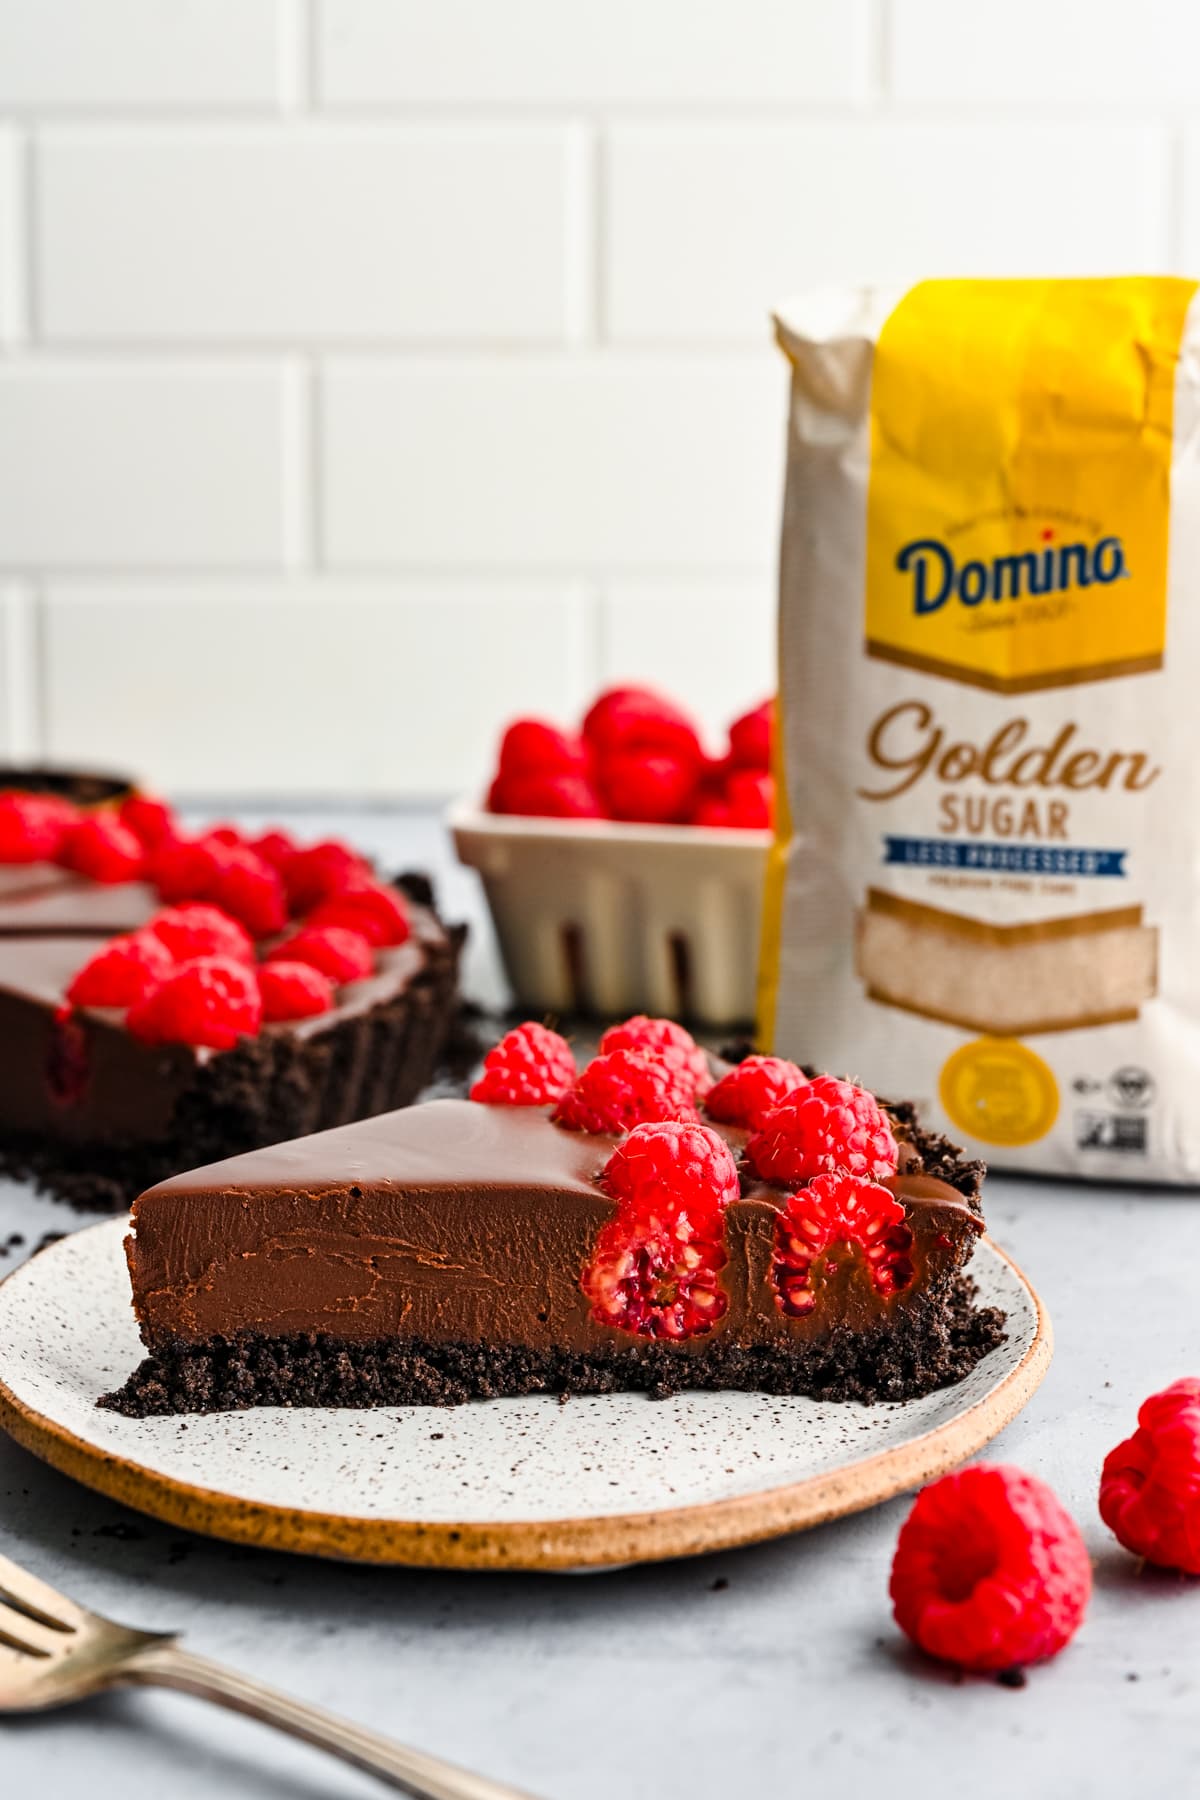
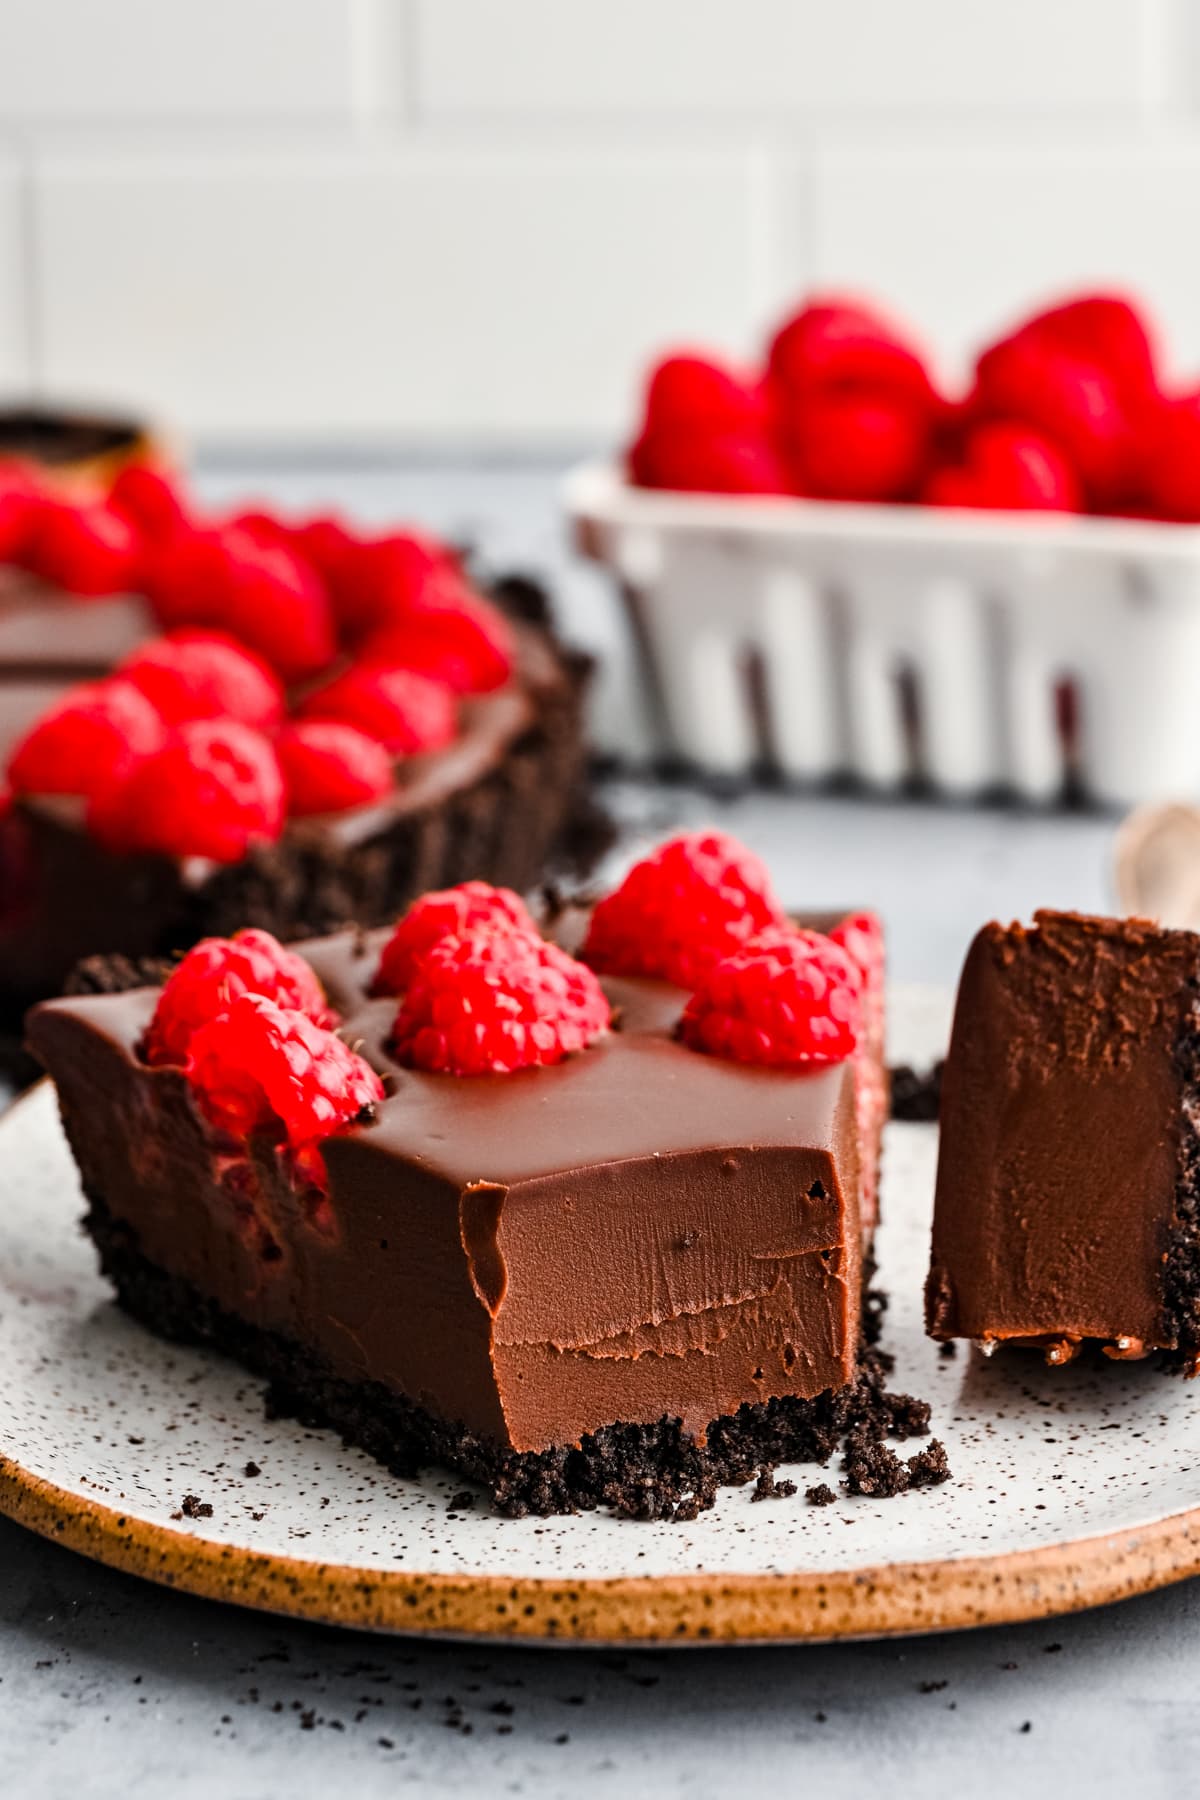
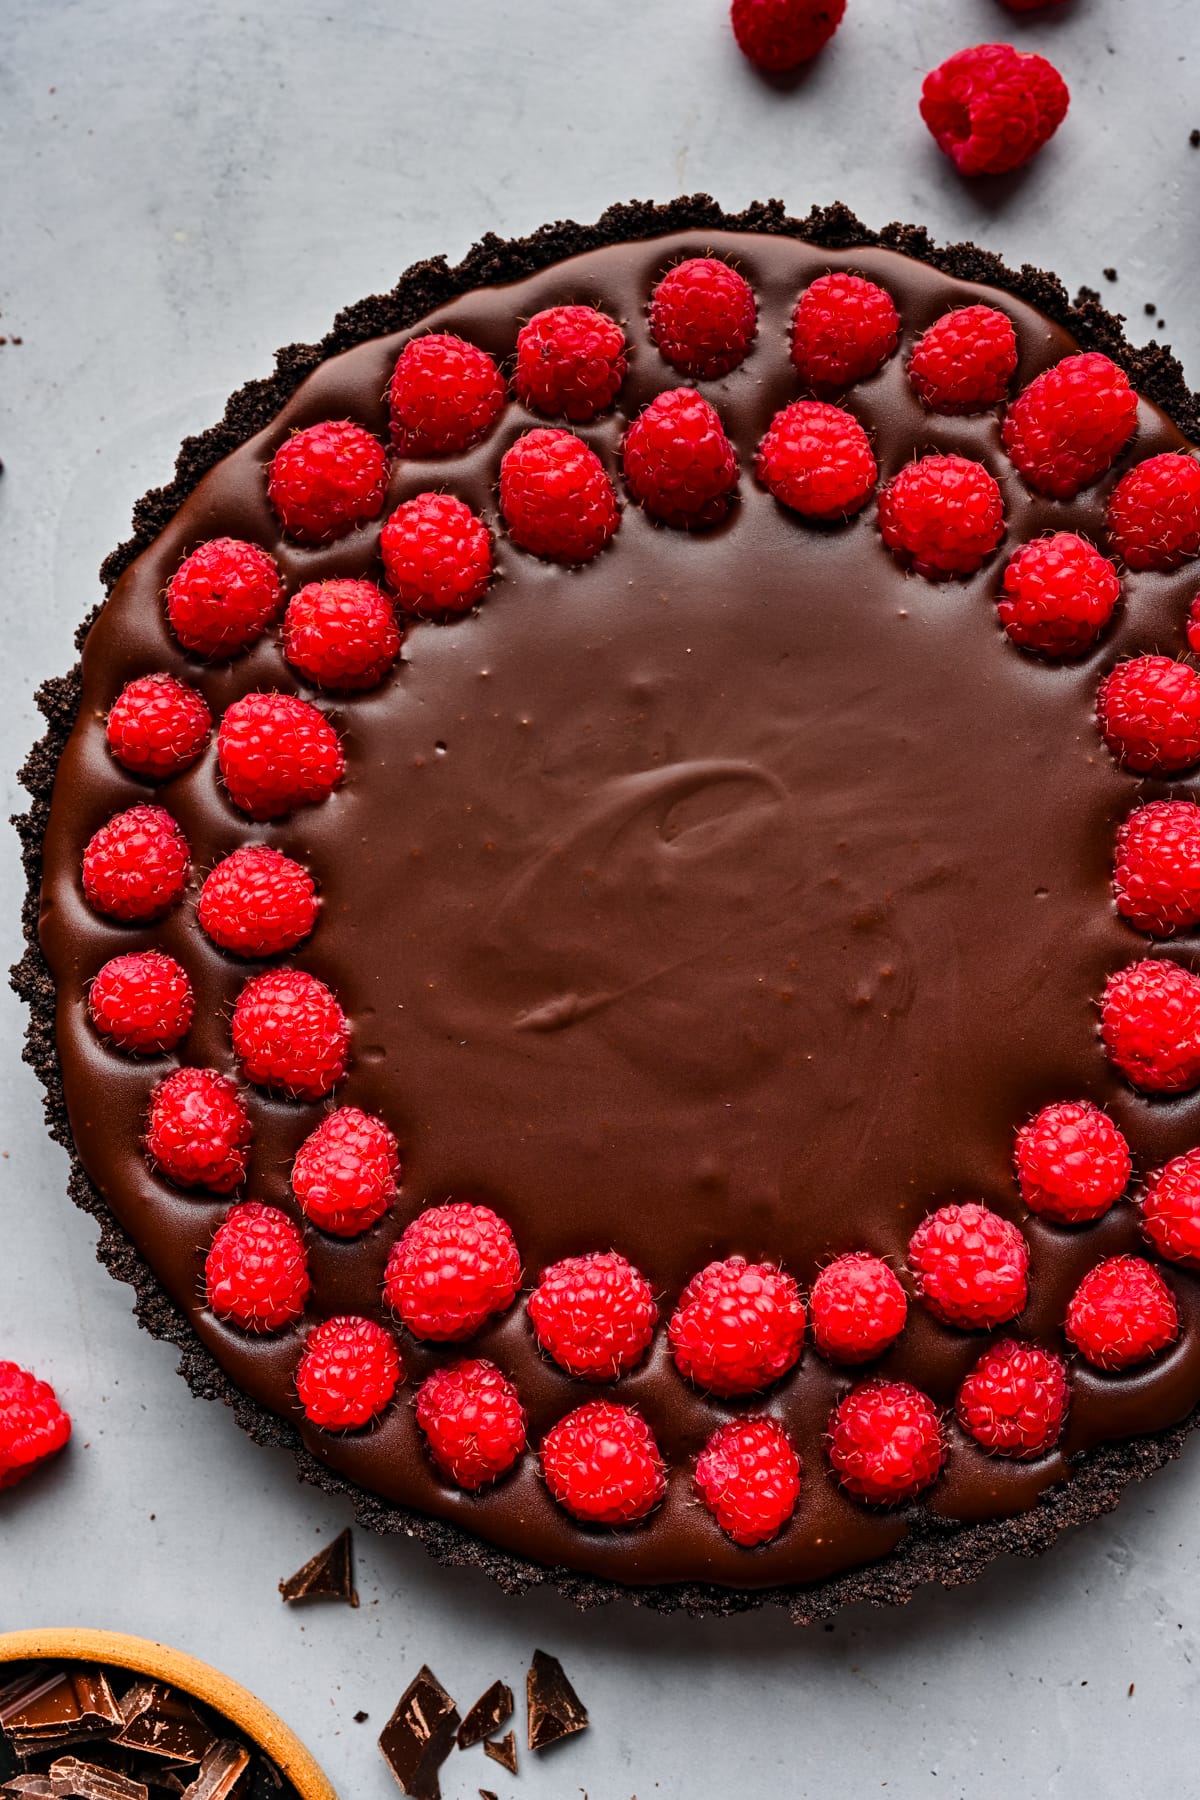
- Absolutely delicious: With a buttery chocolate cookie crust, a silky smooth, perfectly sweetened chocolate ganache filling, and fresh, tart raspberries, this tart is every bit as good as it looks!
Ingredients
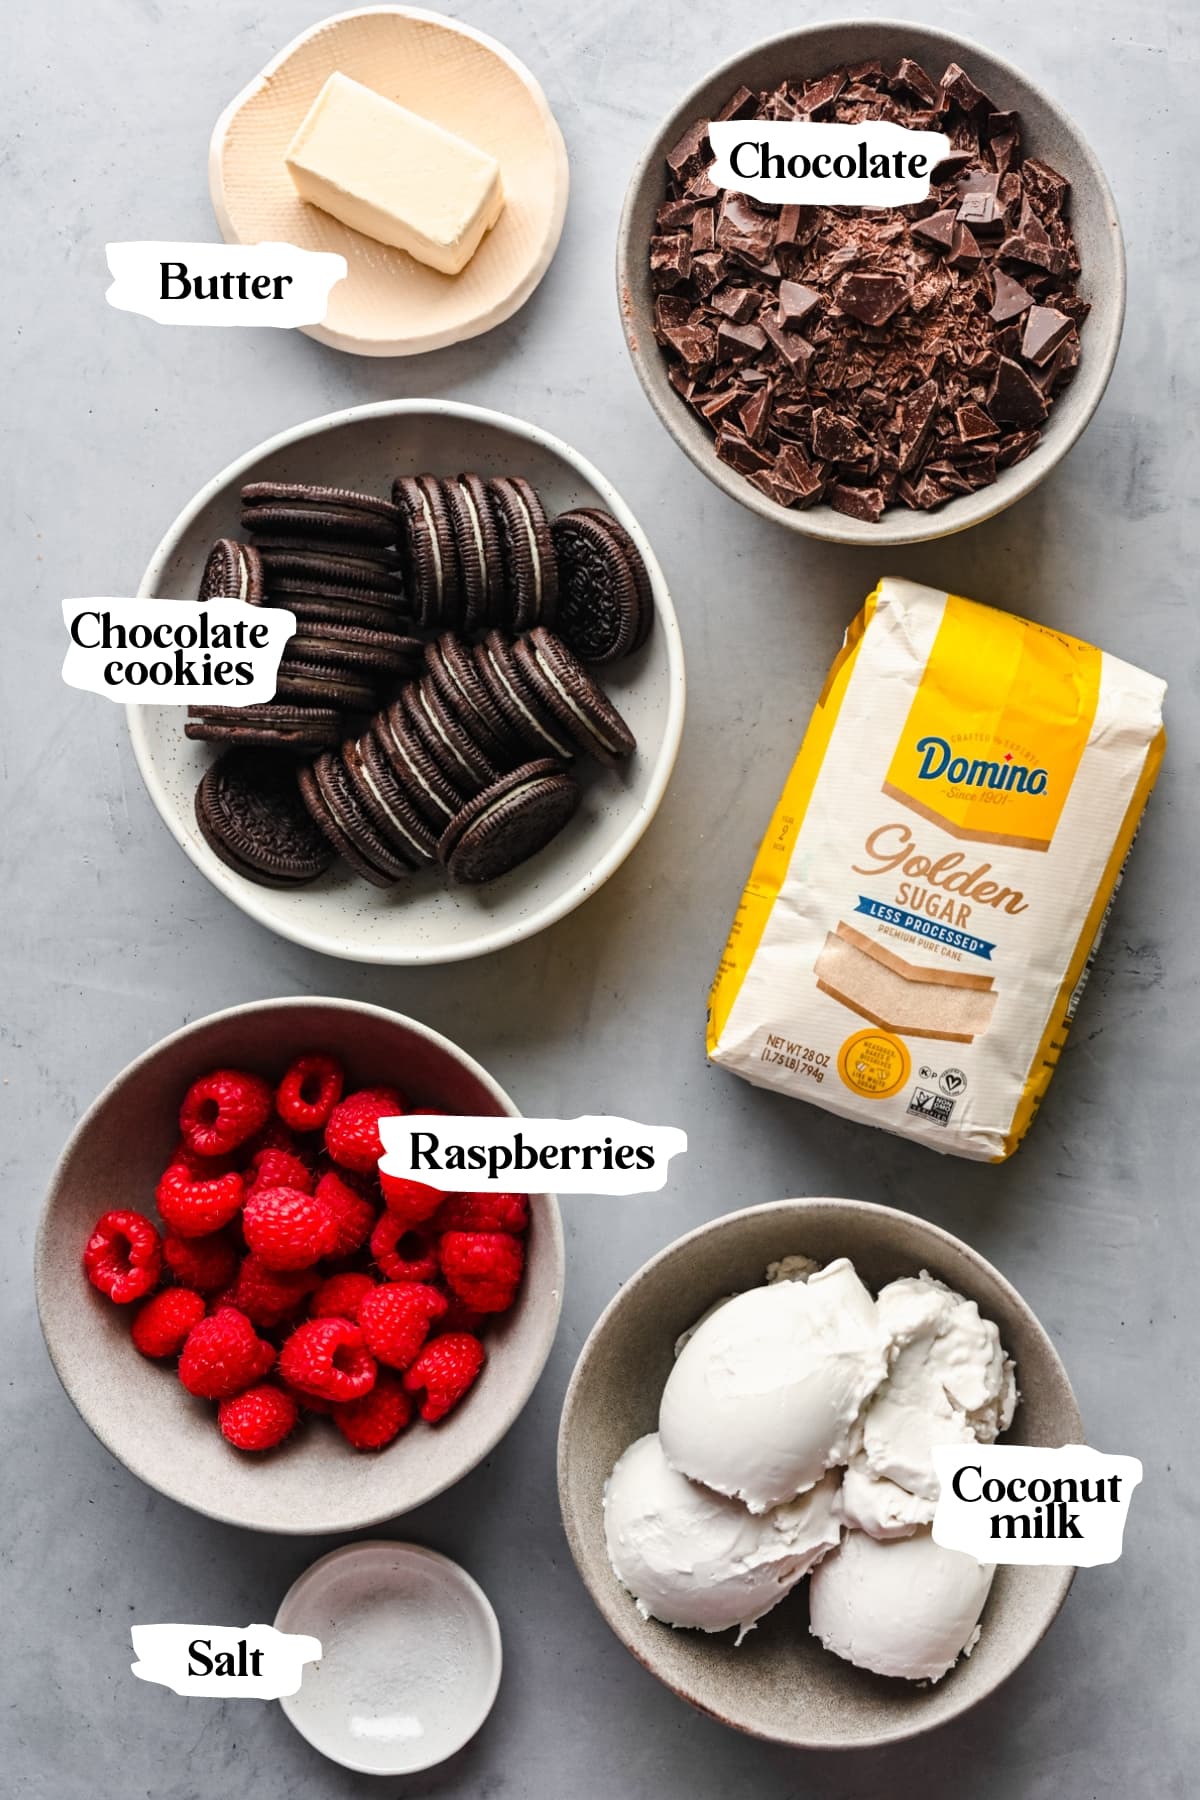
Here's what you'll need to make this chocolate raspberry tart:
Ingredient Notes
- Domino®️ Golden Sugar: We love using this sugar! It's less processed (compared to regular white granulated sugar), tastes great, and you can use it cup-for-cup in any recipe where you'd typically use white sugar. It also has a beautiful golden color and a distinct hint of molasses flavor. We love it in this chocolate tart – it makes the filling perfectly sweet, but not too sweet!
- You can find Domino®️ Golden Sugar in many stores across the US (now including the Midwest - yay!), or online here.
- Chocolate: We like to use semisweet chocolate (65%) in this recipe. If you prefer darker chocolate, try bittersweet (65-80%) or dark chocolate of choice (80%+). The darker you go, the more bitter the filling will be. If you're dairy free, be sure to check the label for dairy content.
- Coconut milk: We use full fat canned coconut milk, but ONLY the top layer of fat/cream. Scoop out that layer and do not use the remaining liquid at the bottom of the can, otherwise your tart will not set up firmly!
- Chocolate sandwich cookies: Any brand will do in the crust. If you want to make this recipe gluten free, simply swap with a gluten free alternative.
- Butter: To keep this recipe dairy free, we're using a nondairy butter, but you can also use regular butter or melted coconut oil.
- Raspberries: Fresh is definitely best here! If you'd like, you can also mix them into the ganache filling before pouring it into the crust.
- Salt: Technically optional, but it balances out all of the flavors in the ganache and pairs perfectly with chocolate.
Step-by-step Instructions
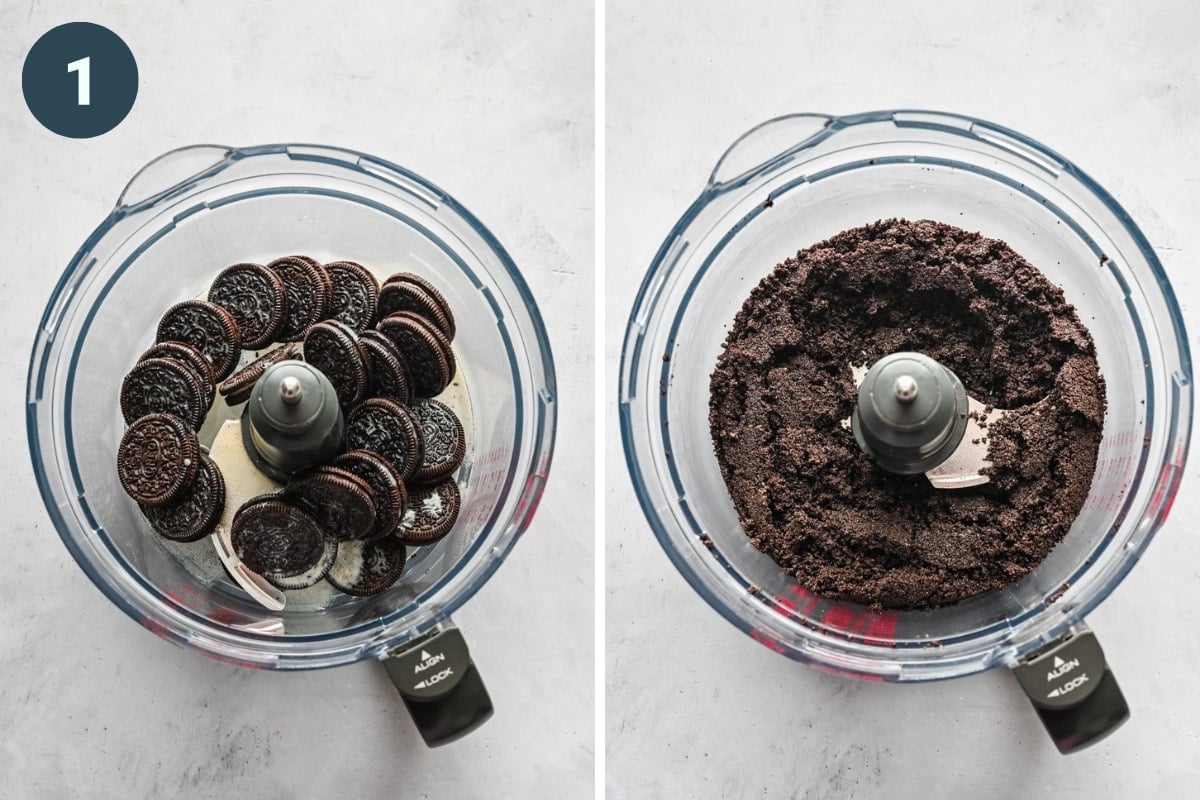
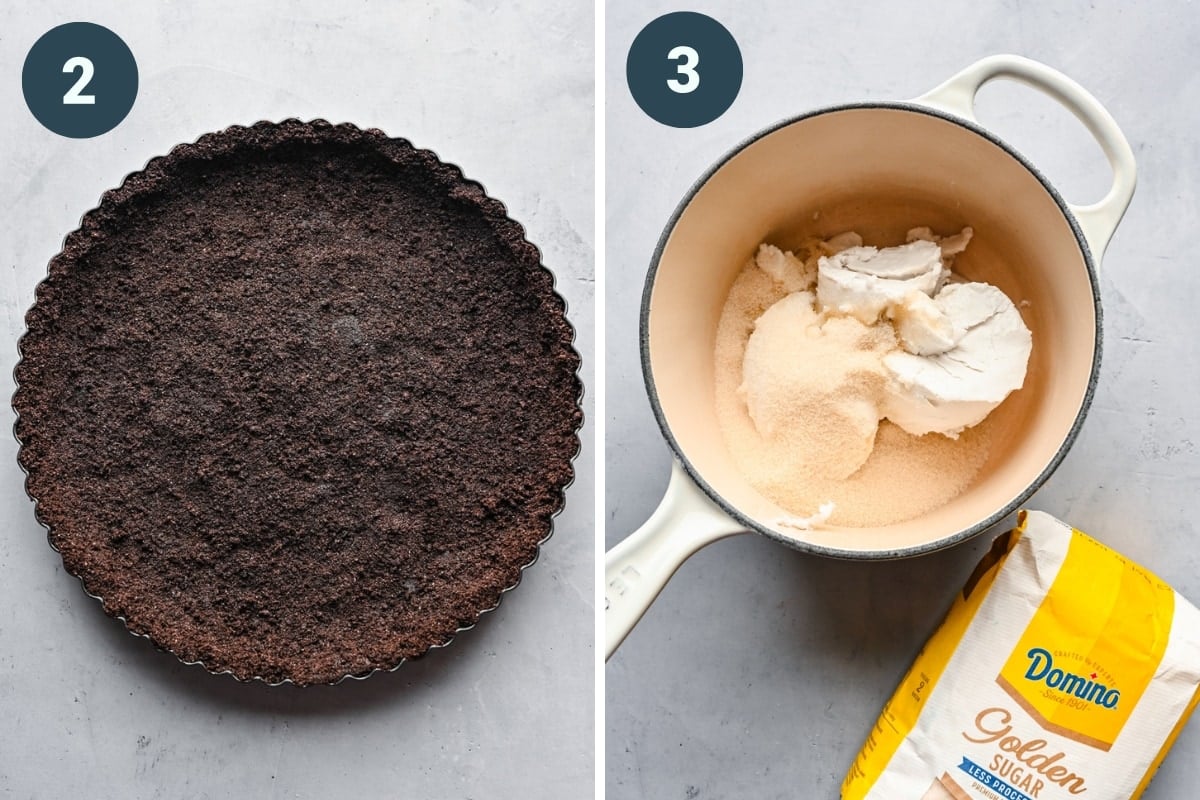
STEP 1: Add the cookies and melted butter to a food processor and pulse until it forms a fine crumb mixture.
STEP 2: Press the crust mixture into a 9-inch tart pan with a removable bottom. Place in the freezer while you make the filling.
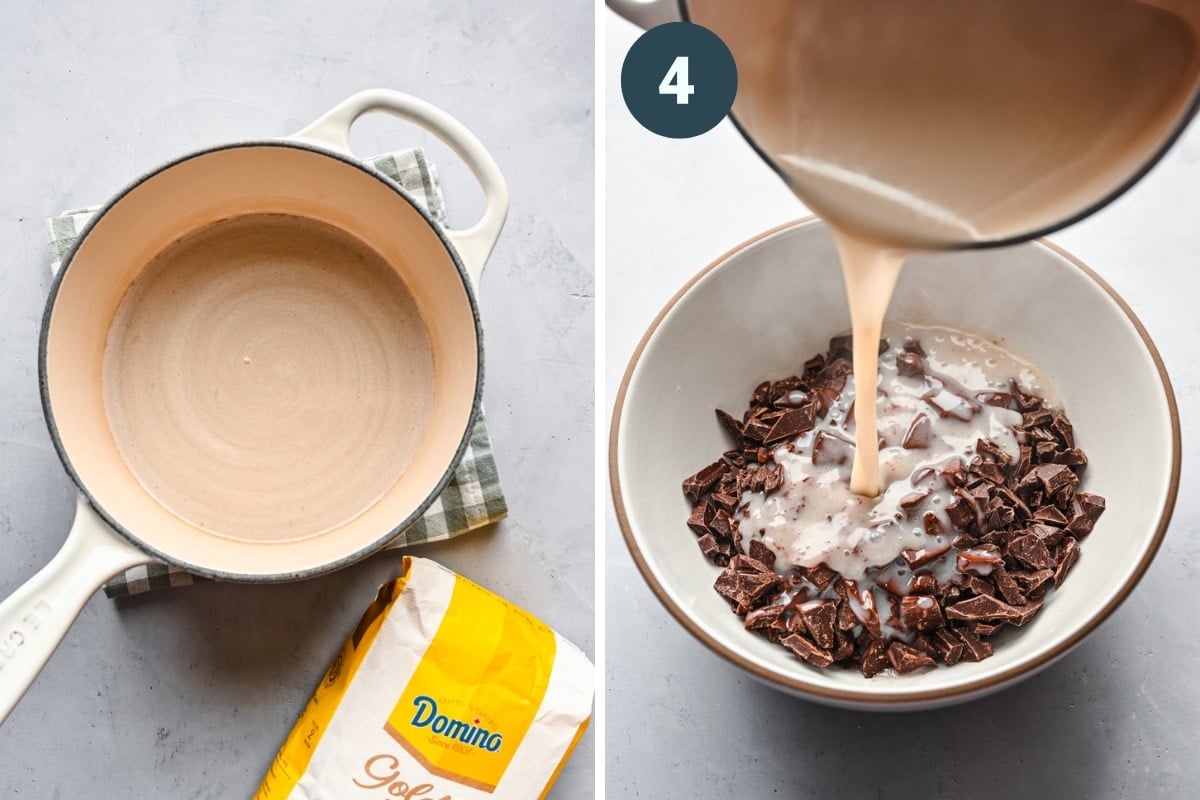
STEP 3: Scoop out the top layer of fat/cream from both cans of coconut milk. Discard the liquid at the bottom of the can or save it for another recipe. Do not use the liquid in the can, otherwise the filling won't set.
STEP 4: Add the coconut cream and sugar to a small saucepan over medium heat. Heat until the sugar is dissolved, stirring often, and the mixture is just starting to simmer.
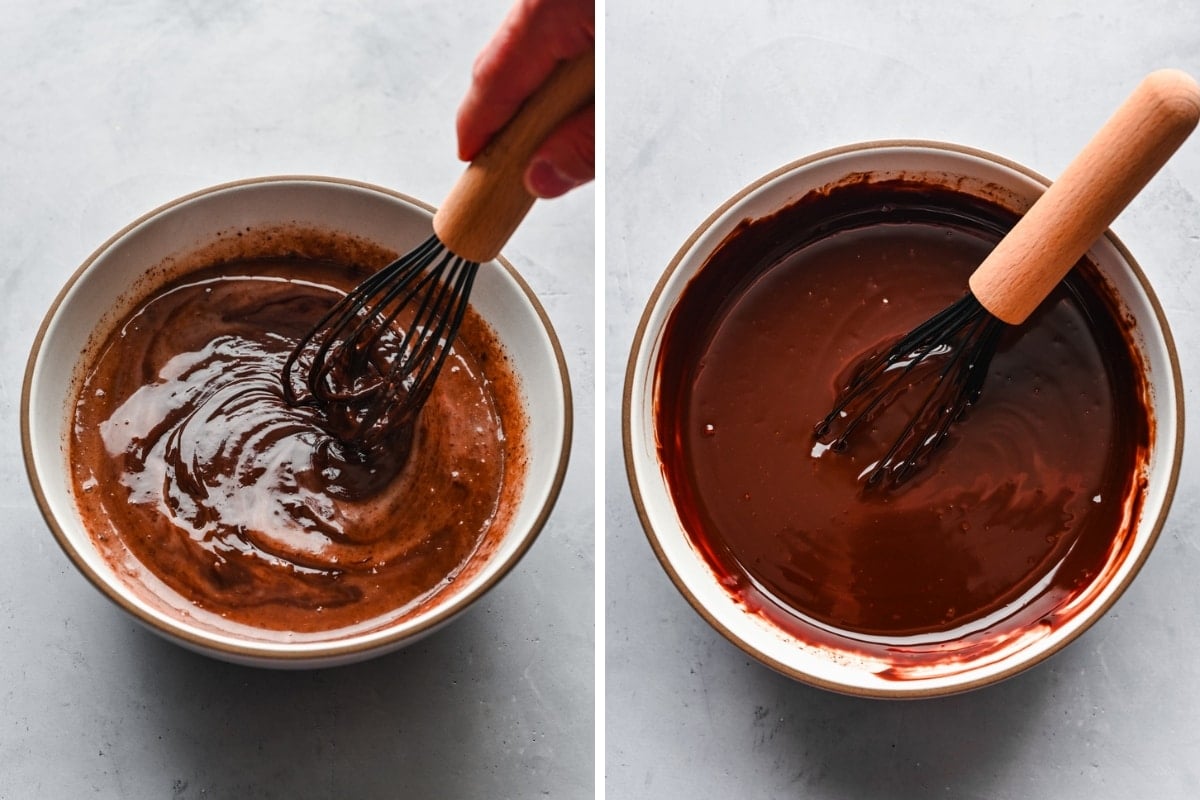
Add the chopped chocolate and salt to a large bowl. Pour the hot coconut milk mixture over the chocolate, cover with a clean towel and let sit for 2 minutes, until chocolate is melted. Whisk until completely smooth.
STEP 5: Pour the filling into the prepared crust. Top with raspberries, gently pushing them into the filling. Return to refrigerator for 4 hours to set.
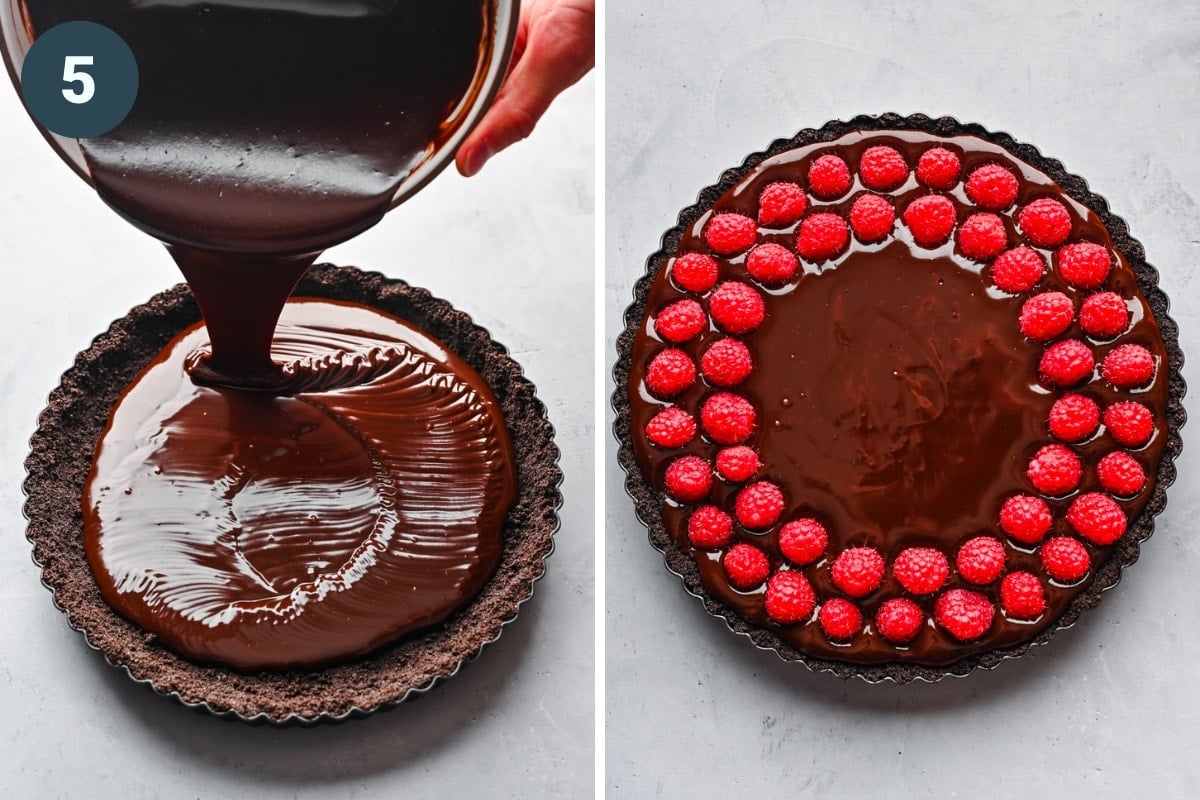
Slice and serve!
Expert Tips and FAQs
- Only use the top layer of fat from the coconut milk can: Avoid using any of the liquid from the bottom of the can, otherwise the filling will not set properly. You can save the liquid for using in smoothies or other recipes!
- Let set completely before serving: When you pour the filling into the crust, it will have a pudding-like consistency. It needs a few hours for the coconut milk and chocolate to set, so don't rush it! It should take about 4 hours to set in the refrigerator. You can hasten this by putting it in the freezer, but note that the raspberries will get mushy once defrosted.
- Regular dairy options: Feel free to substitute the coconut milk with 1 cup of heavy cream. You can also use regular butter in the crust.
- Stir raspberries into the ganache: We like to arrange the raspberries in a pretty layer on top of the tart, but if you'd prefer, you can mix them into the ganache filling before pouring it into the crust.
- Swap raspberries with another fruit of choice, like strawberries or blueberries.
- Storage: Cover and store in the refrigerator for up to 4-5 days.
- Freezer storage: Cover tightly and store in a container for up to a few months. Defrost at room temperature for at least 15 minutes before enjoying.
Related Recipes

Tried this recipe? Please leave a star ⭐️⭐️⭐️⭐️⭐️ rating below and/or a review in the comments section further down the page.
📖 Recipe

Chocolate Raspberry Tart
- Total Time: 4 hours 15 minutes
- Yield: 8-12 servings 1x
- Diet: Vegan
Description
This delicious Chocolate Raspberry Tart is made with just 6 ingredients, and it comes together quickly and easily in just a few simple steps! This recipe also happens to be dairy free, with a luscious chocolate coconut milk ganache.
Ingredients
Crust:
- 22 chocolate sandwich cookies (ex: Oreos)
- ¼ cup (4 tablespoons) melted butter (vegan or regular)
Filling:
- 2 13.5oz cans full fat coconut milk, ONLY use the top layer of fat/cream (or 1 cup heavy cream)
- ½ cup Domino®️ Golden Sugar
- 12 oz semisweet chocolate, chopped
- ¼ teaspoon salt
- 1 pint fresh raspberries
Instructions
Crust:
- Add the cookies and melted butter to a food processor and pulse until it forms a fine crumb mixture.
- Press the crust mixture into a 9-inch tart pan with a removable bottom. Place in the freezer while you make the filling.
Filling:
- Scoop out the top layer of fat/cream from both cans of coconut milk. Discard the liquid at the bottom of the can or save it for another recipe. Do not use the liquid in the can, otherwise the filling won't set.
- Add the coconut cream and sugar to a small saucepan over medium heat. Heat until the sugar is dissolved, stirring often, and the mixture is just starting to simmer.
- Add the chopped chocolate and salt to a large bowl. Pour the hot coconut milk mixture over the chocolate, cover with a clean towel and let sit for 2 minutes, until chocolate is melted. Whisk until completely smooth.
- Pour the filling into the prepared crust. Top with raspberries, gently pushing them into the filling. Alternatively, you can pour half of the filling into the crust, top the entire tart with raspberries, and spread the remaining ganache on top. Return to refrigerator for 4 hours to set, then slice and serve.
Notes
Only use the top layer of fat from the coconut milk can: Avoid using any of the liquid from the bottom of the can, otherwise the filling will not set properly. You can save the liquid for using in smoothies or other recipes!
Let set completely before serving: When you pour the filling into the crust, it will have a pudding-like consistency. It needs a few hours for the coconut milk and chocolate to set in the fridge.
Regular dairy options: Feel free to substitute the coconut milk with 1 cup of heavy cream. You can also use regular butter in the crust.
Stir raspberries into the ganache: We like to arrange the raspberries in a pretty layer on top of the tart, but if you'd prefer, you can mix them into the ganache filling before pouring it into the crust.
Storage: Cover and store in the refrigerator for up to 4-5 days.
Freezer storage: Cover tightly and store in a container for up to a few months. Defrost at room temperature for at least 15 minutes before enjoying.
- Prep Time: 15 minutes
- Cook Time: 4 hours
- Category: Dessert
- Method: No bake
- Cuisine: American
Nutrition
- Serving Size:
- Calories: 403
- Sugar: 31.4 g
- Sodium: 98.7 mg
- Fat: 29 g
- Carbohydrates: 38.1 g
- Fiber: 3.2 g
- Protein: 4.3 g


ellie says
This was a hit at my book club's holiday party!
I made a few modifications.
- To make it seasonal, I topped with crushed peppermint instead of raspberries.
- I used gluten-free Oreos to make it gf/vegan. I did use the whole package of Oreos (30 cookies) because 22 did not fill the 9-in pan very well. Even with extra cookies, I wasn't able to create a very strong crust around the edge. I would use maybe 35 in the future.
- After reading comments, I decided to split the chocolate half semi-sweet, half dark (Enjoy Life dairy-free chocolate chips) and I'm glad I did. It's very sweet, so I think the dark helped balance it out. I would bump it up even more next time.
- I had some trouble with separating the coconut milk—I tried two brands (Target's organic Good & Gather and GOYA) and neither were scoopable or easy to splice between the fat and water. I looked into it, and I think it may be due to additives which prevent separation. I went with the Target brand because it seemed creamier and there was a little bit of wateriness at the bottom of the can which I separated for one can (accidentally poured it in with the other can). Because I was worried about the wateriness preventing setting, I added about a tablespoon of cornstarch (mixed 1:1 with water) into the pudding and let simmer for about 5 minutes. I ended up with a little over a cup of extra filling which my husband and daughter had no complaints about. In the future, I would use coconut cream instead of trying to separate the coconut milk.
It set beautifully and sliced very cleanly! It's a very rich and sweet dessert; I would consider using a different cookie for the crust in the future because I think the Oreo frosting adds a lot of sweetness.
Thanks for the recipe! I definitely will make again.
ellie says
Could I use coconut cream instead of the top part of the coconut milk?
Lexi says
Yes
Ali says
What if you can’t find the domina sugar? Could you use normal white granulated sugar?
Lexi says
Yes, any granulated sugar will work here!
Dawn says
My family doesn't like semi sweet. Will milk chocolate work?
Lexi says
Yep!
Marlene Haney says
Really looking forward to trying this recipe! Can this recipe be reduced to serve only 2-4 people? Do you have a recommendation?
Brent Harrison says
The only thing i could think of is using a smaller pan and then reducing the quantities. You could also make them in individual ramekins, but they will not be able to be removed from them.
Cathy says
Amazing! It was a total hit at a luncheon when I had to bring dessert. I also made a raspberry purée to serve along side. *Question: how much liquid will the coconut fat make when melted before adding to the chocolate? I’ve found it can vary quite a lot and never want to add too much.
Lexi says
So glad you enjoyed, Cathy! Thanks for sharing! Love the idea of a raspberry purée to go with it. The coconut fat amount definitely differs from brand to brand, but we've found it doesn't matter too much as long as we don't add any of the watery liquid in the can. If just the fat is added, it will solidify when refrigerated so should be fine no matter the amount!