
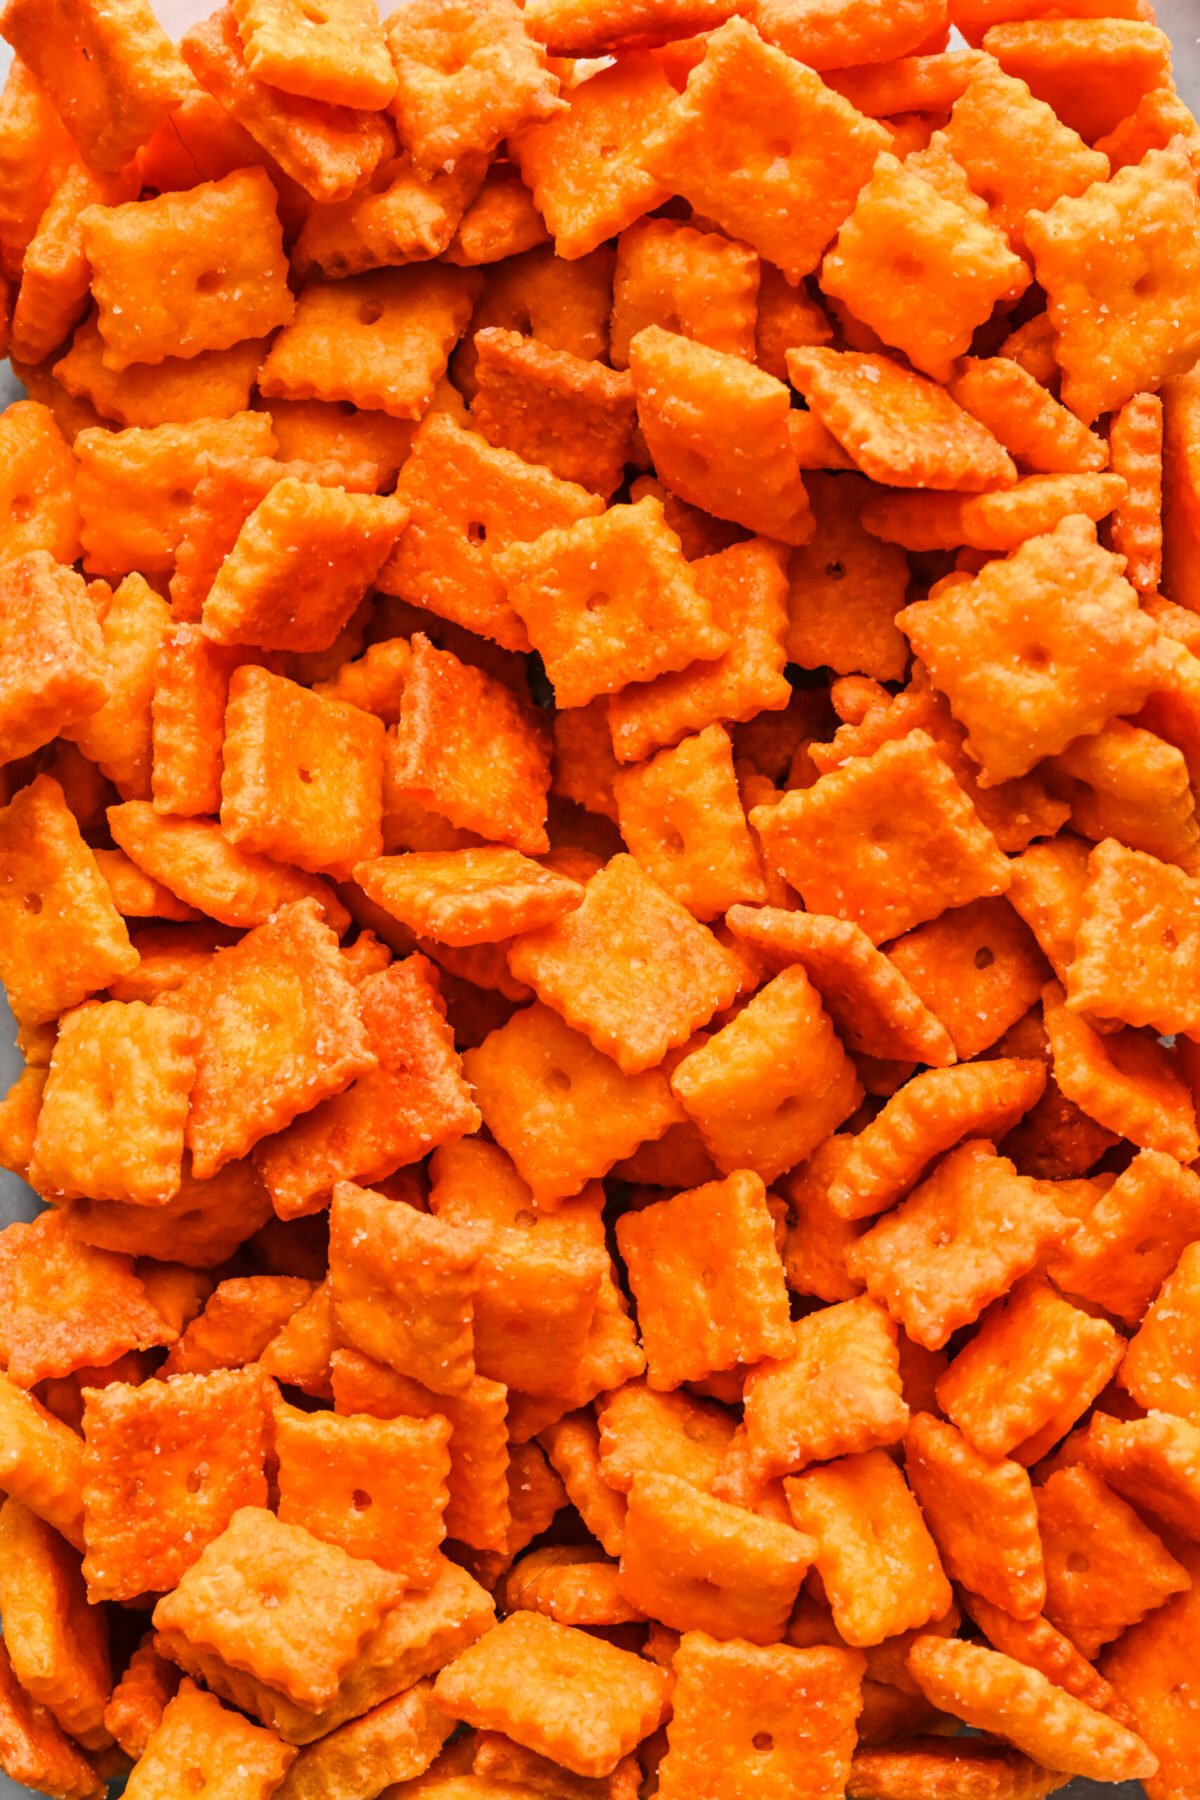
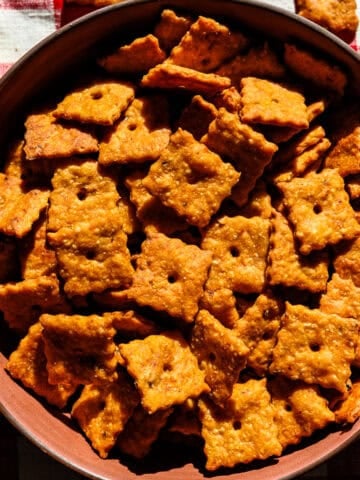
Cheesy, crispy, and salty, these homemade Cheez-Its taste just like the real thing! They're super easy to make with just 5 ingredients and a super simple process.
This recipe is one of the most popular recipes in our viral series: Better Than Store-Bought, a series where we share homemade versions of our favorite store-bought snacks, drinks and meals. For a fun variation, try our Parmesan Sun-Dried Tomato Crackers (Pizza Cheez-Its!) next.
This post is sponsored by Zwilling.
Jump to:
Why We Love This Recipe
- Just 5 ingredients: Cheese, milk, flour, butter, and salt. That's it!
- Simple recipe: Just pulse everything in a food processor, roll out the dough, cut it, poke a hole in each cracker, and bake! This is easy enough that you can do with your kids.
- Tastes just like store bought: These crackers are just as crispy, cheesy, and salty as the real thing!
Ingredients and Notes
Here's what you'll need to make these homemade cheez its:
- Cheese: We used a sharp yellow cheddar, but you can also use white. If you want the cheese flavor to stand out in the final cracker, be sure to use a sharp or extra sharp cheese variety. It's best to shred your own cheese from a block of cheddar, as store-bought shredded cheese contains anti-caking agents.
- Flour: We used all purpose flour.
- Gluten free: We have not personally tested this recipe with gluten free flour. A few people commented that they have tried it and they did not turn out very crispy.
- Butter: Unsalted is best. If you're using salted, cut the listed salt amount (½ teaspoon) in half. Make sure the butter is cold when you put it into the food processor.
- Milk: We used cold, whole milk in this recipe. 2% or skim should work as well, though we haven't tested it with lower-fat milks.
- Salt: We always use a coarse kosher salt. If you're using regular table salt, you'll want to add less than the stated quantity in this recipe.
Equipment
Zwilling Fresh & Save
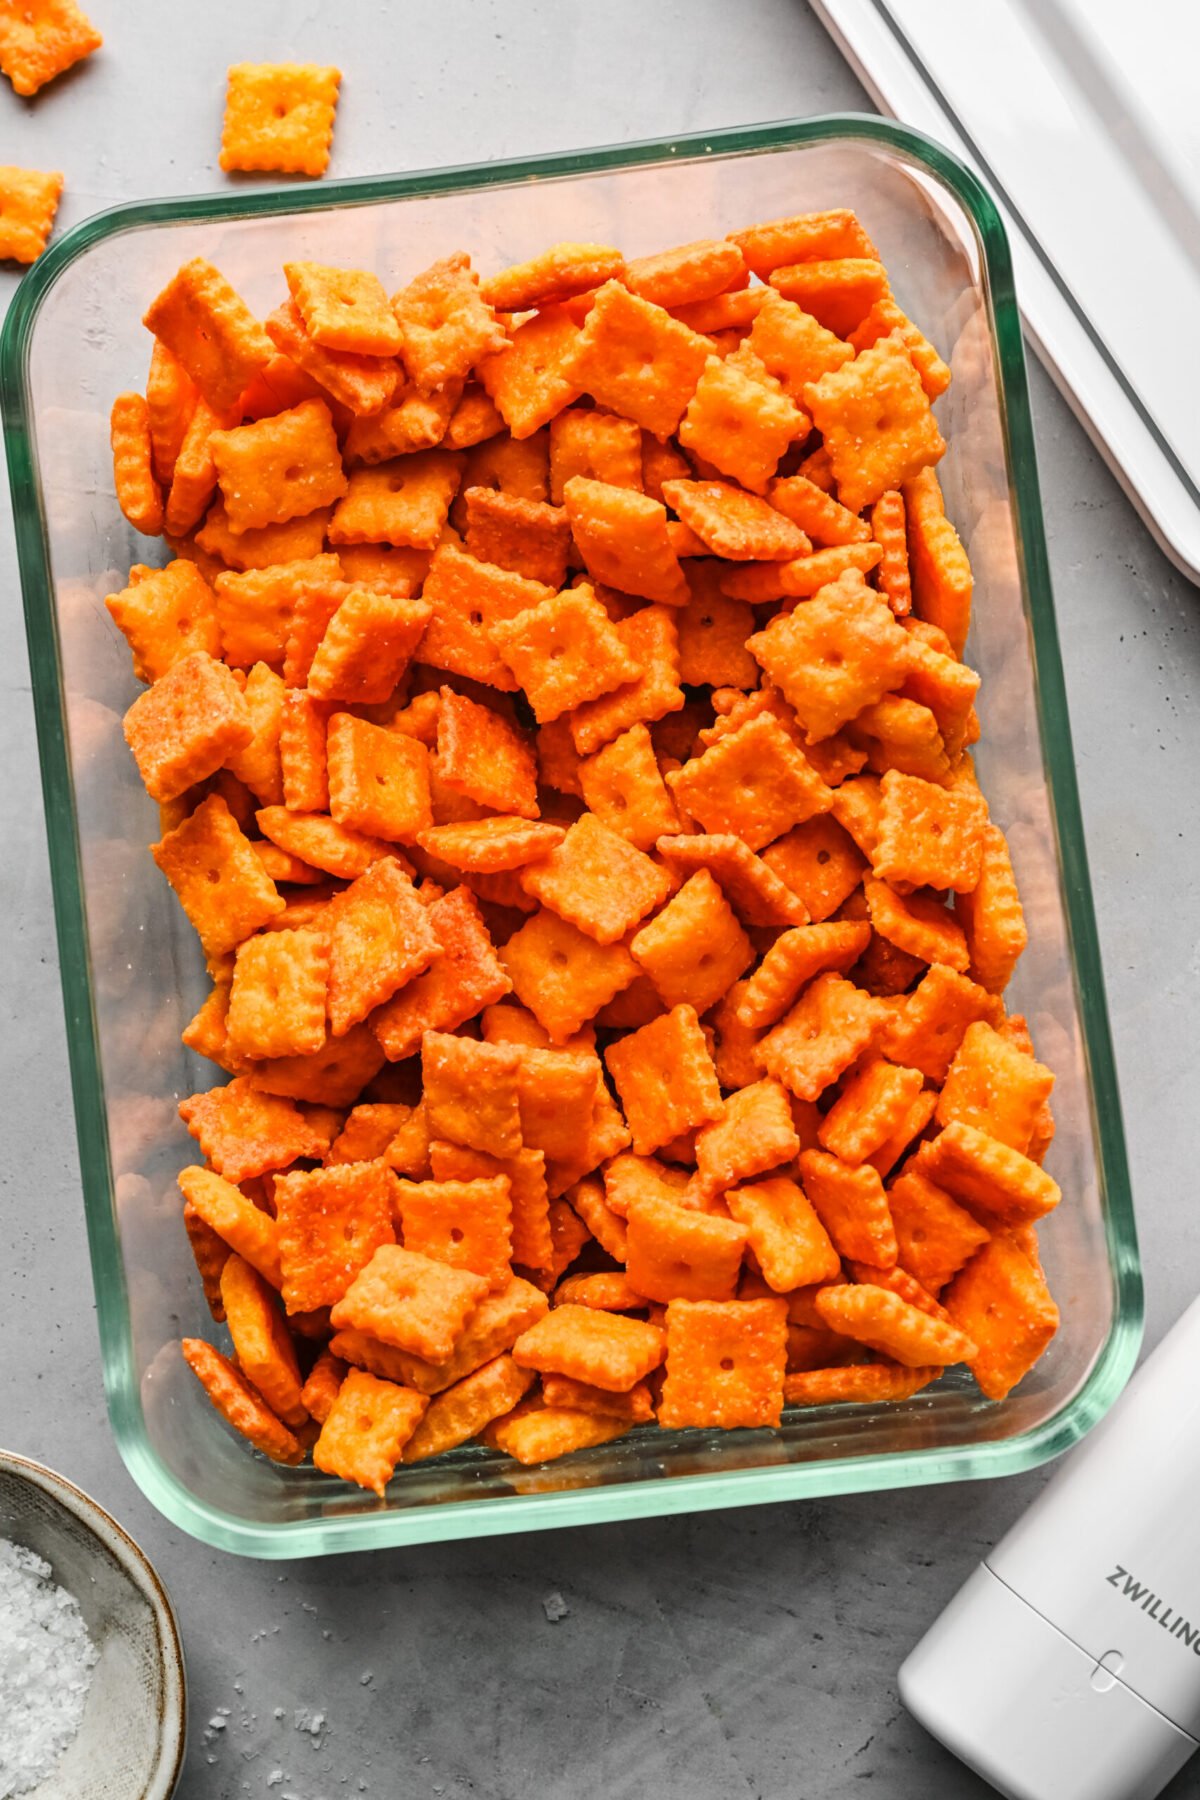
Since these crackers are at their best when they're crispy, it's important that you get them into an airtight container right away so they stay super fresh and keep their snap and crunch. We highly recommend Zwilling's Fresh & Save containers to ensure your crackers stay at their best for as long as possible.

These containers can be vacuum sealed to keep food fresh for up to five times longer(!) than regular containers. We've been using Zwilling's Fresh & Save line for years now, and they're the only storage containers we use - there's a drawer in our house that's filled with them, and our fridge is packed with Fresh & Save containers.
Best of all, they're dishwasher safe, microwave safe, freezer safe and they come in plenty of sizes. The glass ones that we show here are also oven safe! So go ahead, try them out!
We also love that the Fresh & Save line has vacuum seal bags – they're ideal for long term freezer storage.
If you're looking to store dried foods in your pantry, Zwilling also has you covered with their CUBE container sets. It's the same vacuum seal technology as the Fresh & Save containers, but made for dry ingredients!
They also come with reusable labels, measuring and prep tools and more for optimal organization. I'm moving into my new house in a few months and can't WAIT to organize my pantry with these Cube containers!
Step-by-step Instructions
PREP: Preheat oven to 325˚F and line 2 baking sheets with parchment paper.
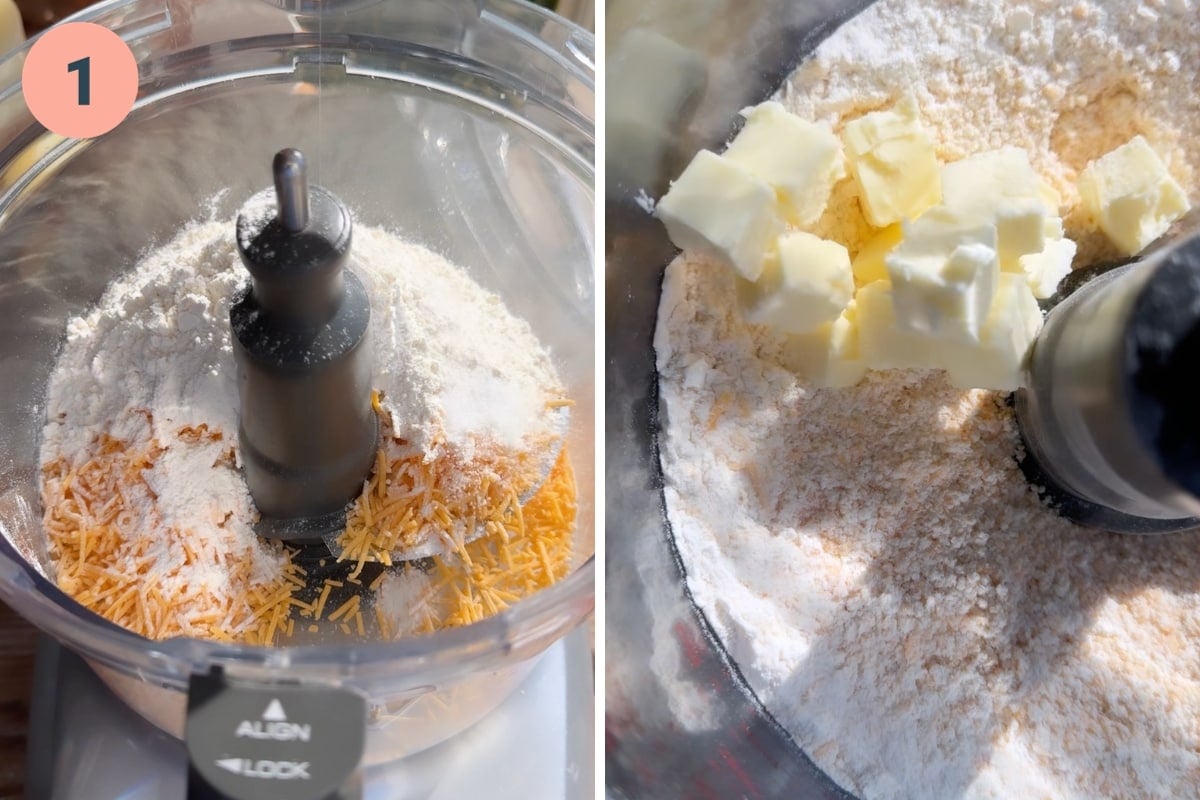
STEP 1: Add the cheese, flour and salt to a food processor and pulse several times. Add in the butter and pulse a few more times, until the dough is crumbly.
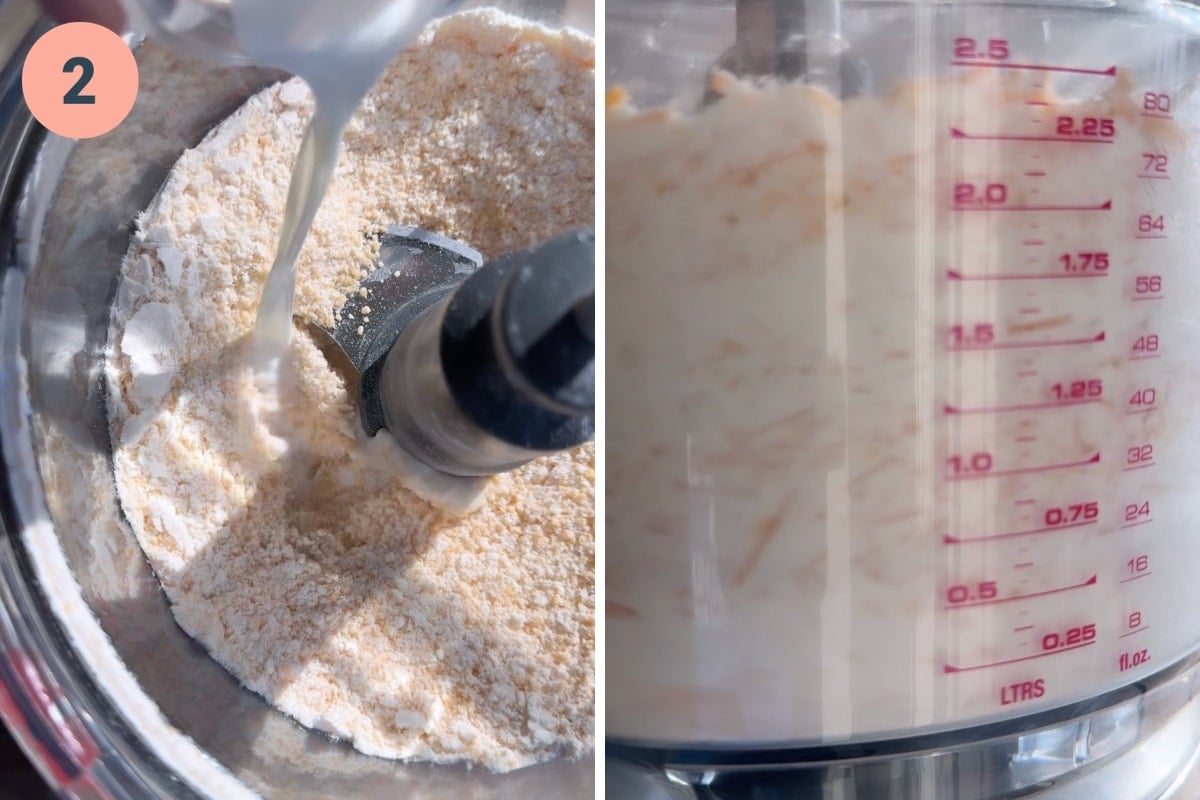
STEP 2: Add in the milk, then pulse several more times. The dough won’t come together in a ball, but it should come together when you press it between two fingers.
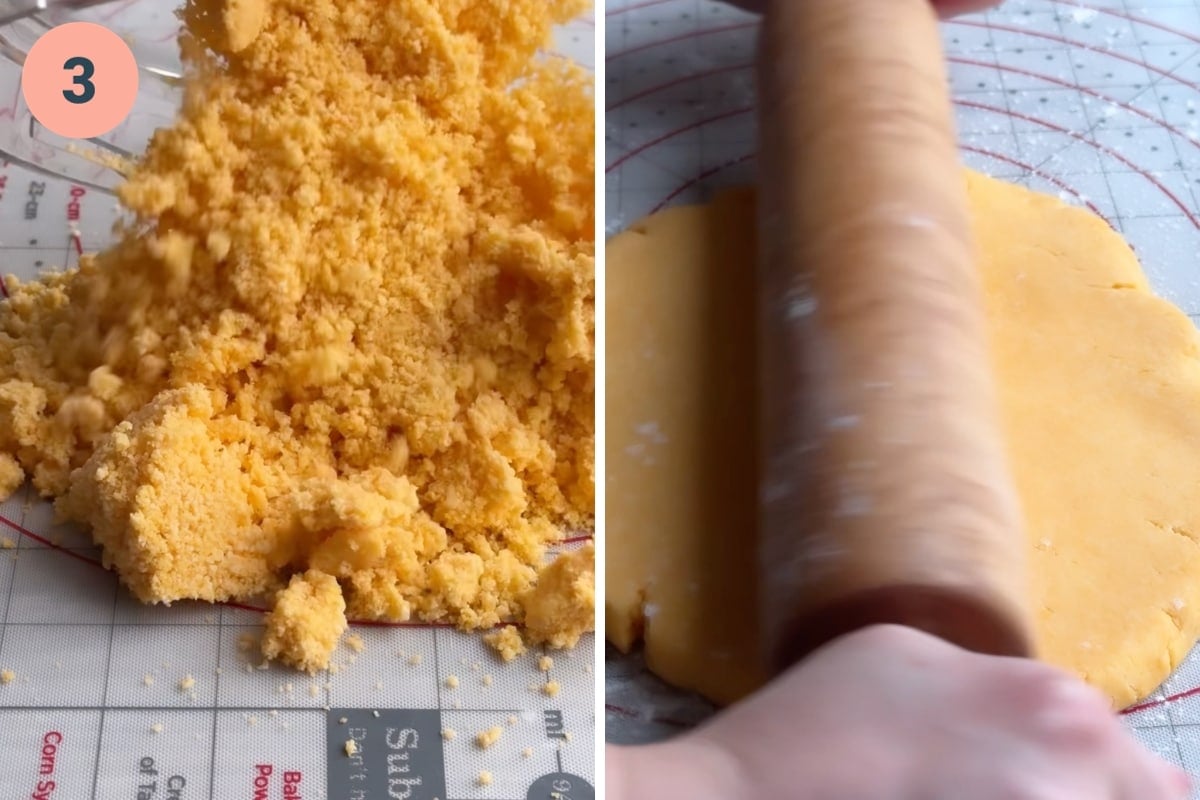
STEP 3: Transfer to a lightly floured surface. Roll into a large rectangle, rolling as thinly as possible. We go even thinner than ⅛-inch as they puff up quite a bit when baking.
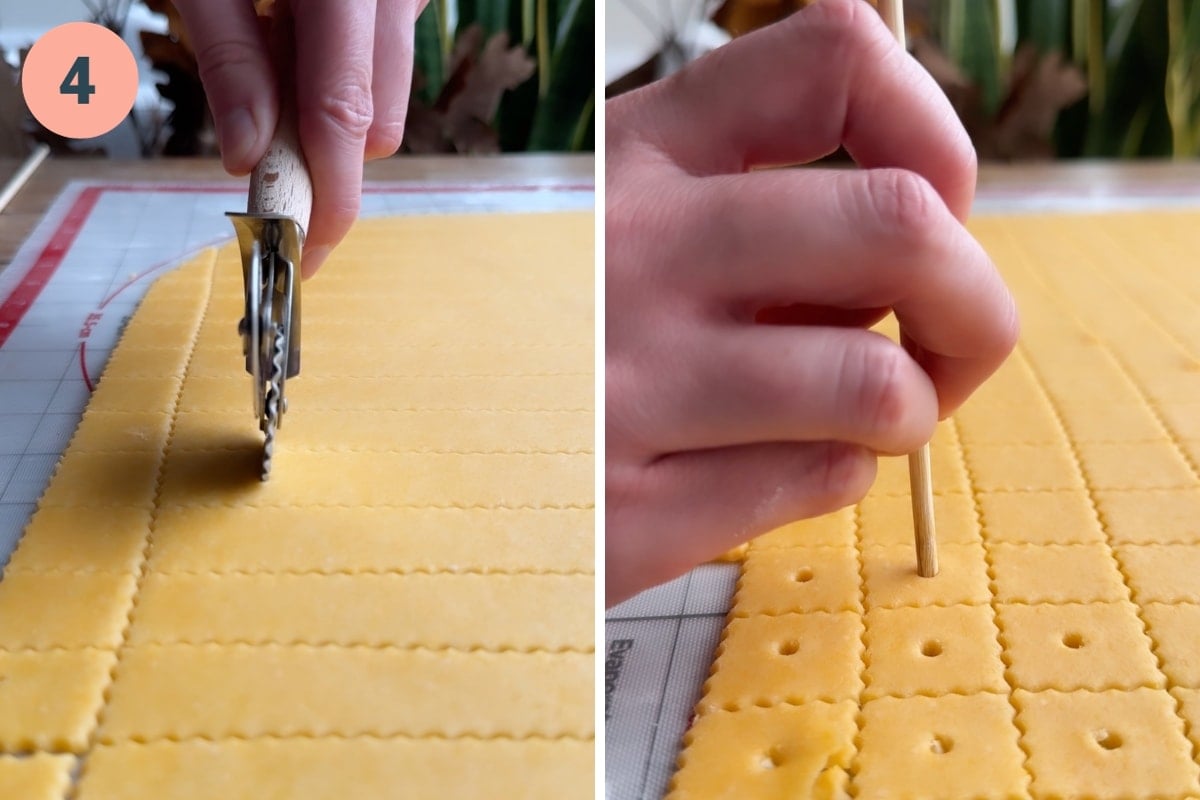
STEP 4: Using a knife, pizza cutter or fluted pastry wheel, slice into 1-inch squares. Use the flat end of a skewer to poke a hole all the way through each cracker. Transfer to sheet pans and sprinkle with more salt.
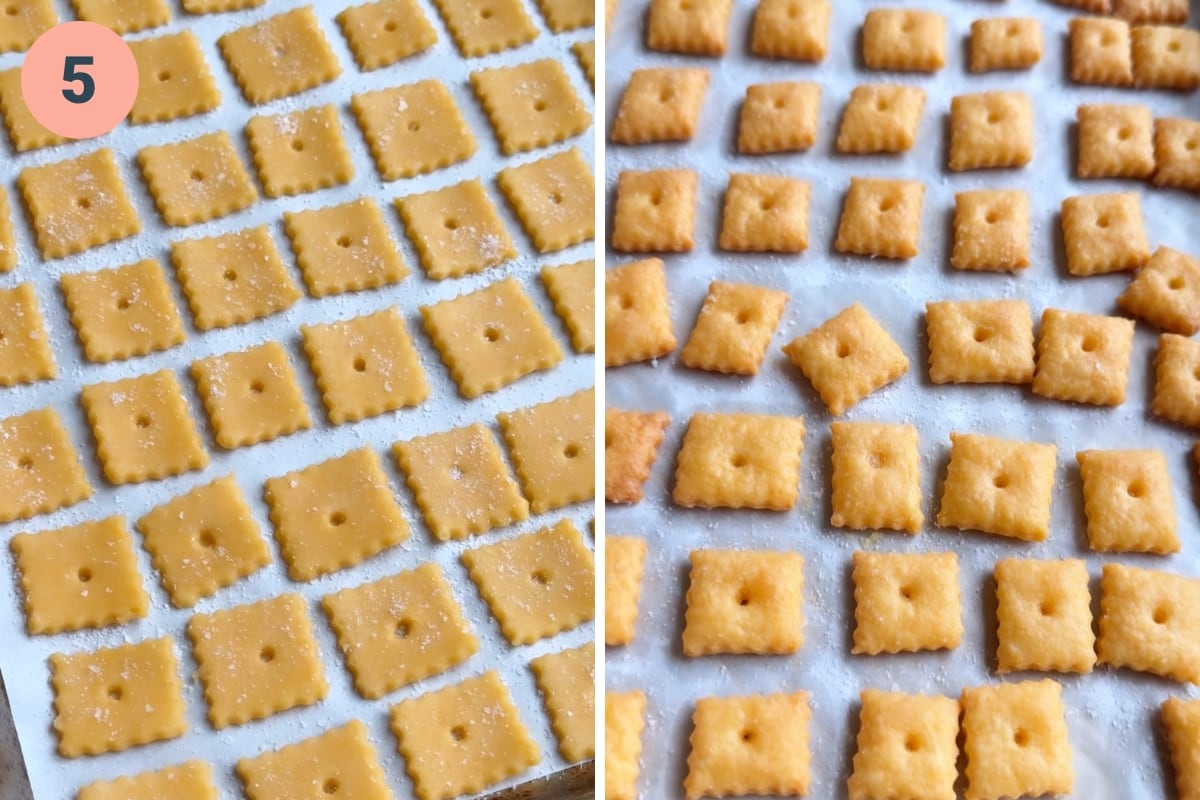
STEP 5: Bake for 17-20 minutes, until deep golden brown on the bottom of each cracker. If they are too light, they won’t have much crisp. Let cool completely before enjoying!
Expert Tips and FAQs
- Use a fluted pastry cutter to get those trademark edges.
- Be sure to roll it out as thin as possible. If it's not thin enough, they puff up into what almost become squares.
- Add salt before cooking in the oven - it won't stick if you add it after.
- Store these in an airtight container and they'll keep for about a week, or even longer if you're using Zwilling Fresh & Save containers! If they start to lose some of their crispiness, you can reheat them in the oven for 5-8 minutes.
Related Recipes


Tried this recipe? Please leave a star ⭐️⭐️⭐️⭐️⭐️ rating below and/or a review in the comments section further down the page.
📖 Recipe

Homemade Cheez Its
- Total Time: 25 minutes
- Yield: 150-200 crackers 1x
- Diet: Vegetarian
Description
Cheesy, crispy, and salty, these homemade Cheez-Its taste just like the real thing. They're super easy to make with just 5 ingredients and a super simple process.
Ingredients
- 8 ounces sharp cheddar cheese, shredded
- 1 cup all purpose flour
- ½ tsp salt, plus more for topping
- ¼ cup unsalted butter, cubed
- 2 tablespoons whole milk (cold)
Instructions
- Preheat oven to 325˚F and line 2 baking sheets with parchment paper.
- Add the cheese, flour and salt to a food processor and pulse several times. Add in the butter and pulse a few more times, until the dough is crumbly.
- Add in the milk, then pulse several more times. The dough won’t come together in a ball, but it should come together when you press it between two fingers.
- Transfer to a lightly floured surface. Roll into a large rectangle, rolling as thinly as possible. We go even thinner than ⅛-inch as they puff up quite a bit when baking.
- Using a knife, pizza cutter or fluted pastry wheel, slice into 1-inch squares. Use the flat end of a skewer to poke a hole all the way through each cracker. Transfer to sheet pans and sprinkle with more salt.
- Bake for 17-20 minutes, until deep golden brown on the bottom of each cracker. If they are too light, they won’t have much crisp. Let cool completely before enjoying!
Notes
Storage: These will last up to a week in an airtight container. If they start to lose some of their crispiness, you can reheat them in the oven for 5-8 minutes.
Gluten free: We have not personally tested this recipe with gluten free flour. A few people commented that they have tried it and they did not turn out very crispy.
Butter: Unsalted is best. If you're using salted, cut the listed salt amount (½ teaspoon) in half. Make sure the butter is cold when you put it into the food processor.
Salt: We always use a coarse kosher salt. If you're using regular table salt, you'll want to add less than the stated quantity in this recipe.
Cheese: It's best to shred your own cheese from a block of cheddar, as store-bought shredded cheese contains anti-caking agents.
Be sure to roll it out as thin as possible. If it's not thin enough, they puff up into what almost become squares.
- Prep Time: 5 minutes
- Cook Time: 20 minutes
- Category: Snacks
- Method: Oven
- Cuisine: American
Nutrition
- Serving Size: 10 crackers
- Calories: 89
- Sugar: 0.2 g
- Sodium: 133.3 mg
- Fat: 6.1 g
- Carbohydrates: 5.2 g
- Fiber: 0.2 g
- Protein: 3.3 g

Teena Case says
Omg can I say that these are amazing! Way better than the store! Thank you so much for a wonderful recipe!
Eve Boyd says
They came out wonderful! I only had store bought grated cheese and it still worked great. They taste like the real thing!
Francesca says
We really enjoyed this recipe. My 8 year old helped me and she really enjoyed making the recipe. I had her poke the holes in the crackers with a tooth pick. I don’t have a food processor so it was definitely a workout to mix them. They were super tasty. Any tips for using a pastry blender? Should I add more milk and if so, how much ?
Marie says
Can I use almond milk for this recipe?
Lexi says
Definitely!
Francesca says
We used oat milk and they turned out great.
Nicole says
This recipe is much better and tastes fresher than the store-bought version. I’m definitely not buying another box from the store anytime soon. It’s a fantastic recipe that’s easy to make.
Cel says
Have you tried making these without a food processor? I do g have one and I’m wondering if I can do it in the blender maybe or kitchen aid mixer after shredding the cheese really fine?
Lexi says
Yes you can just work the dough by hand
Daddio says
Just made these and they were terrific! Very easy to make, however, I struggled transferring to the baking sheet. After I rolled out the dough on my granite counter (which I had lightly floured), I cut them and made the hole, but they stuck to the counter. What can I do to make the transfer easier? Any tips would be helpful, I'm fairly new to working with dough.
Lexi says
Really glad you enjoyed! More flour will prevent that from happening, or you can try a silpat (a silicone baking mat) which should keep it from sticking. You'll still need to flour the silpat, but I find it can be easier to work on than countertops.
Daddio says
Thanks - baking mat might be in my future. In the meantime, when you suggest more flour, does that mean more flour in the recipe or on the counter?
Lexi says
Just on the counter!
Cel says
Rolling or out on wax paper might work too
Daddio says
I tried rolling straight onto parchment paper which seemed to help.
Isabella says
Hi! Have you tried freezing these? Like to make in bulk to last longer?
Sarah says
I use a Parchment paper underneath its a little hand trick to have on hand
Anna says
Thank you for the recipe. I liked the results but i need to remember for the next time that the "burnt"(actually dry) ones are better. I am considering topping them with seeds next time amd thinking which herbs to use.
Shelly Brugal says
I found the recipe and instructions very helpful. They were very easy to make, and I learned with my test batch that I still needed to roll the dough a little thinner. They are delicious and I will make them again. The next time I plan to try a few of the suggested flavorings!
Jarrod says
Do you use Morton’s or Diamond kosher salt? One is much saltier than the other?
Lexi says
We use Diamond kosher salt
M K says
Has anyone made these with alternative 'flours' like almond or coconut..
Devin says
Can I use half butter and half margarine? only have half of the amount of butter right now
Lexi says
That should work fine.
MorganCrowdedKitchenFan says
Don't own a food processor... How can I do this without??
Lexi says
Hi! You can work the dough with a pastry cutter and your hands. It will take longer for the dough to come together and may not be quite as cohesive, but it should still work. Make sure the cheese is at room temperature!
Joyce says
Excellent recipe! As I write this comment, I realize I had forgotten to add the liquid! Ooops!
Cheezits are such a nostalgic snack and I've been missing them since I became vegan. The few brands available are super expensive and now, I am having trouble finding them on shelves. I replaced everything in this recipe with the plant-based version (Parmela's Sharp Cheddar + Country Crock Plant Butter), but forgot to add the 2T milk and they still turned out great!
I split the dough into two balls and rolled them out on top of silpats and placed a sheet of parchment on top to make rolling out easier. I did my best to roll it out thinner than 1/8" and cut squared using a fluted pastry roller. The bake time ended up being more than 30 minutes each. I baked each sheet for 20 minutes but they weren't crisp enough when cooled so they went back in for another 10 min. They cooled to the perfect texture and are nice and crispy. It makes me wonder if this would have baked faster had I remembered to add the milk as the dough would have been just slightly less dense. Either way, these are amazing and my entire house smells like cheese! Thank you!
Alison says
These are very tasty. However, they are very hard to roll out. I think I need to increase the liquid by another 1/2 to 1 tbs. Next time so I can roll them out more easily. I read another recipe that rolled the dough into a ball and chilled it to make it easier to roll out so I might try that too. They are very delicious.
Barbara says
Look forward to making your White Cheez-its, which I found on YouTube, but couldn't find on this website. I figured out it is basically the same recipe, except switching cheeses! How large is the rolled-out rectangle?
NN says
These turned out great!